Here's our ultimate list of the different types of tie knots along with detailed instructions of how to tie each type. We've also included some tips so you can master even the complicated ones.

Though there are few different types of ties, there are many, many different types of tie knots. The different ways you can tie a tie are practically endless. You may even decide to invent your own knot, as some designers and style gurus have.
Learn how to make the classic types of knots, the fancy types of knots and the types of knots that are going to make other people stop, stare and ask you about it. If you master enough different types of knots, you will have different looks and great style for all occasions all the time.
Contents
- Atlantic
- Balthus
- Bloom
- Boutonniere
- Caldwell Swagg
- Cape
- Capsule
- Cavendish
- Christensen
- Cupid
- Dapper
- Diagonal
- Double Cross Knot
- Eldredge
- Ellie
- Eric Glennie Braided
- Fishbone
- Four-in-Hand
- Four Rings
- Grantchester
- Hanover
- Kelvin
- Krasny Hourglass
- Linwood Taurus
- Luxe
- Manhattan
- Merovingian
- Murrell
- Nicky
- Onassis
- Plattsburgh
- Pratt
- Prince Albert
- Rose
- Rosebud
- Saturn
- Scale
- Simple
- St. Andrew
- Trinity
- Truelove
- Van Wijk
- Victoria
- Vidalia
- Full Windsor
- Creating the Tie Dimple
- Bow Ties
- Other Types of Knots
- FAQs
- Which tie knot is the most professional?
- Which tie knots are good for weddings?
- Do tie knots have meaning?
- Which tie knots are in style?
- How many different types of tie knots are there?
- Where does your tie clip go?
- Is there a knot that cannot be untied?
- What do you do if your tie is too long?
- Which tie knot suits you?
- How long should a tie be with a suit?
- What type of tie knot do royals use?
- What’s the fanciest type of tie knot?
- Which tie knot does the military use?
- Which tie knot is best for an interview?
- How should a necktie fit?
- Are tie clips in style?
- What is the easiest tie knot to tie?
- Which types of tie knots work with skinny tie styles?
Atlantic
The Atlantic knot, also known as the cafe knot and the ventaglio knot, is a casual tie knot that can be tied in just a few simple steps. This knot works best with solid ties, rather than patterned ties or striped ties.

Instructions
- Cross the thin end of the tie over the thick side.
- Bring the thin side of the tie up and under the tie collar, then back down across the knot of the tie to take the tail over to the other side.
- Take the tail of the tie under the knot, taking it horizontally to the other shoulder.
- Bring the tail back across the front of the tie now.
- Take the tail of the tie up under the collar, then back down and over the collar, staying on the same side of the knot.
- Bring the tail back to the other shoulder, going under the knot.
- Take the tie up and over the neck loop, then back down and under the collar, then through the back loop of the knot.
- Tighten and straighten your Atlantic knot.
Tip
The Atlantic knot is the pratt knot in reverse.
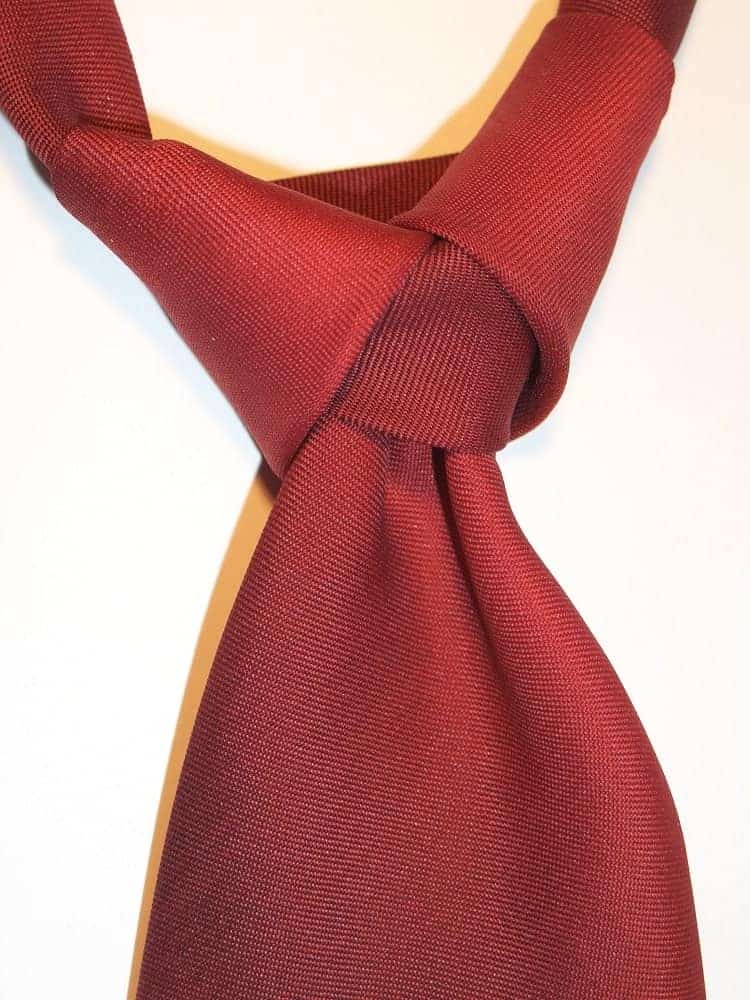
Balthus
The balthus knot is a perfect choice when you want to elevate your look. It looks a bit like a fancy Windsor knot and it’s more complicated, so give yourself a little time to tie this one.
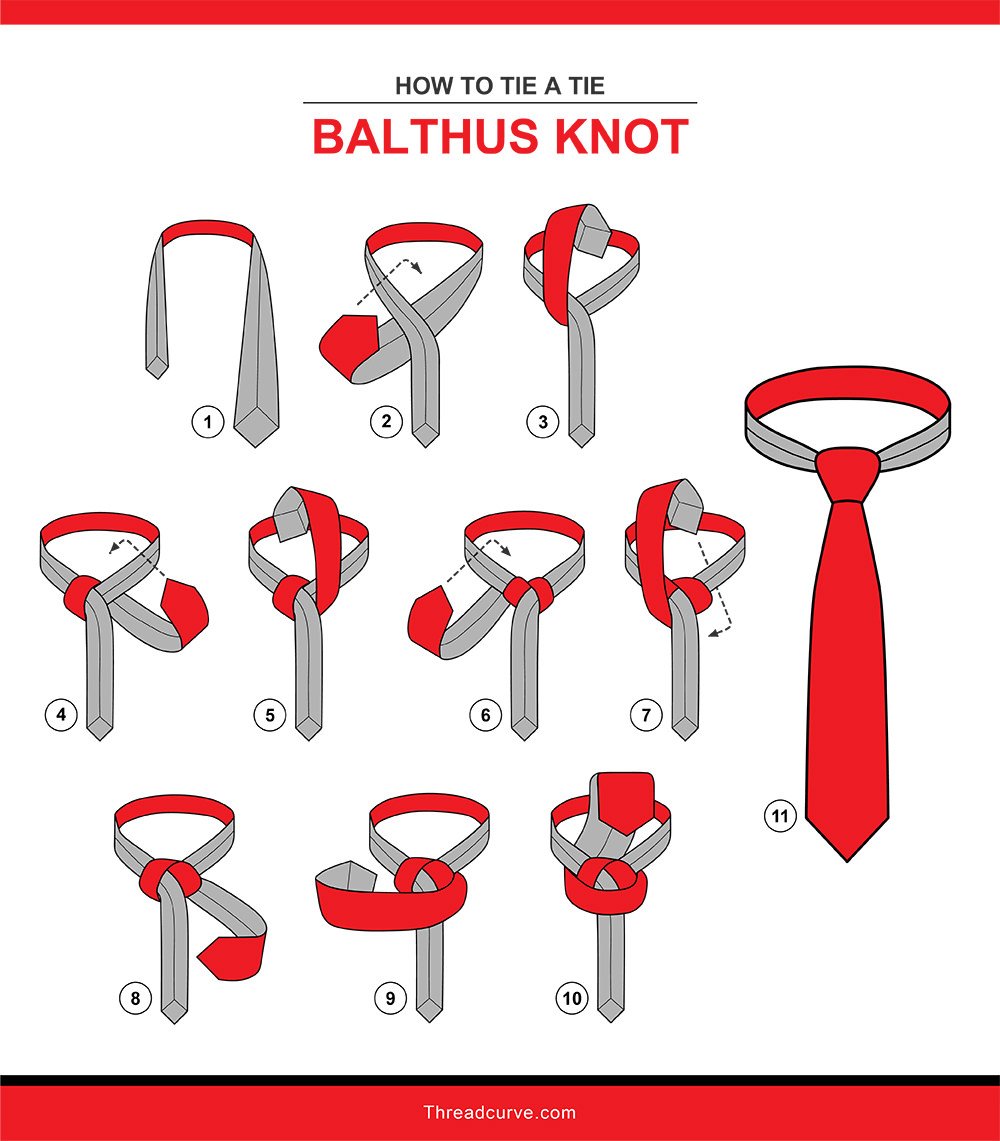
Instructions
- Place the tie around your neck with the back side of the tie facing outward.
- Criss-cross the two ends of the tie together, bringing the skinnier end over the top of the thicker part of the tie.
- Bring the thick side of the tie up over the neck loop and bring it back down again under the collar, or neck loop, pulling it through the collar and crossing under to the other side.
- Pull the tie over and through the collar again, bringing it across to the opposite side.
- Repeat, going through the collar and over to the other side again.
- Pull the tie across the front and then behind the knot, bringing the end of the tie up and over the back side of the knot.
- Place the end of the tie through the loop you created in the step above.
- Pull the tie down through the knot and tighten.
Bloom
The bloom knot is for the bold. If you want to make a stunning impression after you’ve spent a great deal of time making a tie knot, try the bloom. This knot is great for formal events but it might be a little too distracting for professional situations. This is a wonderful and stunning whimsical knot.
Take it slowly and work precisely in order to make this knot. It can be frustrating but there is a big payoff in the end when you get this one right. You can make this knot with a patterned or solid tie. It’s going to be eye-catching either way.
Instructions
- Have plenty of length on the tail side (the skinny side) of the tie. You’re going to need all the help you can get.
- Pinch the thicker side of the tie, bringing the two sides of fabric together, just under your neck.
- Cross the skinny side of the tie over the fold you made.
- Bring the tail side up under the collar, then back down over the neck loop in front of the fold you made.
- Fold the tail in half, good side out. To make this knot, you must maintain this fold the entire time. Expect things to get tricky.
- Bring the folded tail to the side of the knot on the tail side shoulder.
- Take the tail under the tie to bring it to the opposite side.
- Feed the tail through the loop you just made, going over the top of the tie to do so. You’ll be making a new loop as you complete this maneuver. Do not pull it too tightly. You will be feeding the tie through this loop as well.
- Bring the tail down under the collar.
10.Feed the tail through the loop on the opposite side of the tie, going up and under the collar on this side. You will now have the tail sticking up over your collar opposite your starting side. The knot will have three interlocking sections of fabric.
- Remember that you are still maintaining the fold in the tail of the tie as you bring it down toward your starting shoulder.
- Go around the knot and under the tie, back up around the other side of the knot and through the loop you just made on the opposite side. Essentially, you’re wrapping a ring of fabric around that three-section knot at the center.
- Bring the tail back down around the outside of the knot and across the front of the tie under the knot.
- Tuck the tail of the tie into the last loop of the knot you just created.
- Your completed bloom knot will look like a fabric flower that will get you compliments all night.
Tips
Use a mirror and work slowly. Focus on getting each step right and on not pulling the tie too tightly. You can always start over if you need more fabric to work with.
Boutonniere
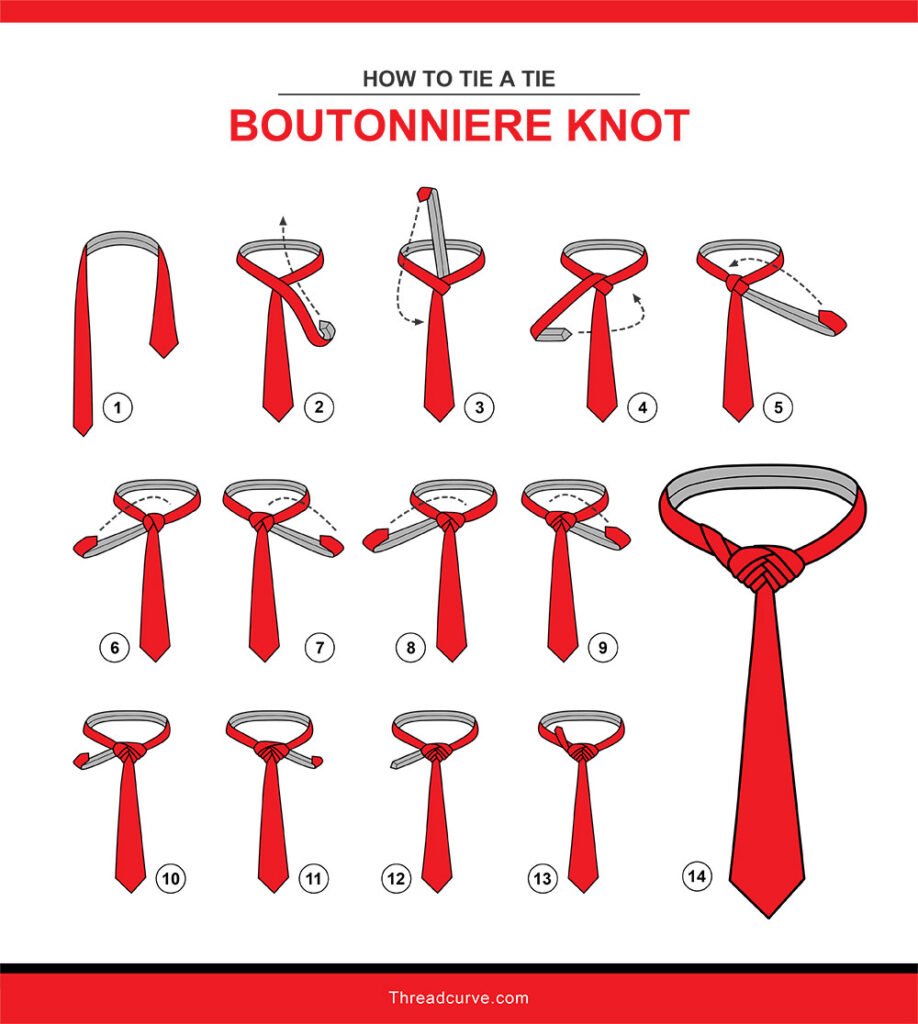
The boutonniere tie knot is a formal look that’s very suitable for weddings. When complete, this knot has a layered look. This knot works well with solid ties.
Instructions
- The tail side, or skinny side, is the active end you’ll be working with to create this knot. Make sure this side is nice and long before you begin. You will need the material.
- With one hand, slightly pinch the wider half of the tie to right where you’re going to make your knot. Bring the two edges of the fabric together for your pinch.
- Take the skinny side of the tie and cross it over the pinched section, going across the top.
- Bring the tie up and under the collar, then back down and over on the other side.
- Take the tie under the knot and over to the opposite side. You can let go of the pinch now.
- Feed the tie up under the collar, then back down over the collar on the other side. You’re going to repeat this motion several times.
- Wrap the tie up and under the collar, then down again to the other side.
- Repeat on the other side.
- Go up, under, down and over twice more. The excess tail can be tucked into your shirt.
- Tighten and straighten your boutonniere knot.
Tip
This tie knot is a layered look, so you don’t want to go right over top of the knot each time. With each layer you add to the knot, go up just a tiny bit to place the new layer on top of and just slightly above your previous loop.
Caldwell Swagg
The Caldwell swagg knot definitely doesn’t look like any other type of tie knot. This is a relatively newer type of tie knot that’s a bit like a variation of the Onassis knot. Try this knot when you want a great look that will go anywhere and work well with just about any type of dress shirt or collar style. It looks amazing in the boardroom and it’s stylish at any formal event. Some knots look complicated but they’re actually rather simple. The Caldwell swagg knot has a simple, elegant look that’s actually pretty complicated to create.
Instructions
- Cross the thicker side of the tie over the thinner side.
- Take the thicker side of the tie up under the collar, then back down and over the collar, staying on the same side of the cross-section.
- Go under the knot to take the tie over to the opposite shoulder.
- Bring the tie up over the collar again, then back down and under the collar, staying on that side of the knot.
- Take the tie under the knot, then back over and down. You will have created something that looks very much like the Onassis knot, just a smooth sweep of tie with the knot hidden.
- Reach under the tie now to take hold of the tail and flip it over so that the underside, the side with the seam, is facing outward.
- Bring the tail of the tie up, under the knot, and pull it down over the front of the tie. The backside of the tail should still be facing outward.
- Flip the tail of the tie up, toward your face, and tuck it down into your shirt collar so that the front side of the tie shows at your neck. If you unbutton a couple of buttons on your shirt under the collar, you can pull the tail of the tie through so that it rests flat.
- Straighten the front of your tie and adjust the knot under the tie as needed to get a good fit. This is how you create a Caldwell swagg knot.
Cape

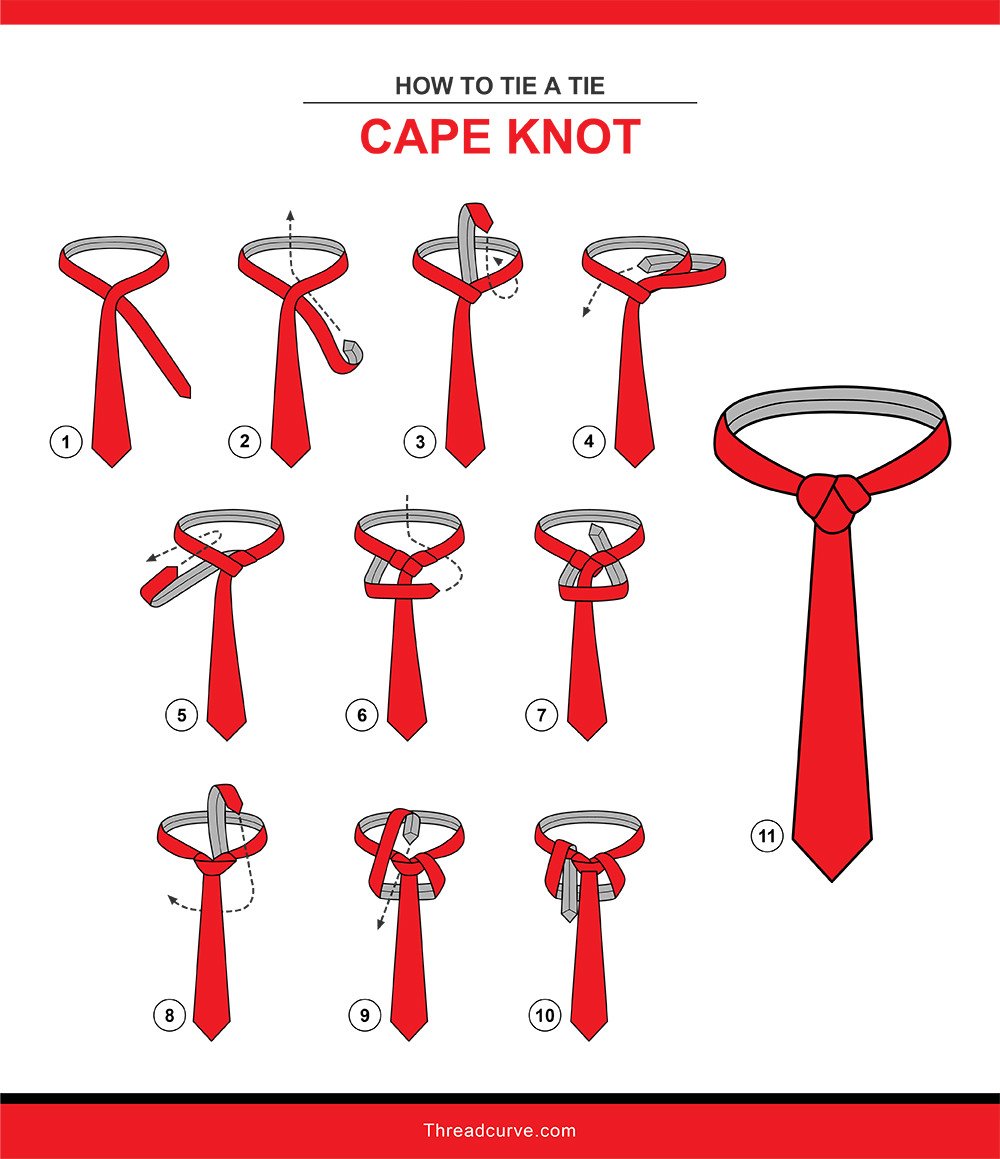
The cape knot is striking because it looks complicated. This knot works very well with patterned ties and paisley ties, as well as solid ties. You may get a little more “wow” factor with patterned ties because of the complexity of the knot.
Instructions
- Bring the skinnier end of the tie over the front of the tie and then pull it under and over the collar.
- Hold the tail of the tie out to the side, then wrap the end under the front of the tie.
- Pull the tail up and over the collar, then back down and over the front of the tie again.
- Pull the tail under and over the collar again.
- Bring the tail end of the tie back under the tie, then over and under the collar.
- Bring the tail through the last loop you just made at the back of the tie.
- Tighten and straighten your tie. You will have three distinct, mostly vertical, knot sections.
Capsule

The capsule knot is very distinctive and it’s a great all-purpose knot. It can be worn at the office or at a formal occasion.

Instructions
- Pinch the thicker side of the tie closed where you plan to make the knot. Pinching the fabric means you’ll bring the two edges together to create a little fold.
- Cross the active side of the tie over the top of the pinch.
- Bring the tie up under the collar and back down over the top of the collar on the other side.
- Bring the tie under the knot and over to the other side.
- Wrap the tie over the top of the knot, but not completely covering the knot. You want this flap of fabric to be slightly lower than the knot so the top still shows. Your tie knot should now look like an inverted V at the top with a band of fabric running horizontally across the bottom.
- Bring the tie up and under the collar, then back down over the collar on the same side.
- You want to bring the tie under the knot again and over to the other side, but don’t pull it too tight. You’ll be creating a new loop of fabric next to the knot. This loop should be somewhat loose.
- Bring the tie up and over the collar on the other side of the knot to create a second loop of fabric on this side. The tail will go back under the collar to cross over to the opposite side.
- Take the tail and feed it through both the last two loops you made on either side of the knot.
- Tighten and straighten your capsule knot so that the base knot has two horizontal layers, one on top of the other, with two wings meeting at the top on either side in an inverted V shape.
- Tuck the excess into your shirt or under your collar.
Cavendish
The Cavendish looks a bit like a larger four-in-hand knot. According to style gossip, this tie knot was created by two physicists. They named the knot after the famous physicist Henry Cavendish.
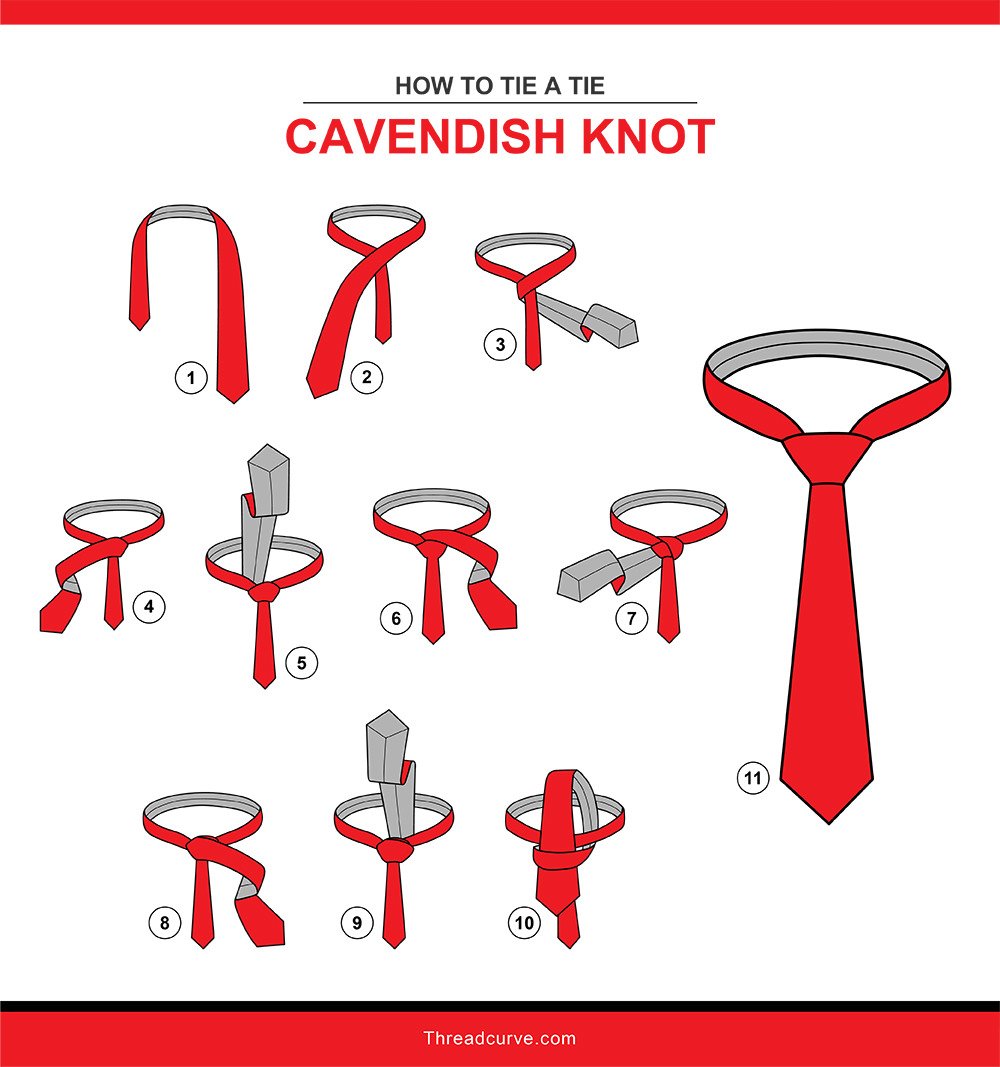
Instructions
- Cross the thicker side over the thinner side, placing the thicker side on top.
- Bring the thick end under the thinner side and across to the opposite side.
- Cross the thick side over the thinner side again, taking the thicker half of the tie to the opposite side.
- Now, bring the thicker side of the tie under the collar and up.
- Bring the thick side down and back to your starting side.
- Take the thicker half of the tie and bring it back under the knot and over to the opposite side.
- Take the thicker end back over the top of the knot and over to the opposite side.
- Bring the thick end up and under the collar.
- Take the tie back down, pull it through the top loop of fabric on the knot, pull through and tighten to create your knot.
Tip
While you’re creating your Cavendish knot, just remember that you’re basically just going back and forth, back and forth, four times in succession.
Christensen
The Christensen knot, also known as the cross knot, was created in 1917 by a Swedish mail-order catalog as a clip-on design. The knot was stitched so it would remain perfect. When complete, the knot gives your tie a somewhat hourglass shape that definitely stands out. This is a great day-to-day knot but may be a little too fun for conservative, formal business meetings.
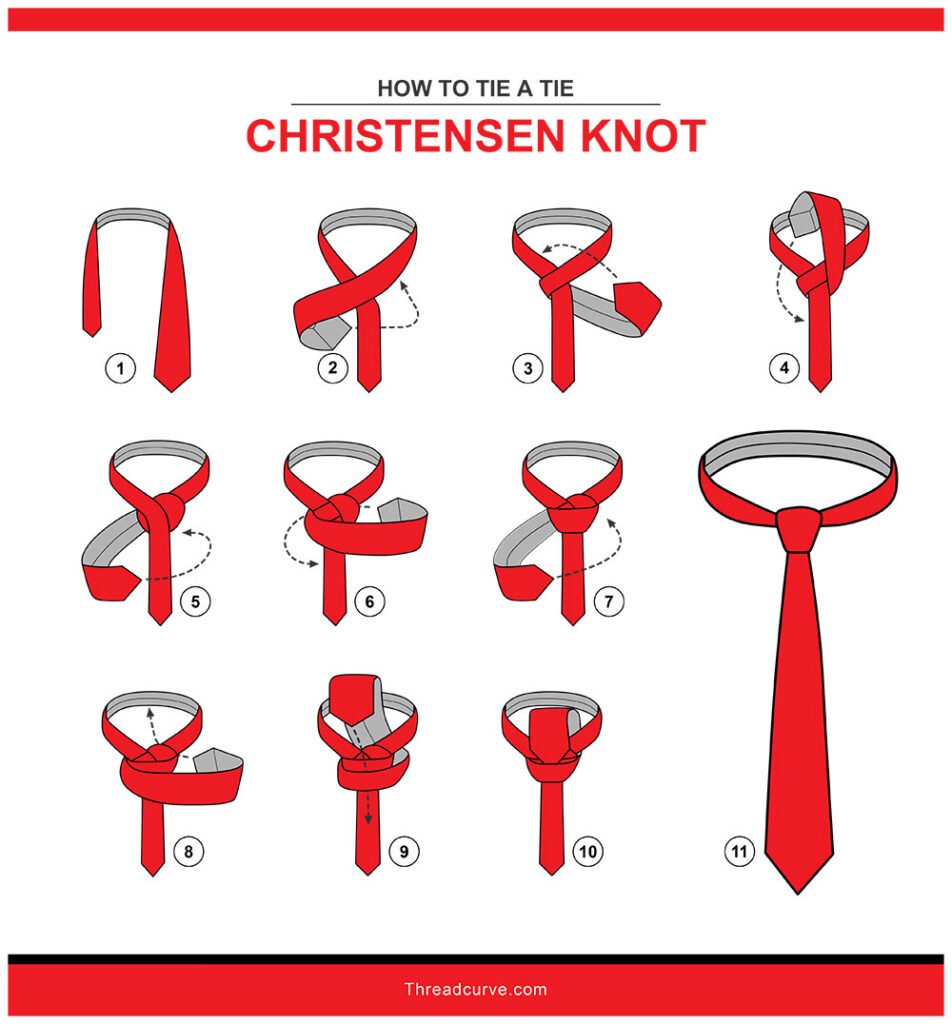
Instructions
- Cross the thick side over the top of the thin side, bringing it to your opposite shoulder.
- Bring the thick side back under the thinner half of the tie and pull the tie to its original side.
- Bring the tie up and over the collar, then back down under the collar and pull the length to the opposite side.
- Take the tie across the front of the skinny tie side, holding it horizontally.
- Wrap the thick side of the tie around the knot twice, keeping it horizontal. End on your starting side of the side, pulling the fabric up and under the collar.
- Bring the tie back down over the collar, pulling it through the top loop of the knot.
- Tighten and adjust.
Cupid
The cupid is a small tie knot that packs a lot of razzle-dazzle. If you want something that’s a little bit fun for semi-casual occasions, this is a great knot. The cupid looks much more difficult to make than it actually is, which is another big bonus of using this necktie knot.
Instructions
- Pinch the thicker side of the tie just below your neck to create a fold in the fabric.
- Bring the skinny side of the tie across the thicker side, under the pinch.
- Holding the skinny end of the tie toward the shoulder opposite your starting shoulder, pull the thick side of the tie back and under the collar, then over and down.
- Pinch the thick side of the tie again right at the center of the collar.
- Take the tail under the tie across, back to the starting shoulder.
- Wrap the tail back over the knot below the collar. The gathering of the fabric should still be visible above this loop.
- Bring the tail up and under the collar then down and across on the other side of the knot.
- Take the tail across and under the knot, then back up over the collar and down under the collar.
- You’ve created a loop of fabric behind the knot. Tuck the tail of the tie through this knot and pull to tighten.
Dapper
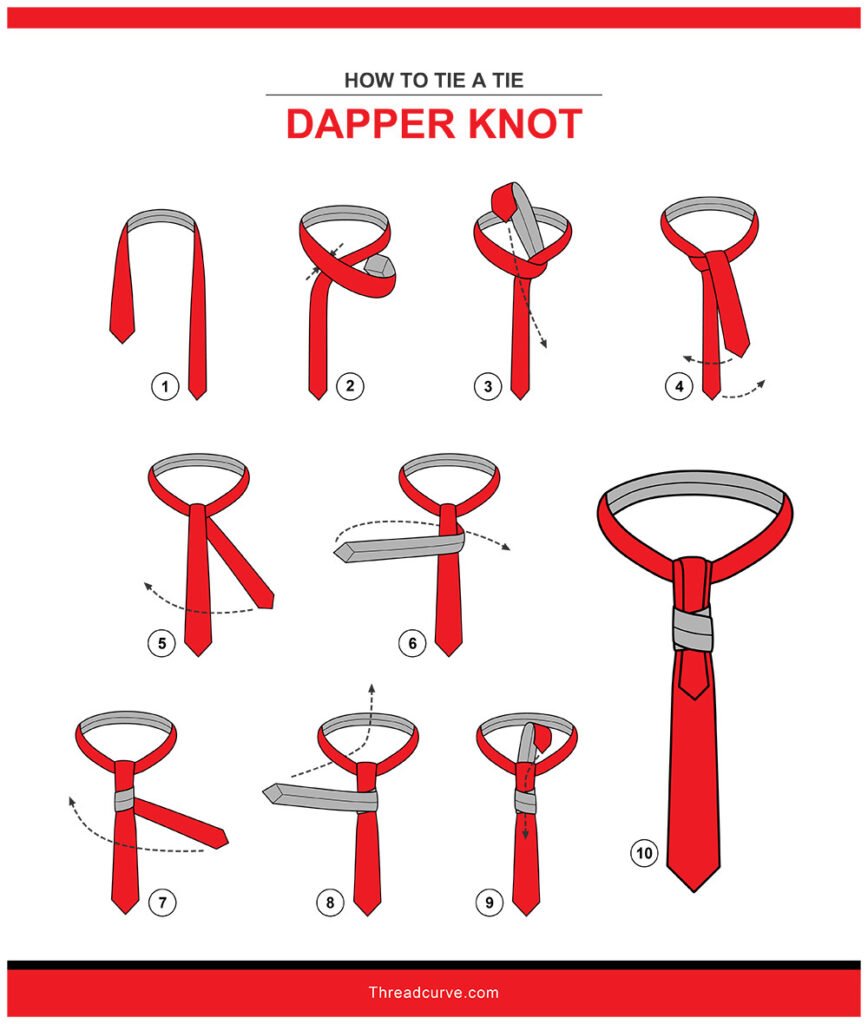
The dapper knot is quite flamboyant, just the knot you want when you want to make a big impression. It’s probably far too showy for the office but it’s definitely perfect for weddings and other events where you want to really stand out, style-wise.
Instructions
- Cross the thick side of the tie over the thinner side, taking it to the opposite shoulder.
- Bring the thicker side of the tie up, under the collar, then back down and over, still staying on the opposite shoulder side of the cross-section.
- Straighten the tie so that it hangs straight down.
- Now, hold the two pieces of tie (the front and the tail) together with one hand, holding them about two inches below the collar.
- With your other hand, bring the tail of the tie up and wrap it around the thick half of the tie twice. The back side, the side with the seam, of the tail will be facing outward. The thick side of the tie will become slightly pinched.
- Insert one finger beneath the two loops you just made, creating a little space between the loops and the tie they are surrounding.
- Pull the tail out toward the shoulder opposite your starting shoulder and fold the fabric up so that now, the front side of the fabric is facing out.
- Bring the tail up under the knot at your neck, then over and down so that it covers the front of your tie.
- Feed the end of the tail through the loops you made in the tie. You have just made a top loop on the knot with the tail. Fluff this up slightly because this is a feature of the dapper knot.
- Straighten and adjust as needed.
Diagonal
The diagonal knot is named for its distinct design, where you can see a line going through the tie knot diagonally. This is a good-looking knot that’s great for everyday wear.
Instructions
- Cross the thick side of the tie over the thinner side, taking it across to your other shoulder.
- Take the thicker side of the tie back under the cross-section and across, holding it out horizontally.
- Bring the tie back across the front of the knot again, returning the tie to the other side.
- Go back under the knot, again moving the tie back to the other shoulder.,
- Bring the tie up and over the collar, across to the other side, down and under the collar.
- Your tie knot has a bottom loop of fabric running horizontally across the tie, with another diagonal piece of fabric above it. Your task is to gently loosen this horizontal ring of fabric. Take the end of the tie, turning it so the “good side” is facing outward, and loop this through the fabric ring you just loosened.
- Pull it through and tighten. You will see the diagonal line that gives this tie knot its name.
Double Cross Knot
The double cross knot, or double knot, doesn’t have a whole lot in common, looks-wise, with the cross knot (also known as the Christensen knot). This is a great everyday tie knot and a perfect knot for professional settings. It’s also very simple to tie. You can make a double cross knot in just a few steps.
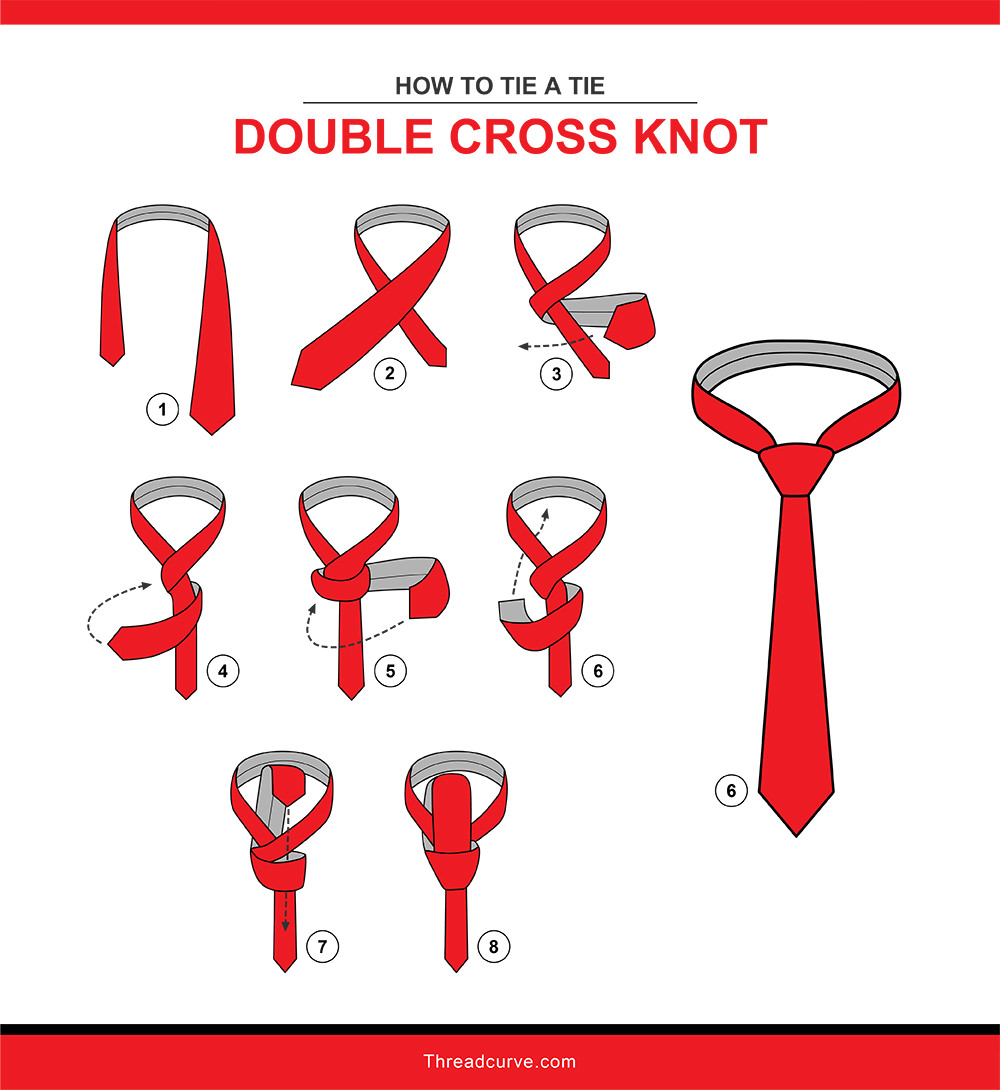
Instructions
- Cross the thick side of the tie over the skinny side.
- Bring the tie under the crossed section horizontally, then back across the top of the tie.
- Wrap the tie around the knot again twice, ending on the starting side of the knot.
- Bring the tie up and under the knot, then back down and through the top loop of the knot.
- Tighten and straighten.
Eldredge
The Eldredge knot is a highly complicated type of tie knot that has the reputation of being the hardest tie knot of them all. If you want a knot that’s really going to dazzle, this is the one you want. The knot is somewhat large and when finished, it will have a fishtail-like pattern. It looks a bit like the scales of a pine cone.
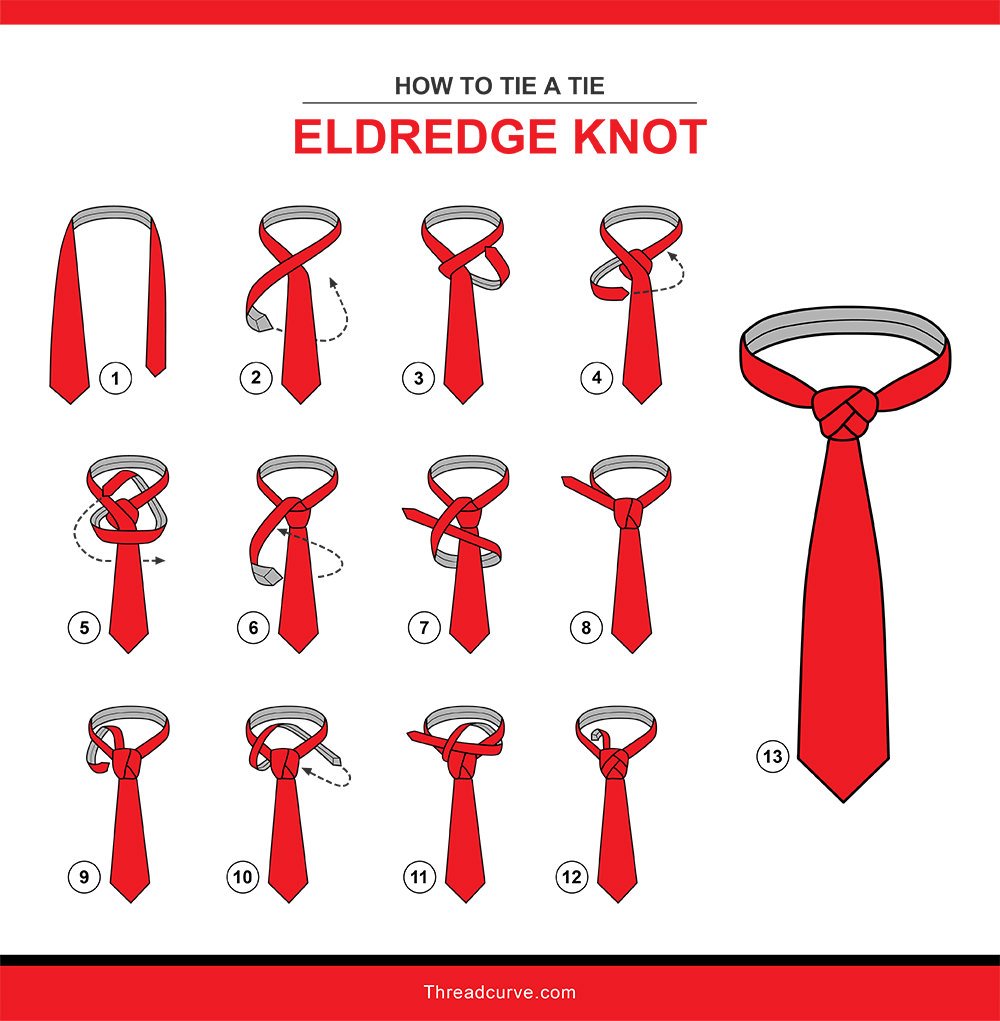
Instructions
- Start by placing the tie around your neck in reverse, with the thicker side on the opposite side that you normally use. What’s interesting about the Eldredge knot is that the thinner end is the active end you’ll be using to make the knot, so your tie will be on the opposite side. You want your active end, the thinner end, to be very long. You’ll need it.
- Cross the active side over the top of the tie, moving it to the opposite shoulder.
- Bring the active side under the knot and pull it horizontally back to the starting shoulder.
- Bring it up and over the knot, crossing to the other side, then back down through the collar. This piece of the tie will now have the underside facing outward.
- Bring the tie horizontally across the knot, so that now the good side is facing outward.
- Bring the tie up under the collar, then back down again across the knot.
- Extend one finger across the top of the knot as you bring the tie under the knot and across to your starting shoulder, then pull it through the loop that is covering your finger.
- Gently pull so there is no bunching or excess in the knot but do not pull too tightly or you’ll destroy the design.
- The active end of the tie should be to the second shoulder side of the knot. Pull it up over the collar, then back down under the collar.
- Bring the tie up over the collar and across, pulling it down through the collar on the other side of the knot. The tie end will now be toward the starting shoulder side of the knot.
- Bring the tie up through the last loop you just made, moving across the knot to the opposite side. It helps if you place two fingers through the loop first, then feed the end of the tie into your fingers and pull it through this way.
- Tighten the tie, but not too much, and tuck the end of the tie into your collar.
Tips
Don’t try this without a mirror! Work slowly and don’t pull the knot too tightly as you go so it will maintain its shape.
Ellie
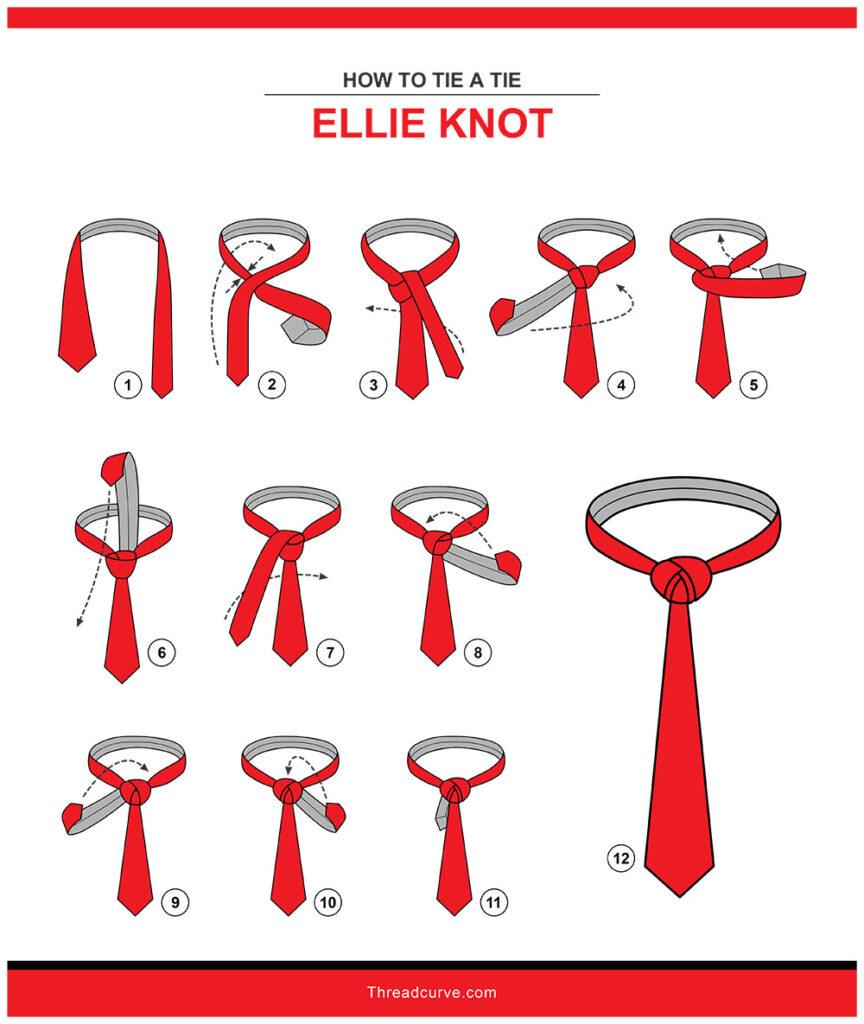
The ellie knot is a slightly simpler version of the Eldredge knot, which is a notoriously hard tie knot to make. The ellie looks fancy and works well with patterned and solid ties. This is a good knot for formal wear and important professional occasions.
Instructions
- Pinch the thick side of the tie just below your neck to put a fold in the fabric.
- Bring the skinny side of the tie over and across the top of this folded section to make an X.
- Pull the skinny side of the tie up and under the collar, then back down over the collar.
- Pull the tie to the opposite side of the knot.
- Bring the tie under the knot, then back over the top of the knot. This is a layered look, so do not go directly across the knot and cover up all your work so far. Maintain your layers while you work.
- Pull the tie up under the collar, then back down over the top, bring the tie down to the opposite side of the knot.
- Wrap the tie under the knot, going back across.
- Staying on the same side of the knot, bring the tie up over the collar, then back down under the collar.
- Pull the tie to the opposite side of the knot and bring it up and over and collar and back down under the collar again, staying on the same side of the knot.
- Pull the tail over to the opposite side and go up over the collar, then back down under the collar again.
- Tuck the excess into the bottom loop of the tie at the back of the knot.
- Tighten and straighten.
Eric Glennie Braided
The Eric Glennie braided knot is a braided, layered knot design that looks very good with striped and patterned ties. This is a good semi-formal and business tie when you want to make an impression. Eric Glennie is a designer who named the knot after himself.
Instructions
- Have plenty of length on the active side, the skinny side of the tie. Cross the skinny side over the thick side, taking it to the opposite shoulder.
- Wrap the active side under the tie, taking it back across to the opposite side.
- Bring the tie up and over the collar, then back down under the collar, taking it to the opposite side.
- Take the tie back across the knot horizontally, taking it to the opposite side.
- Bring the tie up under the collar, then back down over the collar on the other side.
- Bring the tie back to the other side going under the knot.
- Take the tail of the tie up and across the knot, going through the last flap of fabric you just created on the opposite side of the knot.
- Wrap the tail up over the collar, then back down under the collar, staying on that side of the knot.
- Take the tie up over the collar again, going across the knot, and back down under the collar on the other side.
- Bring the tie up over the collar again and then back down behind the knot.
- Tuck the tail of the knot into a flap on the underside of the knot to complete the Eric Glennie braided knot.
Fishbone
The fishbone, or fish bone, is a complicated tie knot that is very similar to the Eldredge. This knot does have a complicated look but many of the steps for creating it are repetitive, so it isn’t as difficult as it appears. This is a wonderful formal tie knot. This knot looks great with solid ties. Patterned and striped ties may look a little sloppy and strange with this knot.
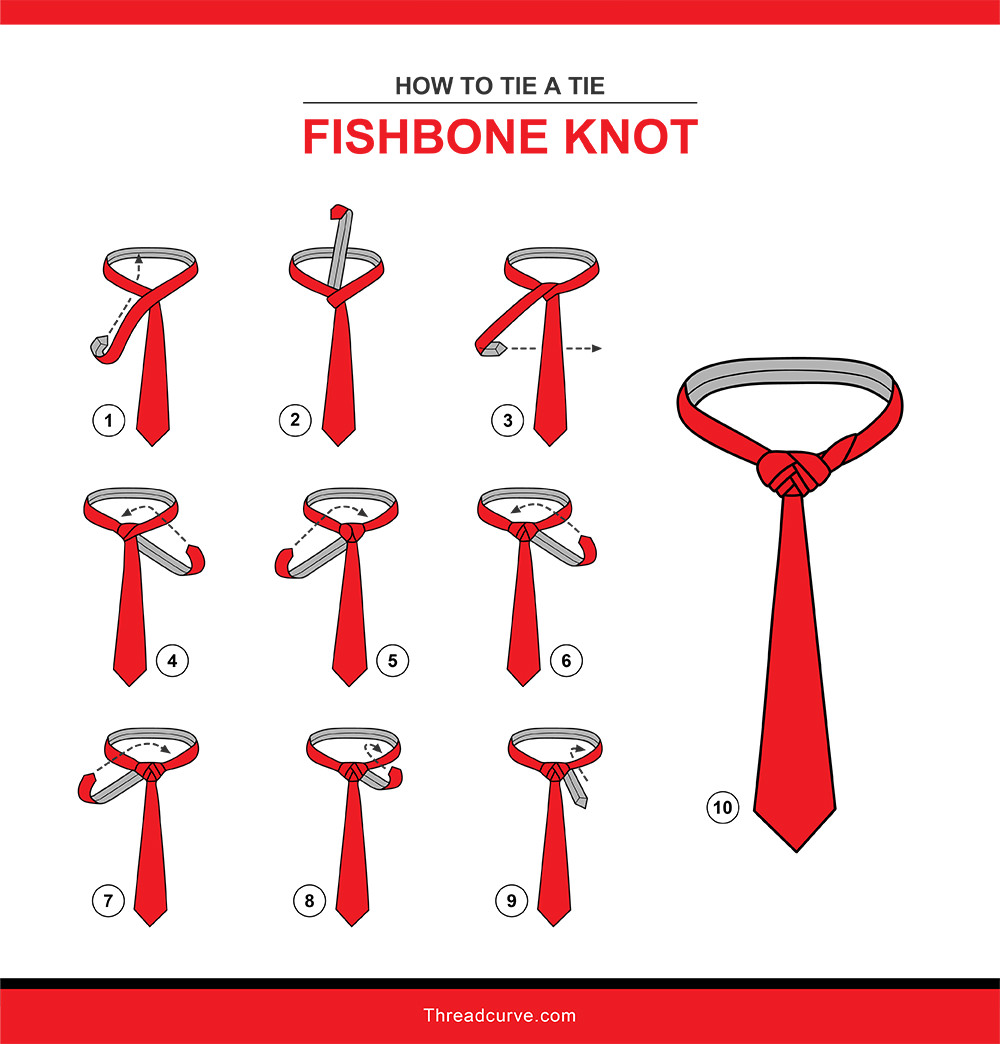
Instructions
- The thinner end of the tie is the active end for creating this tie knot.
- Cross the active end of the tie over the top of the tie, going across to the opposite side.
- Bring the tie straight up, staying to the second side of the tie knot, taking it under the collar and then bringing it back and over the collar, still staying on the second side.
4.Bring the tie under the knot to move it horizontally across to the starting shoulder side.
- Take the tie up over the collar, then bring it back down under the collar, taking it across to the opposite side.
- Do it again, bring the tie up over the collar, then back down under the collar, moving over to the other side.
- Repeat, going to the second side.
- Repeat, moving the tie to the starting shoulder.
- Pull the tail of the tie down, aligning it with the front of the tie. Tighten the knot and tuck the tail into your shirt to hide it.
Four-in-Hand
The four-in-hand is one of the most popular types of tie knots and it’s the one that most everyone knows how to do. This simple tie knot is perfect for daily wear and it works with all types of shirt collars. This is an asymmetrical knot and the one you’ve probably seen most often.
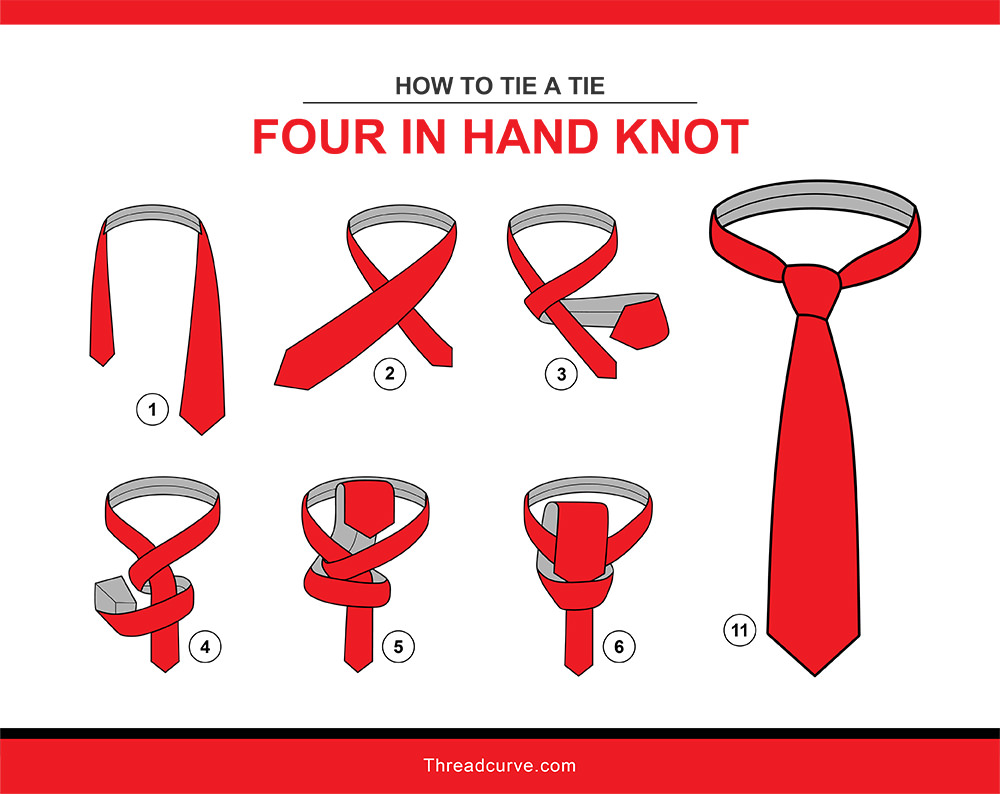
Instructions
- Take the thicker side of the tie across the top of the thinner side, moving it to your opposite shoulder.
- Take the tie under this crossed area, holding it horizontally toward your starting shoulder.
- Move the tie horizontally across the knot, moving it horizontally to the opposite shoulder.
- Take the tie under the collar, then back over and through the loop on top of the knot.
- Tighten, adjust and you’re done!
Four Rings
The four rings knot looks very formal and fancy, deceptively so. This knot is simpler to create than it looks. This is a beautiful knot for fun semi-formal and formal affairs but might be a little too much for professional situations.
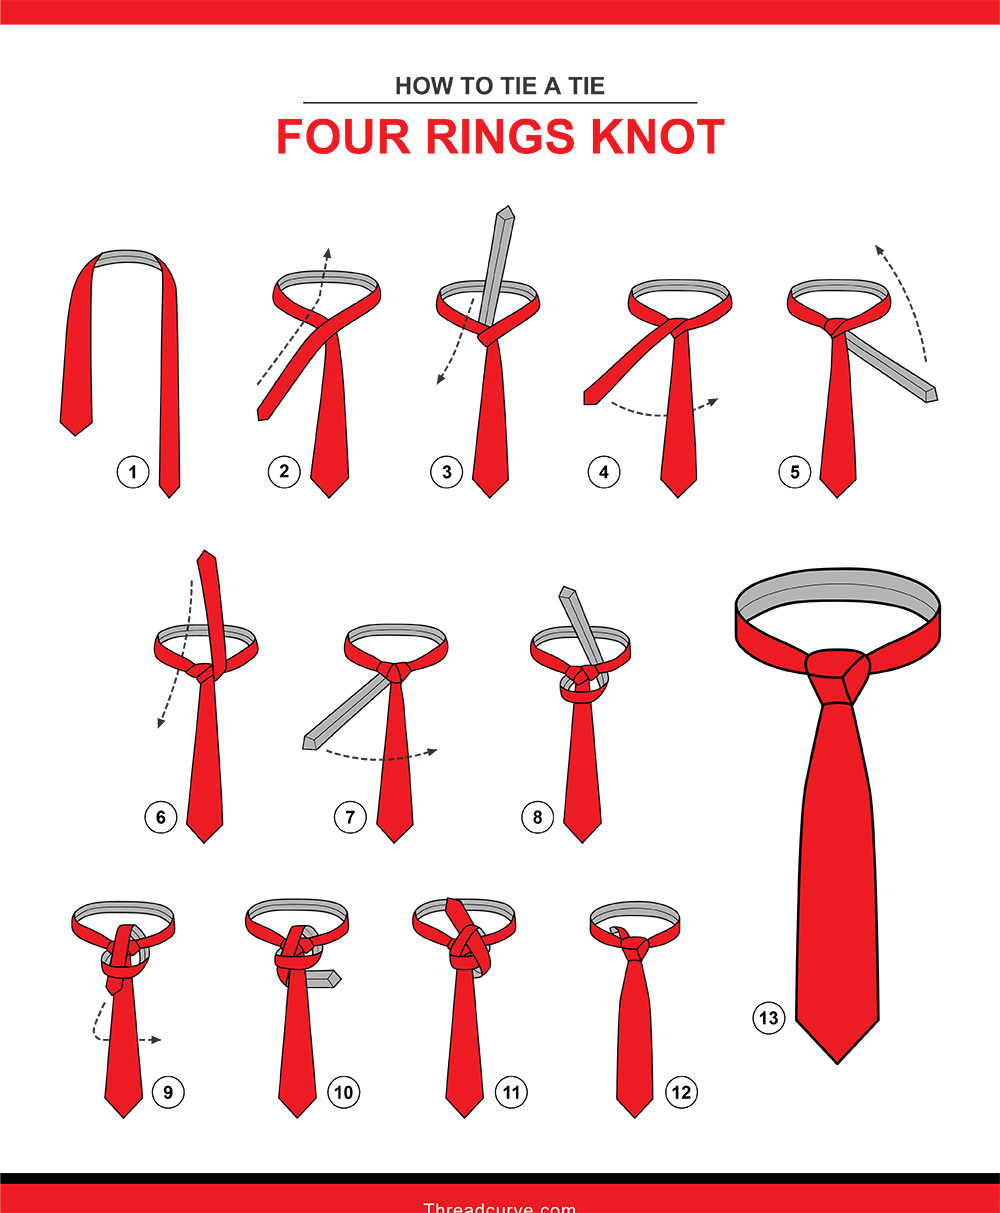
Instructions
- Pinch the edges of the thick side of the tie to create a fold.
- Bring the skinny side of the tie crossways across the fold.
- Take the tie under the collar and across, going back down over the collar on the other side.
- Form a loop in the tie as you bring it under the knot and over to the other side. The loop should be very loose and open.
- Bring the tie up and across to the other side again, going through the loop you just made. Keep the knot very loose.
- Hold the tail of the tie horizontally going toward your shoulder. The underside of the tie should be facing outward.
- Bring the tie back across and under the knot, going up through the loop on the opposite side. You are still keeping the knot very loose.
- Tuck the tail of the tie behind the knot and into a flap on the underside of the knot.
- Tighten as needed and fluff up and spread the four rings that create this knot design.
Grantchester
The grantchester knot looks like a larger four-in-hand knot. This is a great knot if you’re wearing a spread collar style or if you have a somewhat large frame, as this is a wide knot tie.
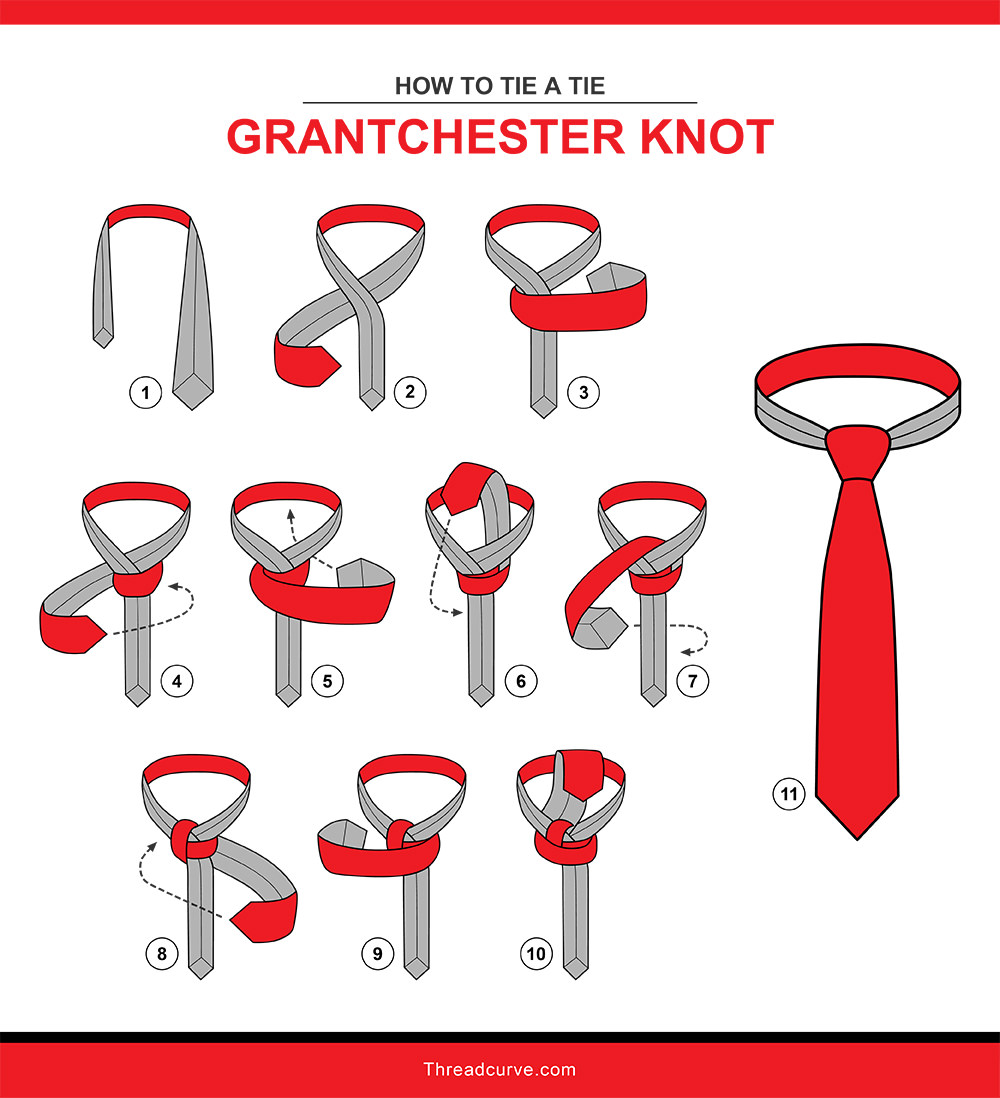
Instructions
- Begin with the tie around your neck facing inward, so that the underside is facing out.
- Bring the thick side of the tie under and across to the opposite shoulder.
- Take the tie over the crossed section horizontally, moving back to the starting shoulder.
- Wrap the tie back under the knot, taking it to the opposite side.
- Take the tie horizontally across the knot again, going back to the starting shoulder.
- Bring the tie up under the collar, then bring it back down, crossing over the top of the knot. Now you’ll be on the second shoulder side of the knot.
- Bring the tie under the knot across to the starting shoulder again, then back over the top of the knot to go back to the second shoulder.
- Bring the tie up under the collar, then back down and through the top loop of the knot.
- Tighten and adjust.
Hanover
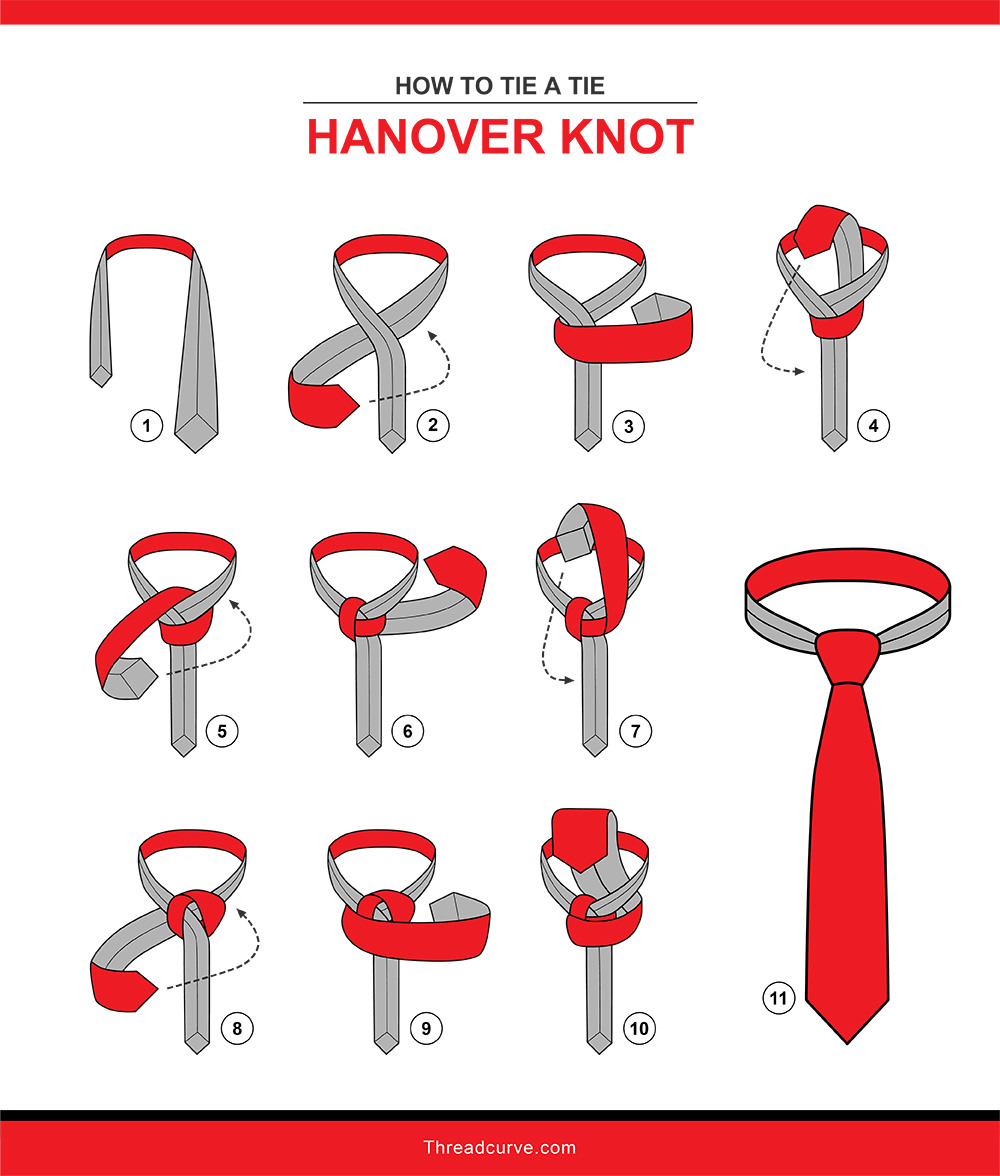
The Hanover tie knot is named for the Hanover royal dynasty, the house that is the direct ancestor of the current British monarchy, the House of Windsor. You’ll get to that tie knot a little later. This is a simple, elegant, symmetrical knot in a perfect triangle shape. This is a somewhat larger knot, so you want to use a tie that isn’t very thick or the knot could end up looking bulky and sloppy.
Instructions
- Start with this tie around your neck so that the underside (the backside) is facing outward.
- Cross the thicker side under the thinner one, taking it to the opposite shoulder.
- Bring it back over the top of the cross-section, holding it horizontally to the starting shoulder.
- Bring the tie up and under the collar, then back down over the top of the knot, taking the tie across to the second shoulder.
- Wrap the tie under the knot, taking it horizontally back to the starting shoulder.
- Take the tie up and under the collar again, then back down under the knot, moving to the opposite side.
- Take the tie horizontally across the top of the knot again.
8,. Bring the tie up and under the collar, then back down and through the top loop of the knot.
- Tighten and adjust.
Kelvin
The Kelvin knot is named after the same physicist who invented the Kelvin temperature scale, Lord Kelvin. This knot is the same size as the four-in-hand knot but has a slightly fuller look.
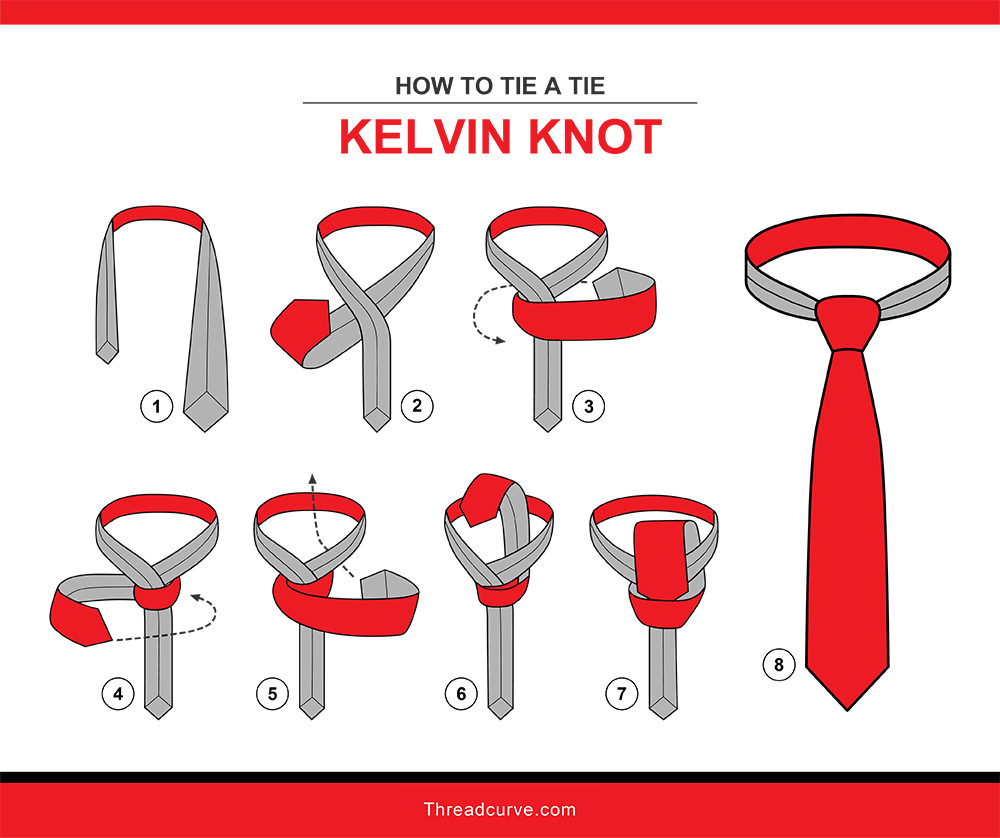
Instructions
- Start with a reverse necktie, meaning that the underside is facing outward.
- Cross the thicker side of the tie under the thinner side, taking it across to your other shoulder.
- Bring the tie back across this crossed section, taking it back to your starting shoulder.
- Take the tie back to the other side, going under the knot.
- Bring the tie over to the starting shoulder again, going over the top of the knot.
- Take the tie up and under the collar, then back down through the top loop of fabric on the knot.
- Tighten and adjust.
Krasny Hourglass
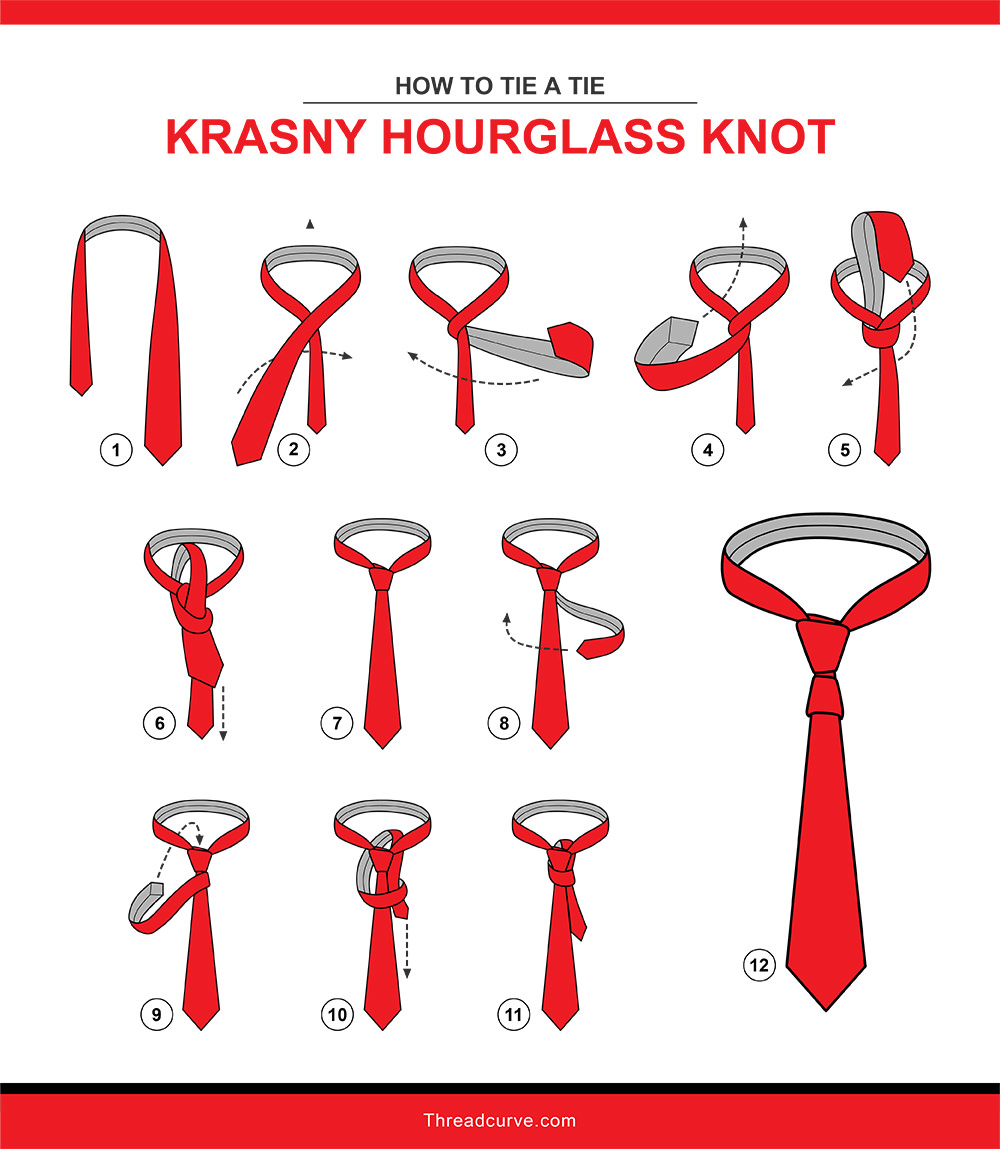
The Krasny hourglass tie knot is named for Alex Krasney, who invented the knot, and the hourglass shape the knot represents. This is a nice professional tie knot that works well for many different looks and collar style choices. This knot is unique because it’s actually two knots, one right on top of the other. This is what creates the distinct hourglass shape.
Instructions
- Start by making a standard four-in-hand knot. To do this, you will cross the thicker side of the tie on top of the skinnier side, then bring it back under the skinnier side of the tie to take it back to your starting shoulder. Take the tie back across, going on top of the other side of the tie, then back under and over the collar at the knot. Loop the thick end of the tie through the top loop of fabric you created. Tighten and adjust to complete the four-in-hand knot. Now, the real work begins.
- Now you will switch, as the tail of the tie becomes the active end of the tie. Take it and hold it out horizontally to your starting shoulder.
- Place your finger next to the four-in-hand tie knot you just made, going to the opposite shoulder.
- Bring the tail of the tie over to the opposite shoulder. The underside, or backside, of the fabric should be facing out. Take that finger and place it on top of the tie.
- With your other hand, bring the tail back to the starting shoulder, leaving your finger in place. Go under the tie, not over.
- Leaving your finger in place, bring the tail of the tie back over to the opposite shoulder.
- Take the tail of the tie and tuck it under the tie, feeding it through the loop you just made.
- Tighten and fluff as necessary so that both knots are roughly the same size. The Krasny hourglass shape should now be complete.
Linwood Taurus
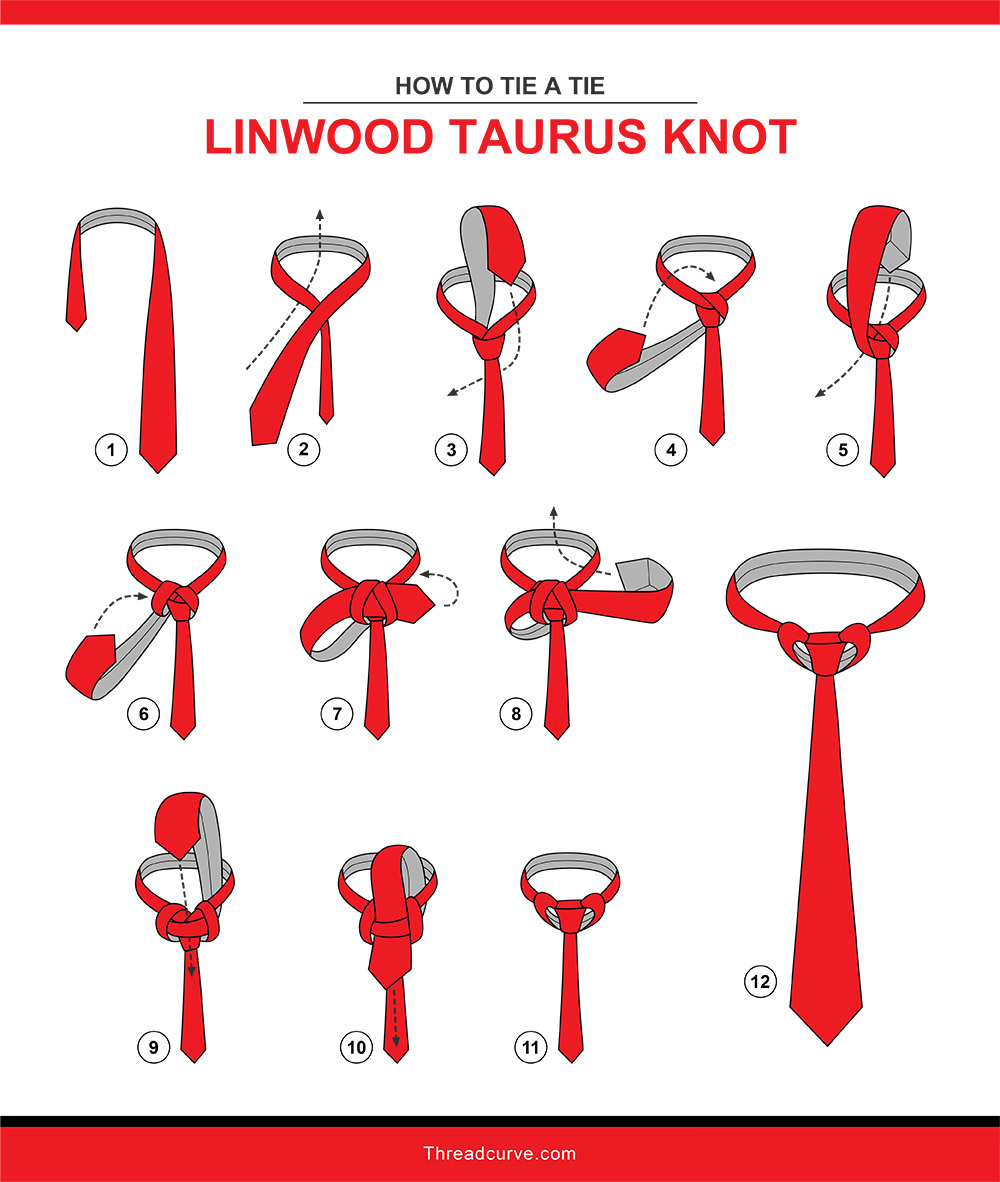
The Linwood taurus knot was invented by stylist Linwood Darkis. It’s a highly stylized tie knot that’s incredibly fun and festive, perfect for a wedding or any celebratory occasion. This might be a little too fashion-forward for conservative office wear but it’s a great tie knot to know when you want to have a somewhat large, attention-getting tie knot.
Instructions
- Give yourself plenty of fabric to work with on the active end, the thicker end, of the tie.
- Cross the thick end of the tie over the thinner end.
- Pull the tie up under the collar, then back down over the collar and back to the other side (your starting shoulder).
- Hold the cross-section of the tie you just created with your thumb on the bottom and your fingers on the lop. Extend two fingers forward and lay them beneath the active end of the tie.
- With your other hand, cross the active end of the tie under the stationary end, moving it to the opposite shoulder.
- Grasp the tie knot now with your other hand, thumb on the bottom of the knot, holding the loop you just made next to the knot in place.
- Extend two fingers of that hand alongside the collar of the tie. Take the active end of the tie up over your fingers and the collar of the tie, then back down under the collar.
- Leave your fingers in place inside the loop as you bring the tail through that loop, then remove your fingers so you can thread the tail through the loop on the other side of the knot.
- Tighten, but not too much. These two loops will be somewhat loose in this fun type of tie knot.
- The tail of the tie is at your starting shoulder now. You will bring it up under the collar on that side next to the knot, then bring it back down and through the central loop of the knot. This is the loop that is between the two loose side loops you created.
- Tighten and straighten your tie and fluff up the two side loops as needed to create this fun tie knot.
Luxe
The name of the luxe knot pretty much tells you what you need to know about this super fancy, highly formal tie knot. When you want to dress to impress and really steal the show, you wear a luxe knot. Work with precision to make this knot or it will end up looking sloppy. Get it right and the intricacies of this knot will speak for themselves.
Instructions
- Pinch the thick side of the tie to create fold and hold it under your neck.
- Cross the thinner side of the tie over this folded section.
- Bring the thinner end (the tail end) of the tie under the front half of the tie.
- Take the tail end of the tie up over the collar, then cross to the other side of the knot and go down, pulling the tail of the tie under the collar.
- Use your thumb to hold the knot of the tie and hold the tail of the tie in place behind the knot.
- Make a fold in the tail of the tie, holding it horizontally toward your starting shoulder. The “good side,” the front side, of the tie should be facing out. This small fold will make a little loop of fabric stick out from the tie, just below the knot. Take the rest of the tail fabric across, under the tie, to the other shoulder.
- Make another fold, this time folding the fabric back toward itself to make another loop that is a mirror of the one on the other side.
- Bring the tail up under the collar, then back down and across, over the top of the collar, to the other side.
- Bring the tail back under the front of the tie and over to the other side.
- Take the tie under and around the knot, going back up and across the knot and down and under to the other side again.
- Tuck the tail of the tie into the top middle loop at the back of the knot.
- Tighten and then fluff your knot, pulling the two crisscrossing loops at the top open slightly to show the knot at the center. You can also fluff the two loops at the bottom of the knot to show off the complexity of this style. Do not pull too much or you could end up pulling the tail out entirely and undoing the knot, as you won’t have a lot of tail fabric to play with.
Manhattan
The Manhattan is an elegant, professional-looking tie knot. It’s actually just the reverse of the half-Windsor knot. So if you can tie a half-Windsor, you can tie a Manhattan.

Instructions
- Start with the underside of the tie facing outward.
- Cross the thick end of the tie under the thinner end, moving it to the opposite shoulder.
- Cross the thinner side of the tie over the top of the thicker side, taking it to the opposite shoulder.
- Place the thick end of the tie over the top of this cross-section, going back to your starting shoulder.
- Bring the thick end of the tie up under the collar, then back down and over the collar, taking it to the other side of the knot.
- Bring the tie up under the collar and then tuck it down through the top loop of fabric on the knot.
- Tighten and straighten the knot.
Merovingian
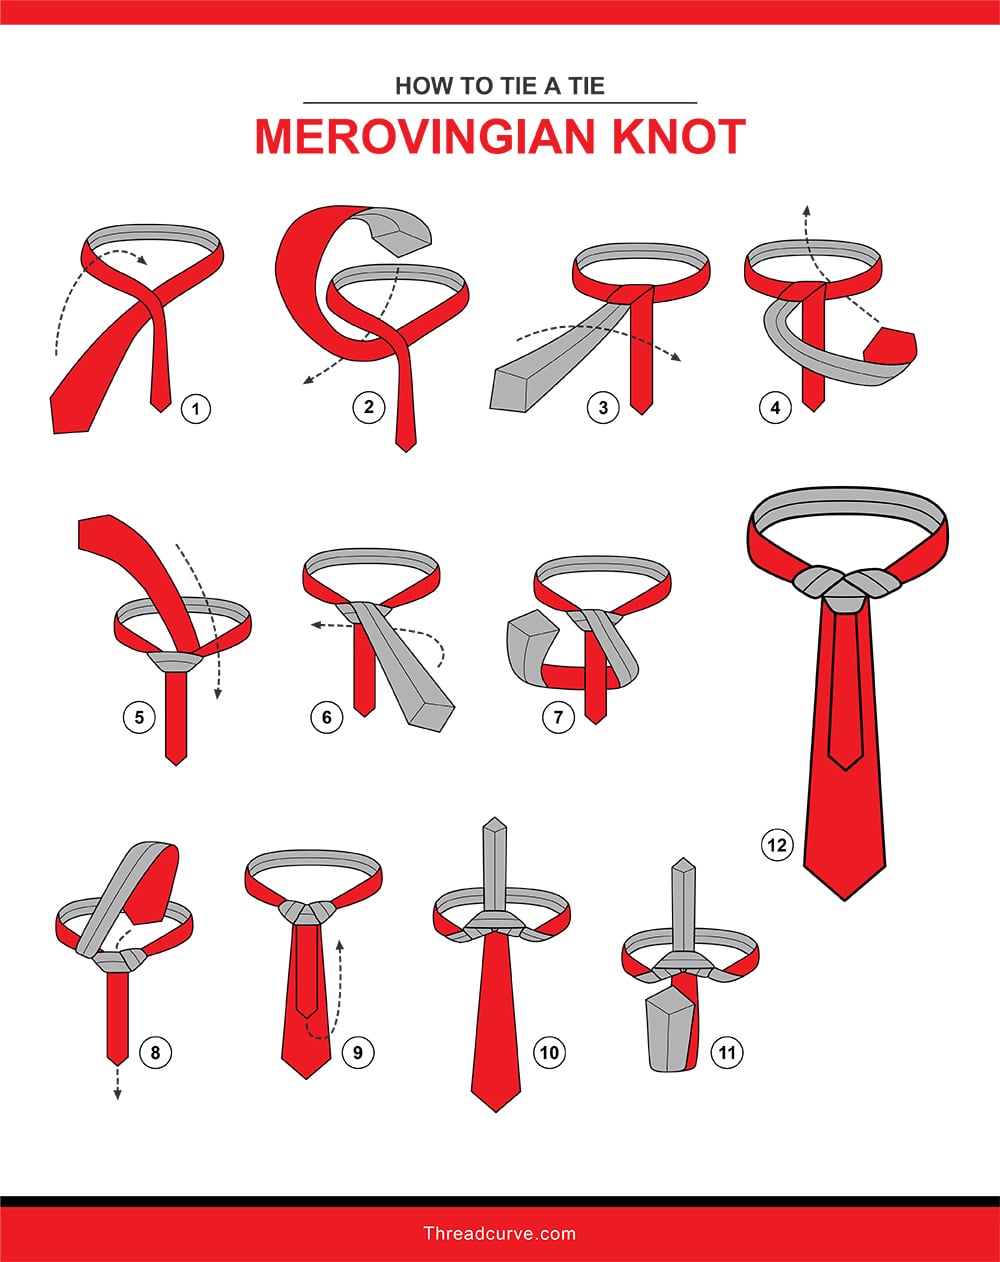
The Merovingian knot, also known as the ediety, dates to at least the 1920s. However, this tie knot really caught on in the 2000s thanks to the uber-popular “Matrix” movies. This tie knot may also be known as the “Matrix” knot because of its association with the movie franchise. So you can walk away right now and wake up in your bed tomorrow…or, you can learn to tie the cool, intricate Merovingian knot.
Instructions
- Start by crossing the thick side of the side under the thinner side, moving it to the opposite shoulder.
- Take the active end (thick end) of the tie up over the collar, then back down and under the collar. Pull it through, staying on the same side of the knot (the second shoulder side, opposite your starting shoulder).
- Take the active end back over the top of the knot to move it to the opposite shoulder.
- Bring the tie up and under the collar, then back down and over the collar, staying now toward the starting shoulder side.
- Take the tie under the knot, up and over the collar, then back down and under the collar on the other side.
- With one hand, bring the tail of the tie straight up. You’ll probably need to hold it up with your mouth or chin, because you’ll likely need both hands for the next step.
- Take the tail of the thicker end of the tie and flip it upward so that the backside of it is facing outward, away from you and facing toward whatever you are facing.
- Loop the tail of the thick side of the tie through the underside of the knot, which is fully exposed because you have the tail lifted. Pull it through this loop that’s under the knot.
- Straighten and adjust. Yes, you have created the chosen tie knot.
Murrell
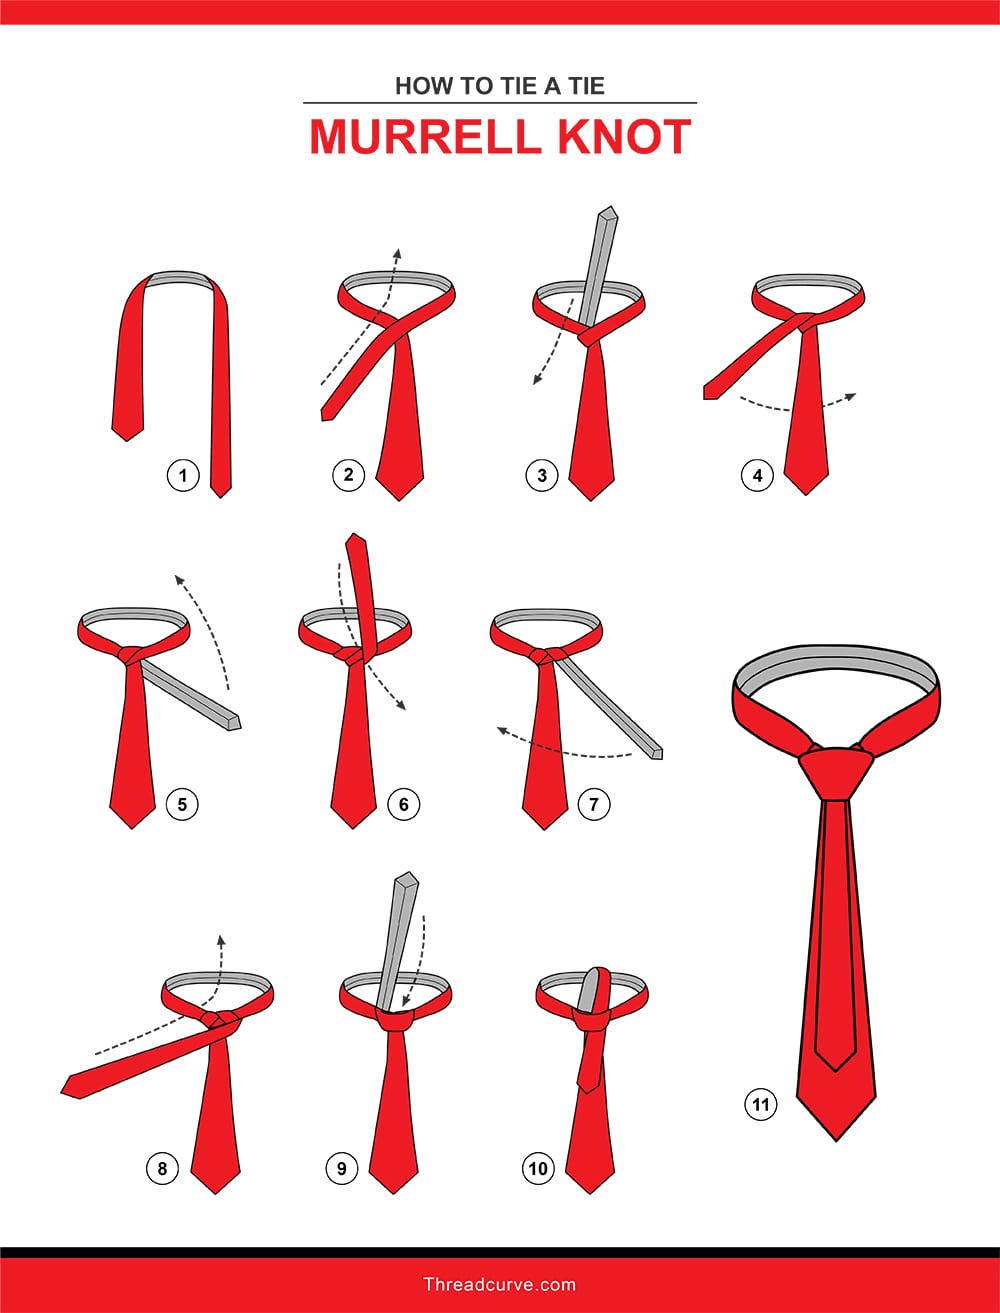
The Murrell knot is for those who want to be a little bit rock and roll…while still wearing a necktie. If you want to show off a little rebel spirit, go for the Murrell. You might not be able to get away with wearing this in conservative office environments but you can wear this simple knot in lots of other situations. This is a nice wide, casual tie knot.
Instructions
- Cross the \thinner side of the tie over the thicker side, taking it to the opposite shoulder. For this tie knot, you’ll be primarily moving the thinner side of the tie as the active end of the tie.
- Bring the tail side up and under the collar, then back down and over the collar. Stay on the same side of the cross-section in the middle, the second shoulder side that is opposite your starting shoulder.
- Bring the active end of the tie back over to your starting shoulder, crossing under the knot.
- Take the tie up over the collar, then down and under the collar. Stay on the starting shoulder side of the knot.
- Bring the active end of the tie over to the opposite shoulder again, crossing in front of the knot.
- Take the tie under the collar and back down over the knot, pulling it through the top loop on the knot.
- Tighten and straighten your Murrell knot.
Nicky
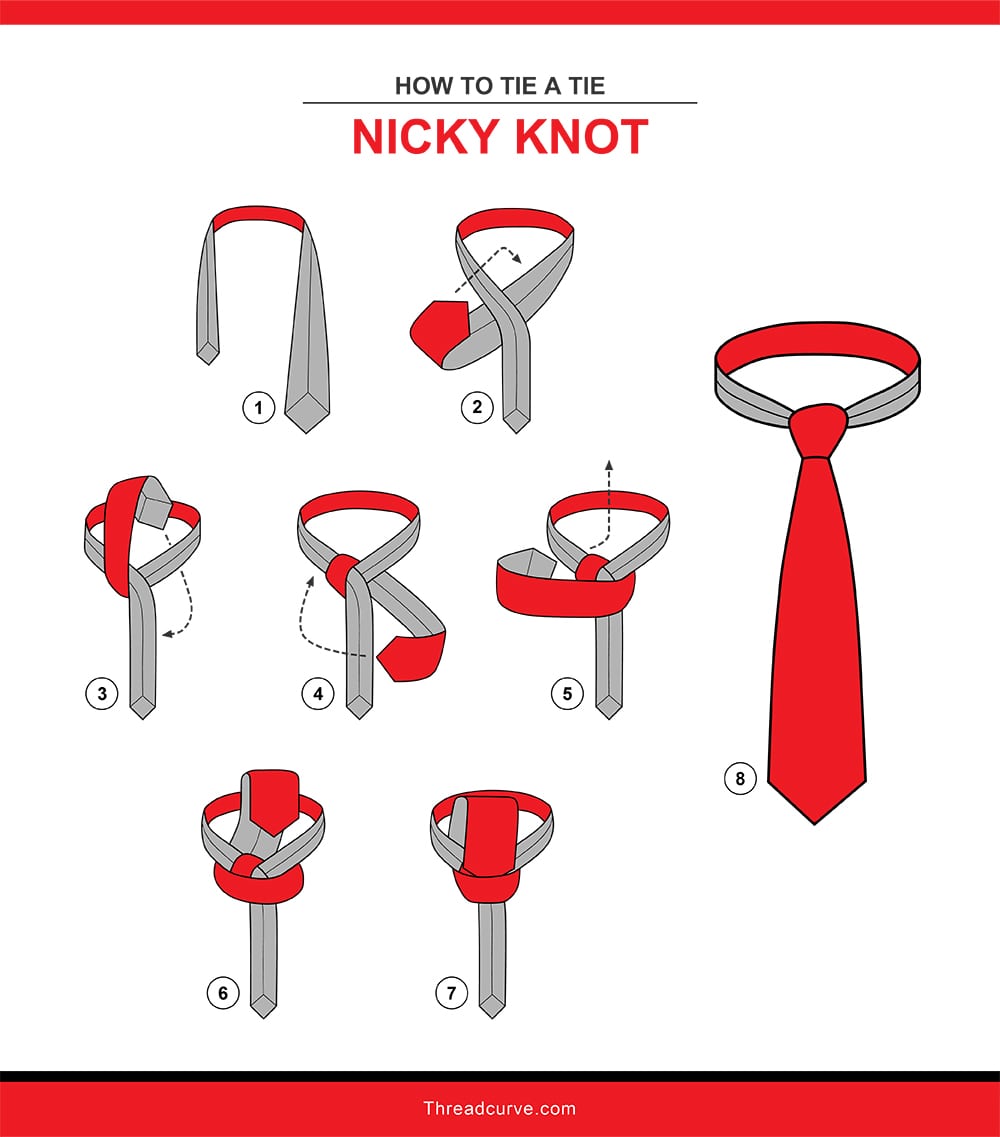
Named for the tie maker brand name Nicky, the Nicky tie knot was invented by Ernesto Curami, a salesman in a Nicky shop. The Nicky is a lot like the four-in hand knot but bigger. This is a very popular tie knot in Italy and it’s a nice, simple, all-occasion tie knot.
Instructions
- Start with the underside of the tie facing outward, so the seam is showing and not the “pretty side” of the tie.
- Cross the thinner side of the tie over the thicker side to form an X, bringing the thicker side of the tie to the opposite shoulder.
- Take the thicker side of the tie up and over the collar, then back down and under the collar, crossing to the other side of the knot.
- Take the thick side of the tie horizontally back over the front of the knot, taking it to the opposite shoulder.
- Bring the thick side of the tie up and under the collar, then back down and through the top loop of the knot.
- Tighten and straighten your Nicky knot.
Onassis
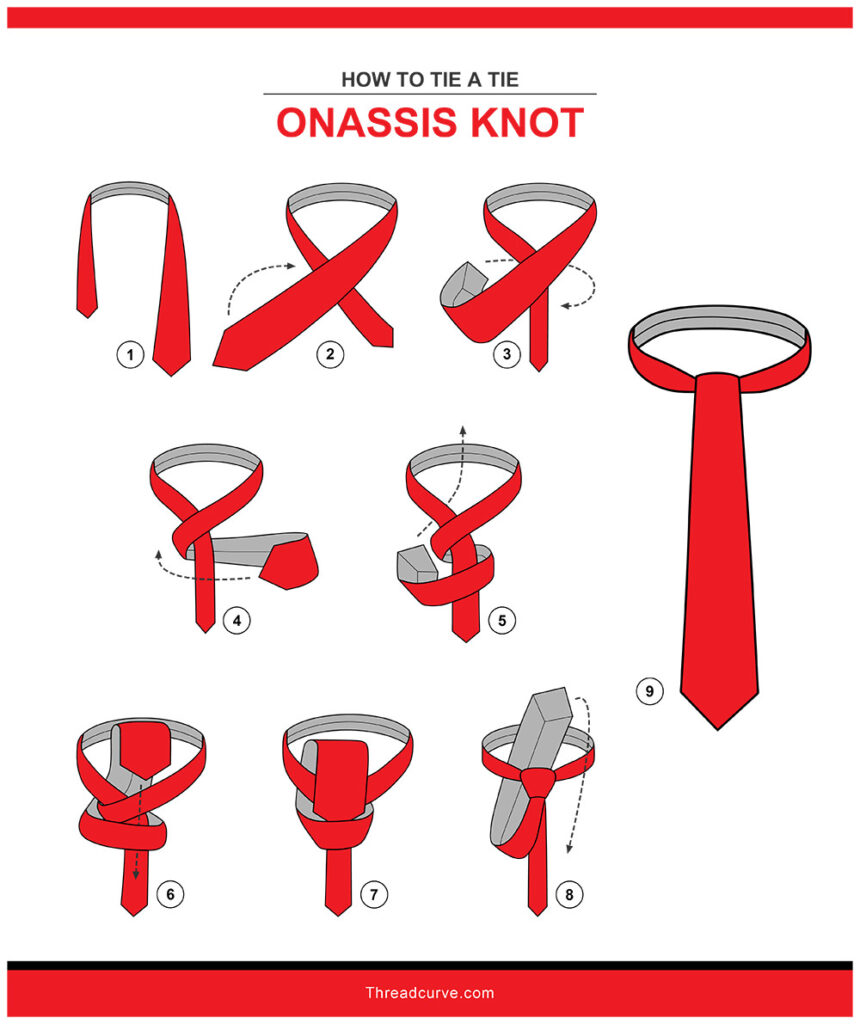
Have you ever had a tie that looked so darn good, you didn’t want to mess it up with a knot? The Onassis knot is the perfect choice, then. This knot is actually hidden by the tie so you can’t even see it. And yes, the look is named after Aristotle Onassis, who became the second husband of Jackie Kennedy after JFK’s assassination. He did not invent this knot but he was well-known for wearing it, so the knot became associated with him.
Instructions
- Cross the thicker side of the tie over the skinnier side, bringing it to the opposite shoulder.
- Take the thicker side of the tie back under the thinner side.
- Bring the tie back over the top of the cross-section, taking it back to the opposite shoulder again.
- Pull the thicker side of the tie up under the collar, then back down through the top loop of the knot.
- Tighten the knot. Now, take the front flap of the tie, take it around and under the knot and pull the end of the tie up under the collar and then back down and over. The knot will now be covered and the tie will have a bit of a cravat-like look. You can add a decorative tie pin or simply let the tie speak for itself.
Plattsburgh
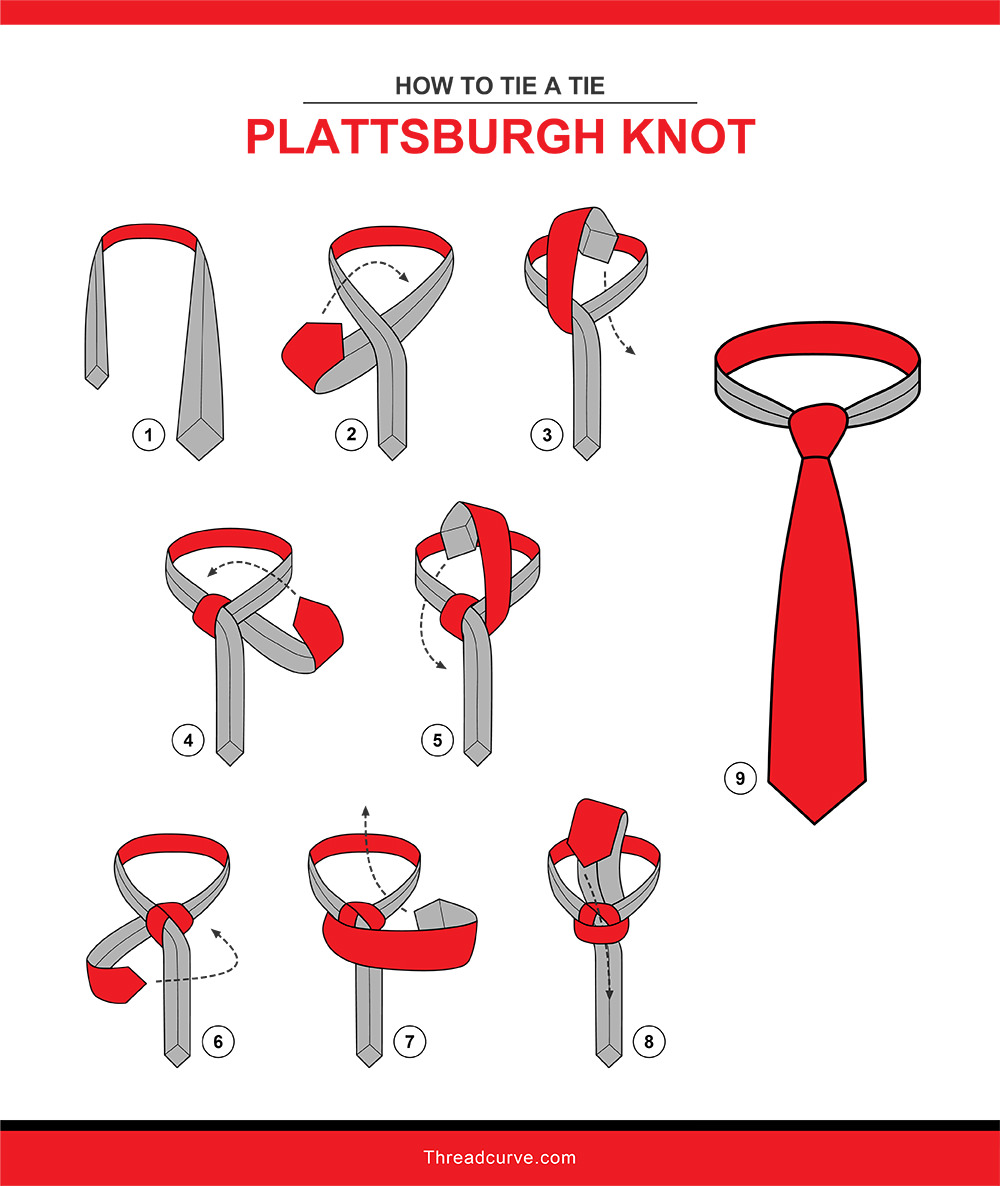
The Plattsburgh tie knot is named for Plattsburgh, New York. The knot was invented by Thomas Fink, who is from the town. This is a very elegant tie knot with a sleek, triangular shape. This is a great office tie knot.
Instructions
- Start with an inverted tie, meaning that the underside will be facing out.
- Cross the thick side of the tie under the thinner side, bringing it toward the opposite shoulder.
- Take the tie up over the collar, then under the knot to bring the tie down and back to the starting shoulder.
- Take the tie back up over the collar, then down and under the collar to bring the tie back to the opposite side again.
- Return the tie back to your starting shoulder, going horizontally across the front of the knot.
- Bring the tie back up and under the collar, then back down again through the top loop of the knot.
- Tighten and straighten your Plattsburgh knot.
Pratt
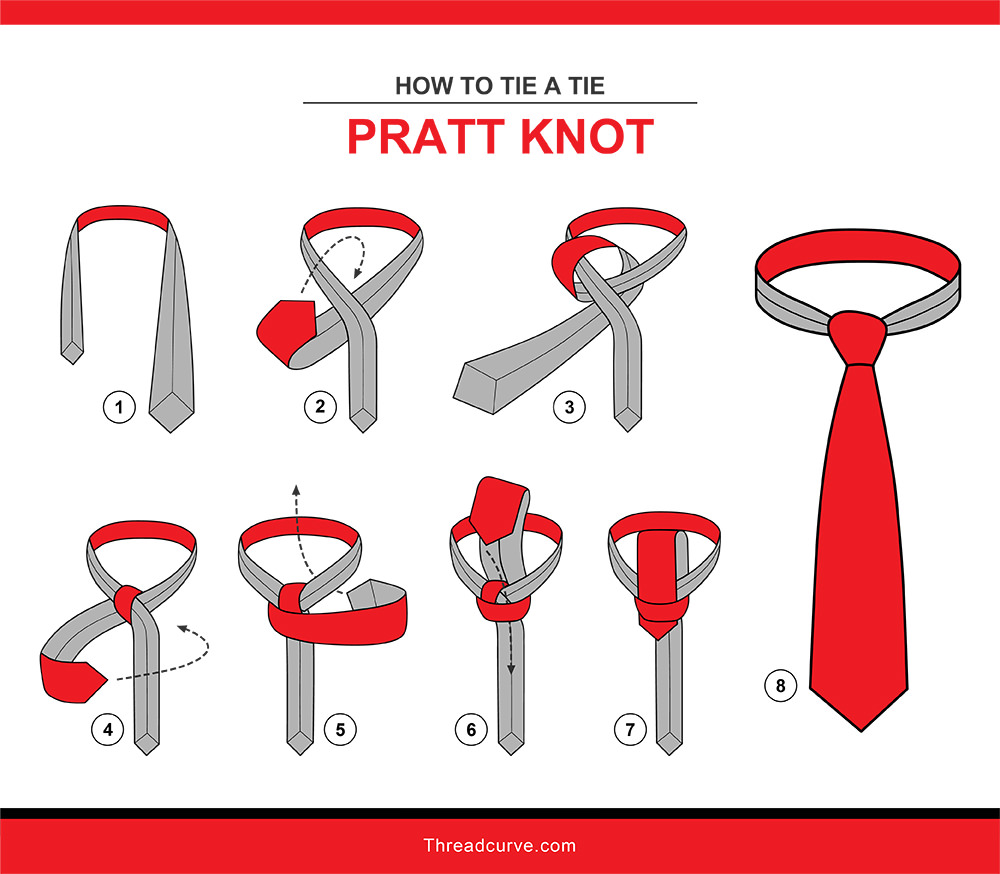
The pratt knot has a nice, neat look that is perfect for office settings and professional occasions. It looks great for any semi-formal event. The pratt knot is also known as the shelby knot, the shell knot or shelby-pratt knot. It looks a lot like the half-Windsor knot but it’s smaller.
Style legend says that the pratt knot was actually invented by politician Jerry Pratt. The knot became famous when Pratt was set to appear on a news program hosted by Don Shelby. Pratt fixed Shelby’s tie, re-tying it with the pratt knot. Shelby wore the knot on the air and New York fashion writers caught sight of it. They wrote about the knot, which became part of Shelby’s regular on-air look.
However, fashion experts like Real Men Real Style say that the knot actually dates to the 1920s, when it was used by tailors in Milan, Italy to display neckties on mannequins. This is why the knot is also known as the Milanese knot.
Instructions
- Start with an inverted tie, where the underside of the tie is facing outward.
- Cross the thinner side of the tie over the thicker side, taking the thicker side of the to the opposite shoulder.
- Bring the thick side of the tie up and over the collar, then back down and under the collar. Stay on the side next to the cross-section you just created, rather than crossing back over to your starting shoulder (as you would in many other types of tie knots).
- Take the tie back to the opposite shoulder, going horizontally across the top of the knot.
- Bring the tie up under the collar, then back down and through the top loop of the tie knot.
- Tighten and straighten the pratt knot to complete your look.
Prince Albert
The Prince Albert knot, also known as the double four-in-hand knot, is very elegant and professional. This is a great all-around knot that can be worn for everything from business casual to formal events. This knot has a visible bottom layer that adds a touch of flair to any style.
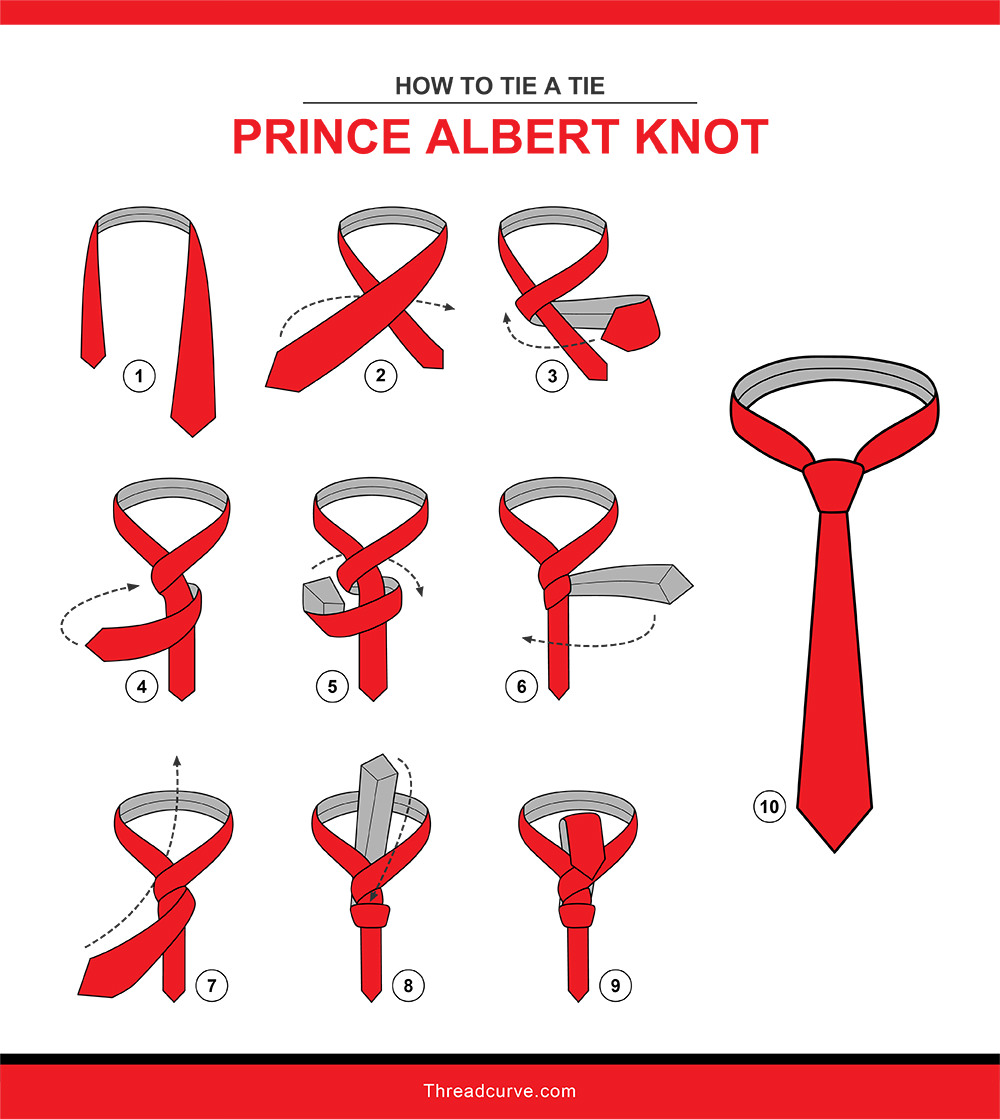
Instructions
- Cross the thick side of the tie over the thinner side, taking it to the opposite shoulder.
- Take the tie back over to the starting shoulder, going under the cross section you just created.
- Bring the tie back across the knot and over to the opposite shoulder again, going horizontally across the top of the knot.
- Go back under the knot again, moving the tie over to the starting shoulder once more.
- Now, go back over the top of the knot once more, again taking the tie over to the opposite shoulder.
- Take the tie up and under the collar. When you bring it back down over the knot, you want to thread it through not one but two of the top layers of the knot. This creates the unique layered look of the double four-in-hand, or Prince Albert, knot.
- Tighten and straighten.
Rose
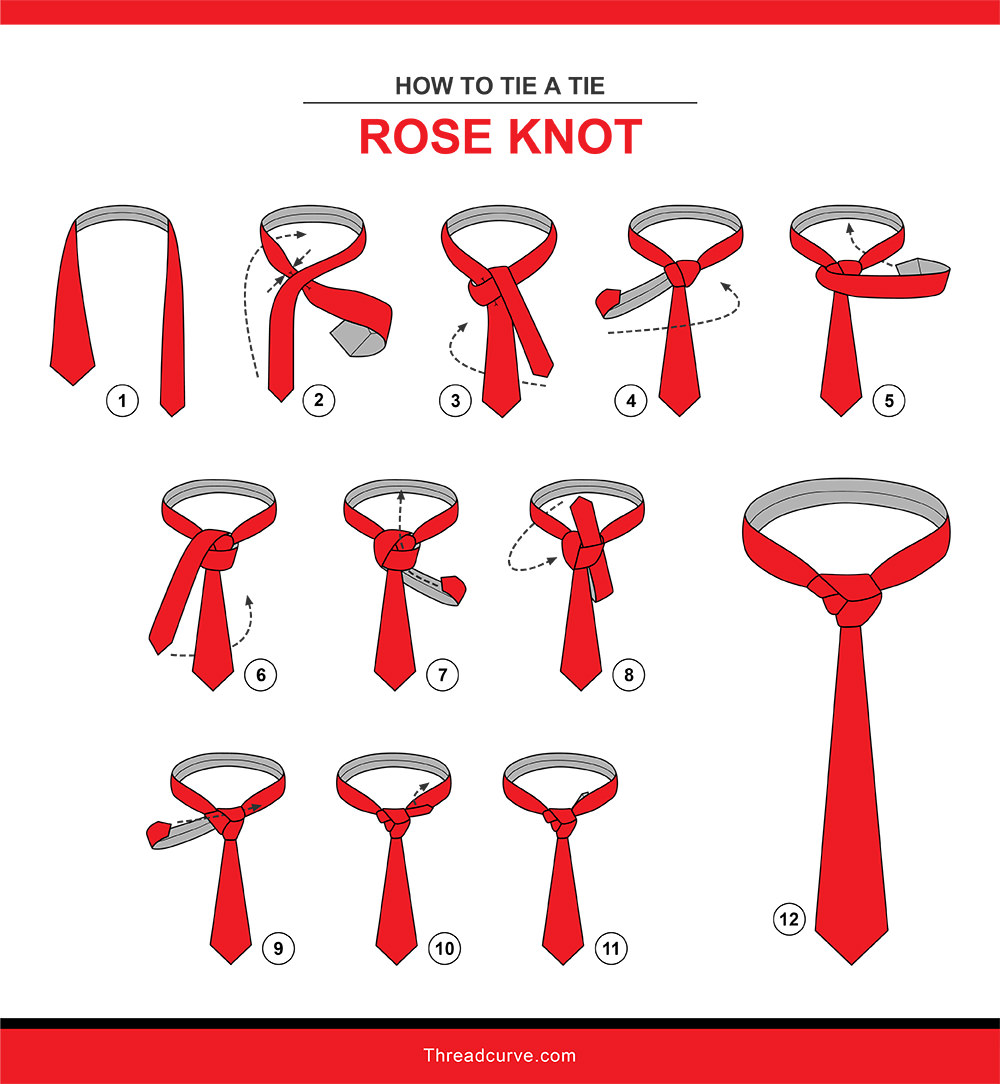
The rose knot truly looks like a rose, which makes this knot perfect for weddings, dates and romantic events where you want to impress. Just make sure you schedule some extra time to get ready because tying this knot can be a bit of a challenge!
Instructions
- Give yourself plenty of tie to work with. For this knot, you’ll be using the thinner end as the active end of the tie.
- Cross the thinner side of the tie over the thicker side, moving it to the opposite shoulder.
- Bring the active end of the tie up, under the collar and back down over the collar, crossing to the other side of the knot.
- Take the tie back over to the opposite side, going under the tie.
- Bring the tie back over the front of the knot, taking it back toward your starting shoulder, and take it up under the collar on that side.
- Bring the tie back down over the collar, moving it to your second shoulder.
- Take the tie back to the starting shoulder again, going under the knot.
- Loop the end of the tie through the bottommost loop of the knot, then over toward the opposite shoulder. Before bringing the tie down, take it under the collar.
- Bring the end of the tie up and loop it through the last loop you just made, then pull to tighten and tuck the excess into your collar.
- Fluff and adjust as needed to make your rose look pretty…and let your style bloom.
Rosebud
The rosebud or rose bud knot is definitely a specialty knot but it’s a good knot to know for times when you want to add some romantic flair to your wardrobe. This is a great tie for formal events and occasions when you want to have a romantic, eye-catching look.
Instructions
- Put a pinch in the thick side of the tie, just under the neck.
- Cross the thinner side of the tie over this pinch, taking it to the opposite shoulder.
- Bring the thinner side of the tie up, under the knot and then back down over the knot, keeping the tie to the same side.
- Bring the tie under the knot and across to the other side, then up and over the collar and back down and under the collar on that side.
- The tie should be back at the opposite shoulder now. Bring it horizontally across the front of the knot, taking it to the other side.
- Insert your finger under the flap you just made at the front of the knot.
- Bring the tie up under and collar, then back down over the collar and through that loop.
- Tighten and tie so that it’s at your neck where you want it.
- Now, you have a nice necktie knot with the thinner side of the tie hanging down in front of the thicker side, the “pretty” side of the tie facing outward. Fold this skinny part of the tie in half.
- Bring the folded tail up over the knot, then back down and under the knot. Take the tie over to the shoulder that is opposite from your starting shoulder, still maintaining this fold
- Take the folded tail up and across the knot, then down and under the knot, to make a diagonal line of fabric across the knot.
- Repeat, taking the folded tail up and across the knot next to this diagonal line to make a second diagonal line of fabric, then tuck it under the collar. Go around the collar with the tail one more time and tuck the tail behind the collar to secure your rosebud knot.
Saturn
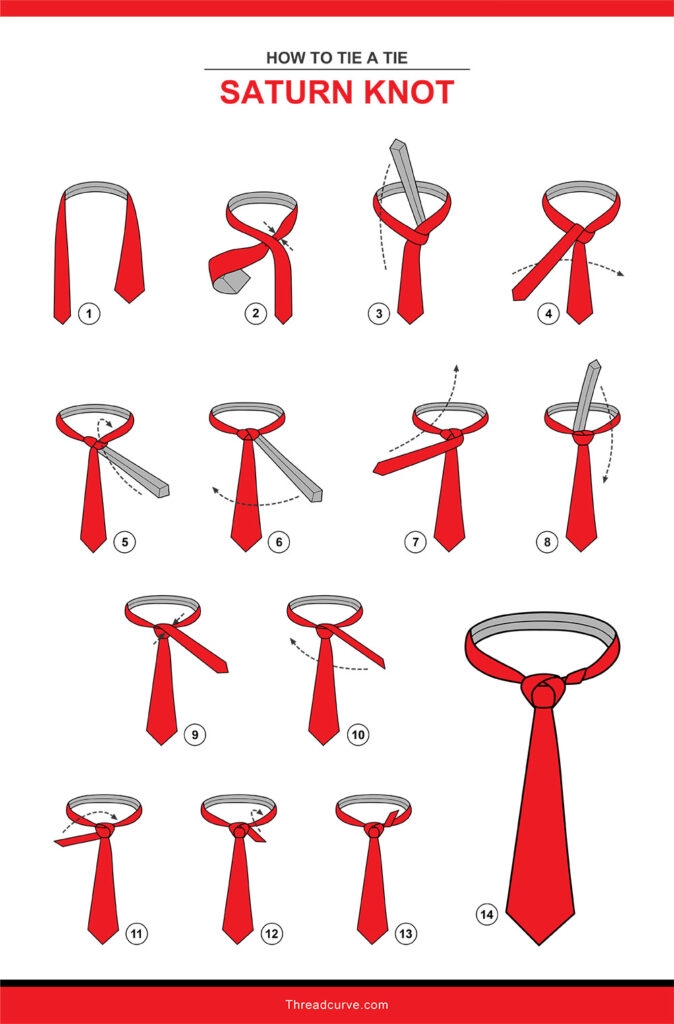
The Saturn is a stylish, eye-catching knot that’s perfect for everything from daily office wear to formal wear.
Instructions
- Pinch the thick side of the tie to put a little fold in it just under your neck.
- With your other hand, cross the thinner side of the tie over this fold.
- Bring the tie up and under the collar, then back down again, moving the tie over to the opposite side.
- Take the tie back over to the starting shoulder, going horizontally under the knot.
- Bring the tie up, over the knot, then down again under the collar and over to the other side.
- Take the tie back across the front of the knot to go to the starting shoulder again, completely covering the knot with the tie fabric.
- Bring the tie up, under the collar and back down over the knot, taking it to the opposite shoulder.
- Fold the remainder of the tail of the tie to give it a little bit of poof, then wrap the tail around and under the knot, then back up on the other side of the knot. You’re wrapping the tail around the knot now so the center still shows.
- Tuck the tail of the tie into the back of the knot, looping it down through the bottom loop of the knot.
- Tighten and straighten the knot.
Scale
The scale knot is a lot like the Eldredge knot but a little bit puffier. It’s great for any formal occasion but probably a little too unconventional for strict office attire.
Instructions
- Pinch the thicker side of the tie to put a fold in it. Hold this with one hand.
- With your other hand, cross the thinner side of the tie over to the opposite shoulder, crossing in front of the fold.
- Bring the tie back to the opposite shoulder, going under the cross-section. Your fold should be secure now so you can work with both hands.
- Take the tie up over the collar, then down and under the knot, crossing to take the tie back to the starting shoulder.
- Go back across the front of the knot horizontally, taking the tie back to the opposite shoulder.
- Here’s where things start to get tricky. You will place your finger on the knot diagonally, parallel to the outer edge of the knot. Hold your finger here with one hand while you use the other to bring the tail of the tie up, over your finger and down, then under the knot. Remove your finger.
- You will not do the exact same thing on the other side, bringing the tie down and across to your starting shoulder again, then taking it back across the front of the knot. You will place your finger diagonally again but this time parallel to the other side of the knot. Again, bring the tie up over the knot, then down and under the knot.
- You will do this two more times, going back forth once more, stacking the layers on top of each other as you make each new pass and fold. This is what creates the “scaled” design that gives the knot its name.
- Tuck the tail of the tie into the back of the knot. Separate and puff up the layers of your scale knot to get the desired look and get ready to dazzle all who see your tie swagger.
Simple
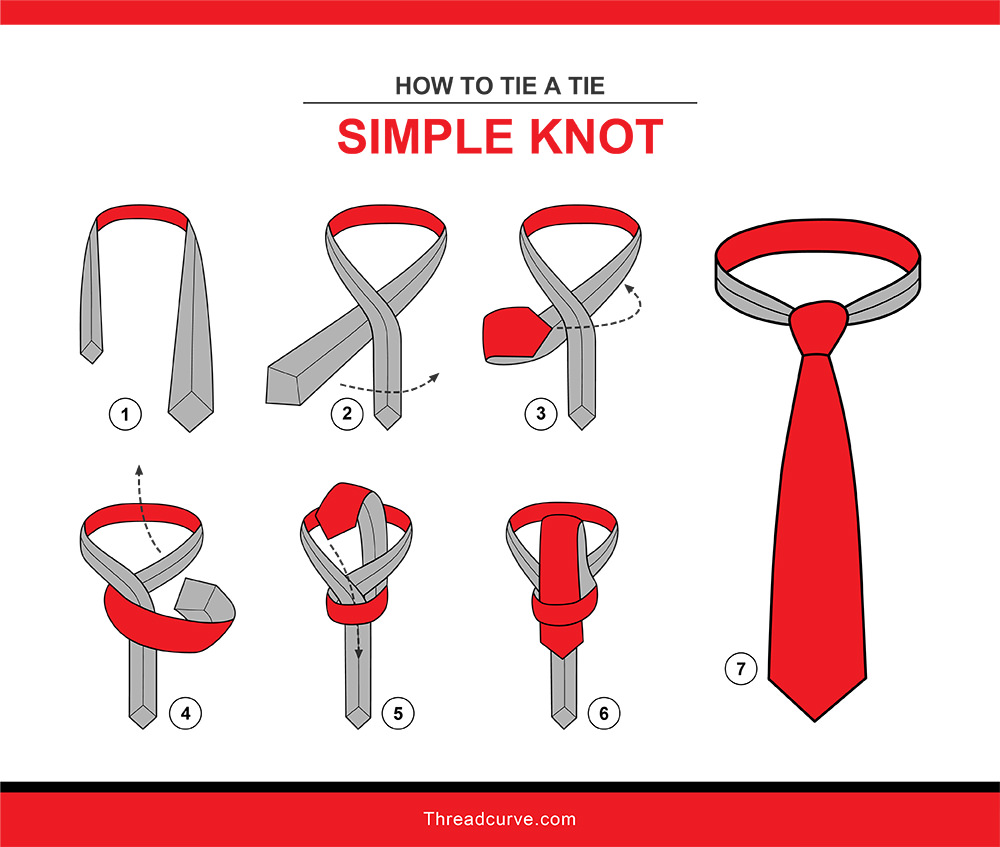
The simple knot is well-named because it is indeed simple to make. This is a great everyday knot for casual wear or regular office wear. The simple knot is also known as the Kent knot and the small knot. This is a very popular tie knot in China. It also has the distinction of not being self-releasing, so it isn’t easy to loosen and untie.
Instructions
- Start with the tie inverted. This means it will face outward so that the underside is showing.
- Cross the thicker end of the tie over to the opposite shoulder, going under the thinner side of the tie.
- Bring the tie back over to your starting shoulder, going horizontally across this cross-section.
- Take the tie up under the knot, then back down through the loop of the knot.
- Tighten and straighten. That’s all there is to the simple knot!
St. Andrew
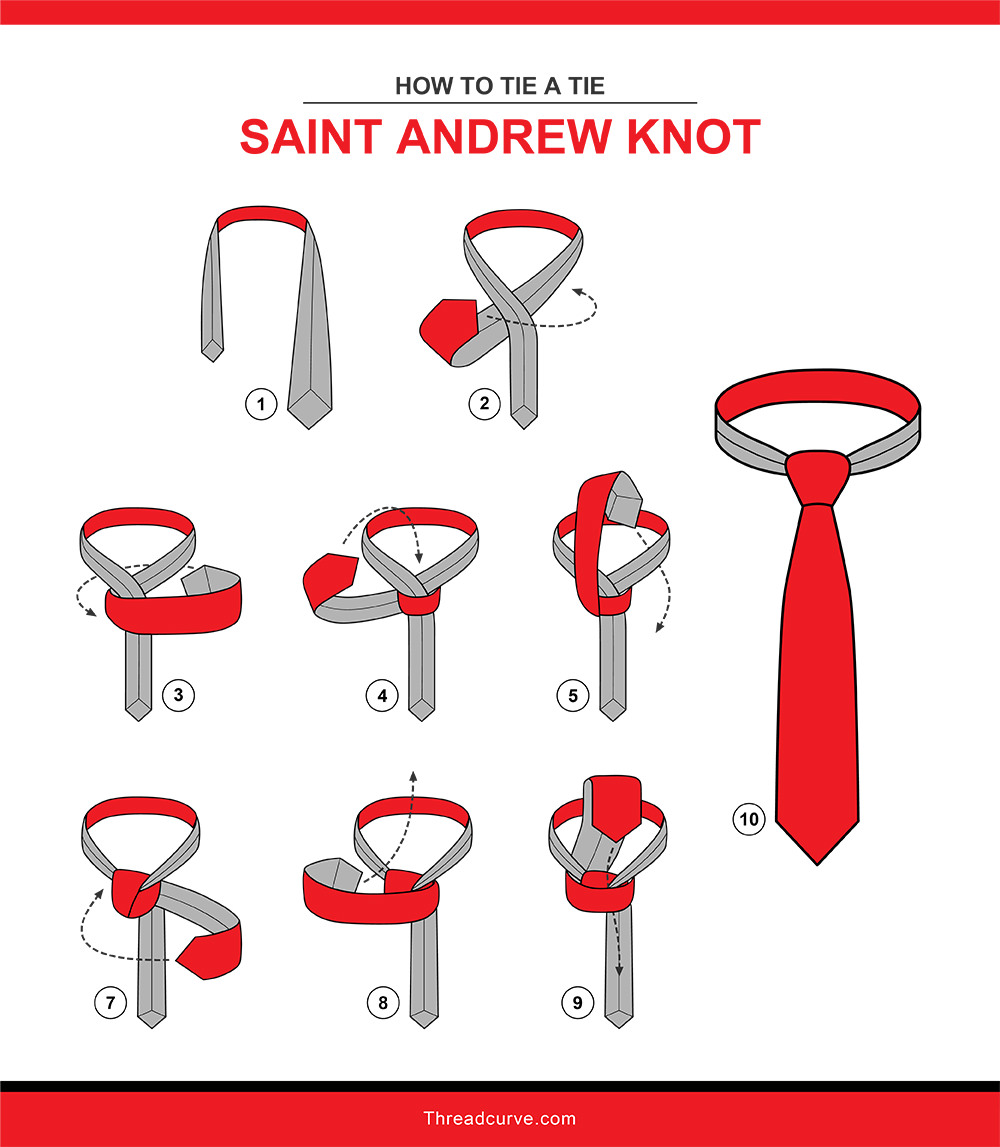
The St. Andrew knot is a lovely elegant, tidy knot that is perfect for office wear and good for understated style at formal events. The knot is named for the patron saint of Scotland. The classic St. Andrew knot might be the perfect thing to wear on his feast day, November 30. It works other days ot the year, too.
Instructions
- Start with the tie inverted so that the underside (the “bad side”) is facing outward.
- Cross the thinner side over the thicker side, taking the ticker side to your opposite shoulder.
- Bring the thick side of the tie back to the starting shoulder, going horizontally across the cross section you just made.
- Take the tie back to the opposite shoulder, going horizontally under the knot to get across.
- Take the tie up and over the collar, then down and through, moving across the knot to take the tie back to the starting shoulder side.
- Go across the front of the knot again, taking the tie to the opposite shoulder.
- Take the tie up and under the collar again, then back down and through the knot, threading the tie through the top loop of the knot.
- Tighten and straighten to perfect your look and finish the St. Andrew knot.
Trinity
The trinity knot is a very attention-getting style element. The tie is named for the three equal sections that create this knot. This is a great knot for fun and formal wear but might be a bit overwhelming in office environments, especially with a patterned or striped tie.
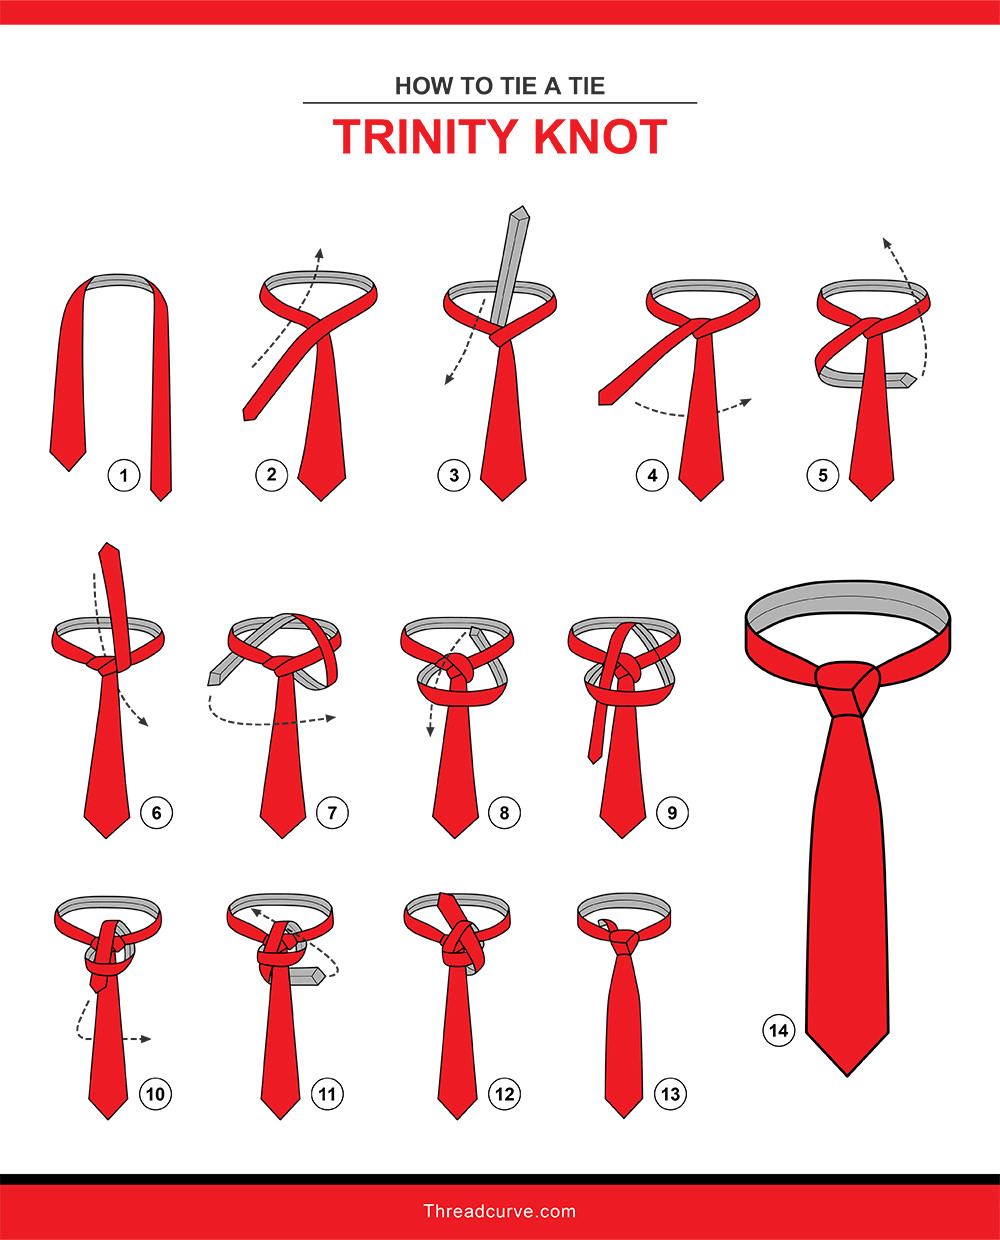
Instructions
The trinity knot is a bit tricky. Watch your work as you go to keep the three sections of the knot equal in size. Give yourself plenty of tie to work with on the thinner side.
- Start by slightly pinching the fabric on the thick side of the tie just under your neck. This is a little hack for this knot that usually isn’t included in the instructions, but it does help.
- With your other hand, bring the thinner side of the tie over to cover the pinch you just made, going toward the opposite shoulder.
- Bring the tie up under the collar, then back down, staying on the same side of the cross-section.
- Take the thinner end of the tie under the cross-section, moving it to the other side of the knot.
- Bring the tail of the tie up over the collar, then back down and under the collar, staying on the same side of the knot. The tail of the tie will be toward your starting shoulder.
- Take the tie horizontally over to the opposite shoulder, going across the front of the knot.
- Take the tie up under the collar and then back down through the loop you just made at the front of the knot. You’re making a loop on top of the knot now. You want to keep this loop slightly loose, not flush against the top of the knot.
- Bring the tail of the tie to the starting shoulder side of the knot, then under the knot, around the knot and through the top loop you just made.
- Tuck the tail into the collar of your shirt. Fluff the three sections of your trinity knot as needed to get them even in size.
Truelove
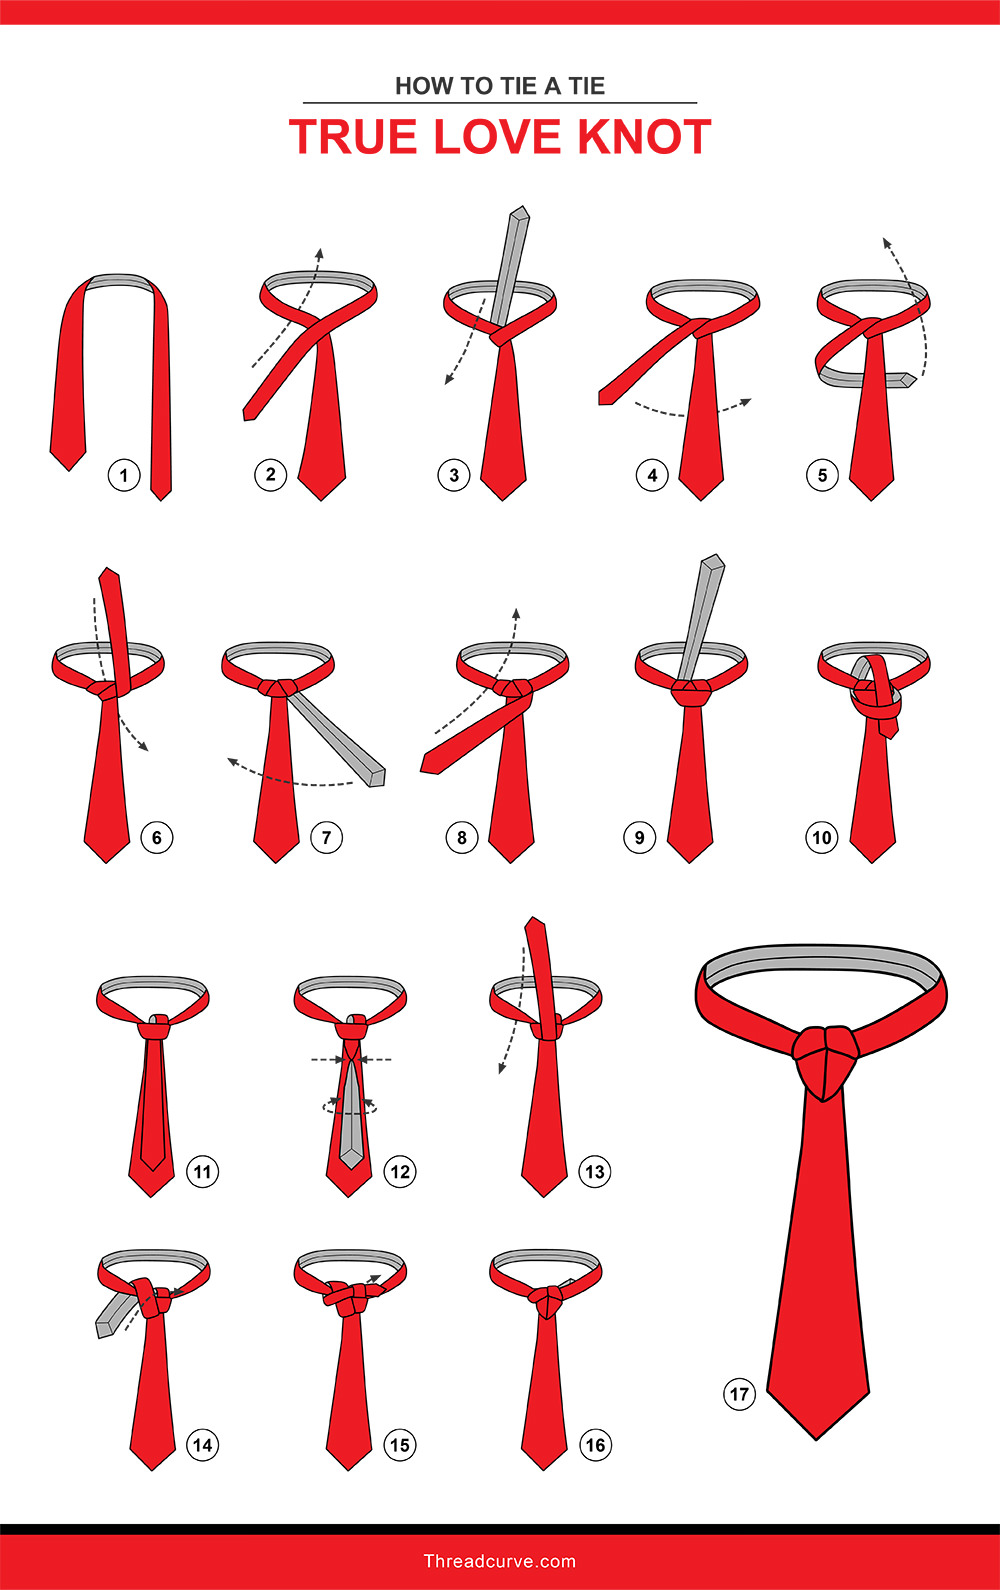
The Truelove knot is one of the most difficult knots to tie but some think the end result is well worth it. This knot was only somewhat recently invented by YouTuber Elliott Truelove, who liked the design so much he gave it his own name. The Truelove knot has four equal sections and it’s notoriously frustrating. Take your time and work with precision and you can create this intricate, very eye-catching tie knot.
Instructions
- Give yourself plenty of room on the thin side of the tie to make this knot. Start by giving the thick side of the tie a little pinch to put a small fold in the fabric, just under your neck.
- Cross the thin side of the tie over the top of this pinch, taking the tie to the opposite shoulder.
- Take the thin side of the tie back under the knot, over to the other shoulder, to form a loop around the fold.
- Take the tail up over the collar, then back down and under the collar, crossing behind the knot and taking the tie back to your starting shoulder.
- Take the tail of the tie up over the collar, then back down under the collar, crossing under the knot to go to the opposite shoulder.
- Take the tie horizontally across the front of the knot, moving it back to your starting shoulder.
- Bring the tie up under the collar, then back down over the knot, going through the loop you just made at the front of the knot. You’re making a loop at the top of the knot here. Keep this top knot loose, rather than allowing it to be flush against the top of the knot.
- The active end of the tie that you’re working with, the thinner end, should have the pretty side of the tie facing outward, facing whatever your body is facing. Take this and flip it around so that now, the back side of the tie is showing.
- Take the tie up over the collar, then back down under the collar, staying on the same side of the knot (toward the shoulder that is opposite your starting shoulder).
- Going across the front of the knot, loop the tail of the tie through that loose loop on top of the knot you created in step 7.
- Tighten as needed and tuck the tail into your collar. Fluff up the four sections of your knot to complete the look of the Truelove knot.
Van Wijk
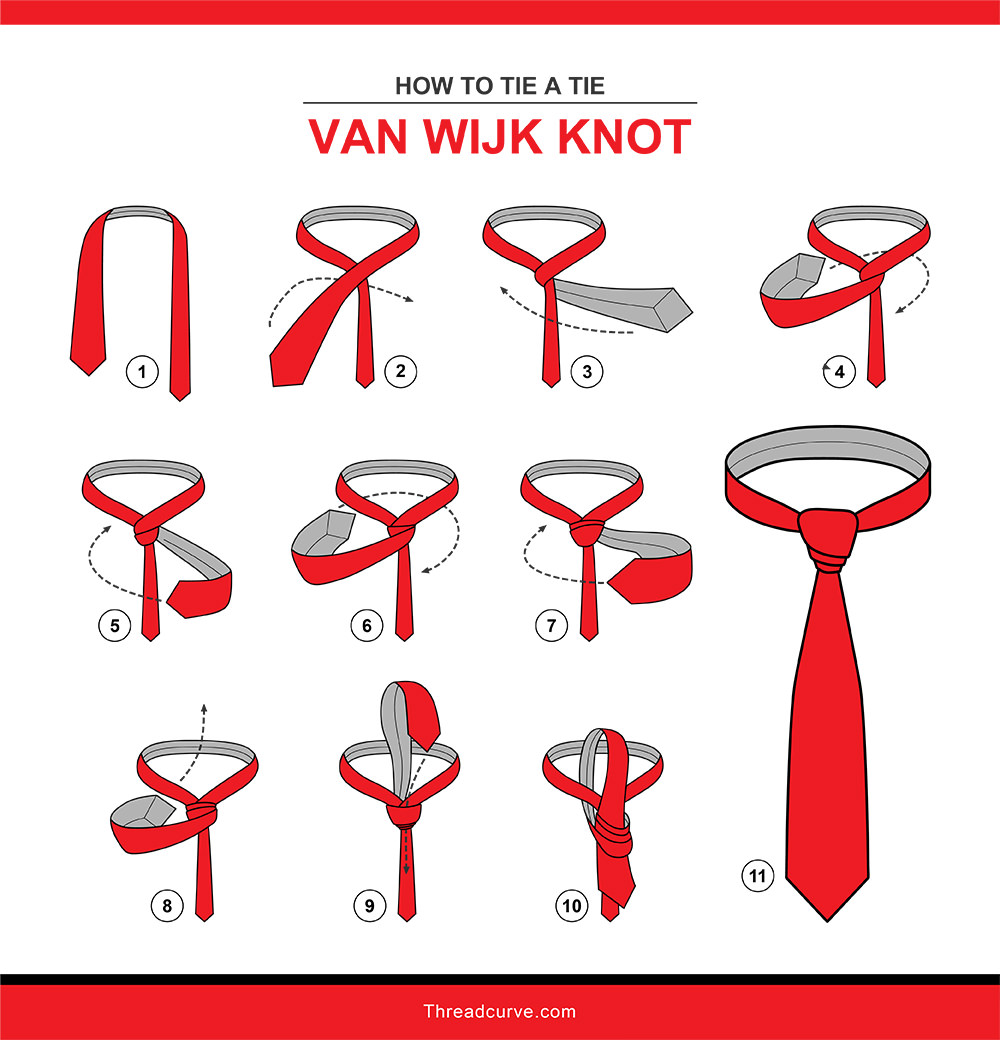
The Van Wijk is a very slim, elegant knot that looks totally unique. There are no other knots that look like the Van Wijk. It’s also not a difficult tie knot to create, which may be a refreshing change if you’ve been constructing more complicated tie knots with a lot of twists and pull-throughs. This knot is named for artist Lisa van Wijk.
Instructions
- Cross the thicker side of the tie over the thinner side. You’ll be working with the thicker end of the tie as the active end to create this knot.
- Take the active end under the cross-section, moving it back across to the starting shoulder.
- Cross the tie back in front of the cross-section now, going back to the opposite shoulder.
- Wrap the tie under the knot, taking it back across to the starting shoulder.
- Again, go back across the front of the knot to the opposite shoulder.
- Repeat this process once more, going back under and across, the back over and across.
- Bring the tie up under the collar now. Next, you will thread it through all the layers you just created. To do this, take a finger and place it vertically under the bottom of the knot. Now, go up into the knot, staying against the tail of the tie, to pull the layers out so you can now slide the tie through to make your Van Wijk knot.
- Tighten and straighten your slender, elegant knot.
Victoria
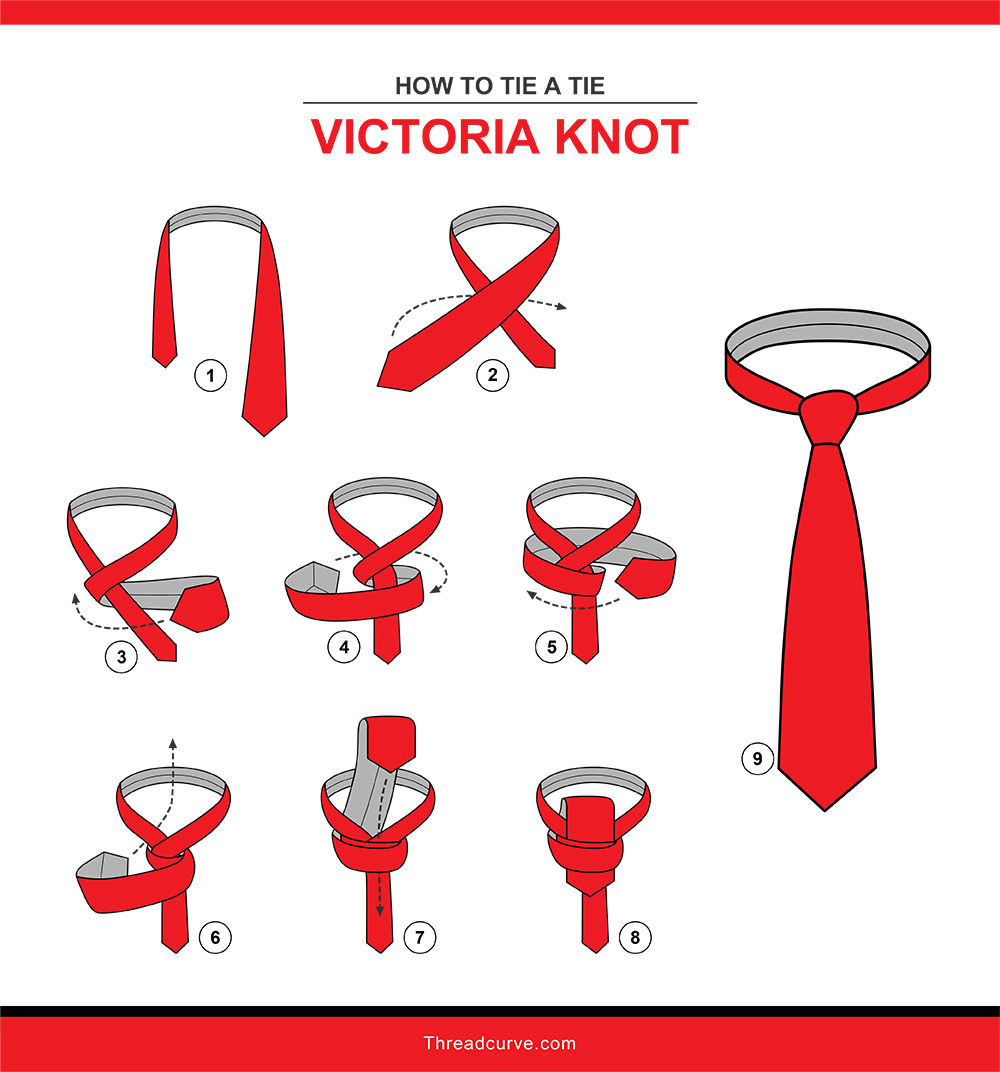
The Victoria is a simple, lovely knot that isn’t difficult to make and looks great as an all-around knot. It’s a somewhat slender knot that works well with many different collar types.
The Victoria knot is exactly like the Prince Albert knot until you get to one of the final steps of creating the knot. Victoria and Albert were married and historically very much in love, ruling England in the 1800s. However, these two knots were first documented in the 1940s.
Instructions
- Cross the thick side of the tie over the thinner side, moving it to the opposite shoulder from your starting shoulder.
- Take the tie back across, this time going under the cross-section.
- Go back across again, moving the tie once more to the opposite shoulder.
- Take the tie under the knot again to return to your starting shoulder.
- Go back over the top of the knot yet again, moving the tie to your opposite shoulder.
- Now pull the tie up and under the collar, then back down and through the top loop of the knot. If you pull the tie through the top two loops, you’ll make the Prince Albert knot.
- Tighten and straighten the knot.
Vidalia
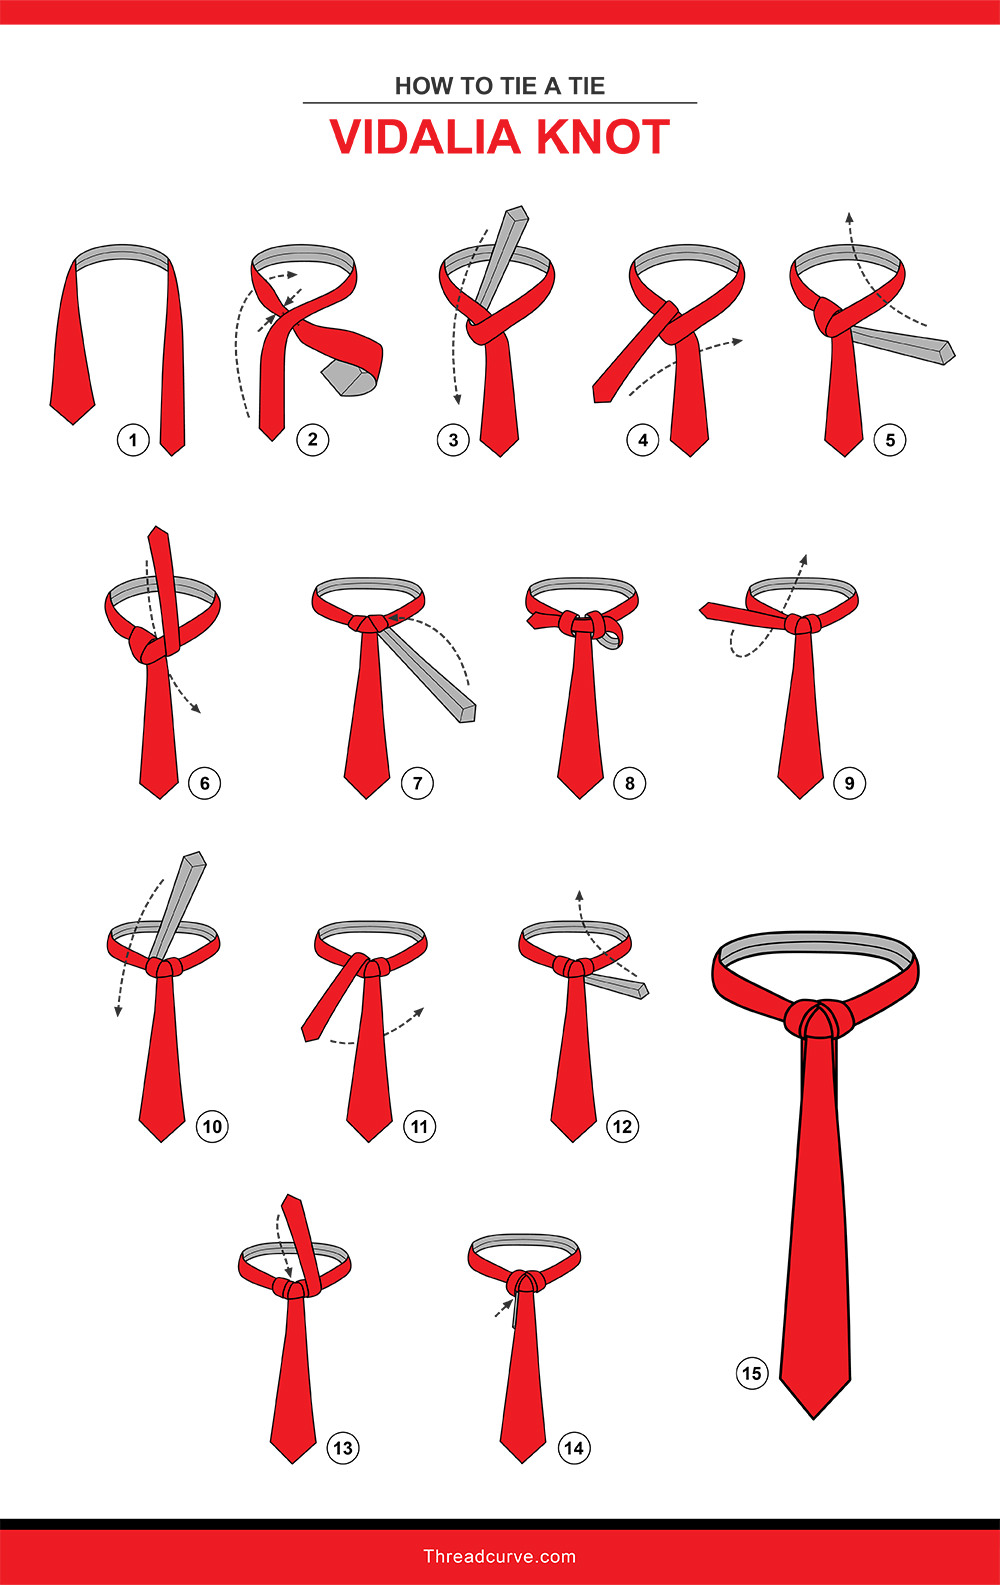
The vidalia knot is a bit of a layered tie knot look, which may be what inspired the name. This knot actually looks like a double cape knot and may be called by this name. This is a somewhat difficult knot to create but when finished, it looks very interesting. The vidalia is a somewhat wide knot and a little busy, so be careful with patterns and striped ties.
Instructions
- Pinch the thicker side of the tie under your neck to make a small fold.
- Cross the thinner side of the tie over the pinch with your other hand.
- Pull the thinner end of the tie under the collar next to the knot, then back down and over the collar, staying next to the knot near the shoulder opposite your starting shoulder.
- Take the tie under the knot, crossing over to the other side (the starting shoulder side).
- Bring the tie up over the collar, then back down and under the collar, staying on the starting side shoulder of the knot.
- You just made two loops on top of the collar of the tie. Gently loosen these two loops with your fingers to make some space here.
- Bring the tail of the tie up and take it through these two loops, moving the tie across the knot to the opposite shoulder.
- Go under the collar and pull the tie up and through, then back down again, staying on the opposite shoulder side of the knot. The front of the tie should be facing outward.
- Bring the tie under the knot, moving back to the starting shoulder. Insert your thumb under the tie, between the backside of the tie and this loop of fabric to create space.
- Bring the tie up under the collar, then down behind the knot through this loop you just made at the back of the tie.
- Tighten, straighten and fluff the layers of your vidalia knot as needed.
Full Windsor
Ah, the Windsor knot. It’s one of the most popular tie knots in style and it’s considered to be one of the classic types of tie knots that everyone should know.
It’s a common belief that this knot was invented by the highly popular Duke of Windsor, who was briefly King Edward VIII before he gave up the throne to marry his true love. The Duke was famously stylish and began several trends in the 1920s and 1930s, but he did not invent the Windsor knot. However, he did favor this symmetrical, wide style of knot, which was named after him. You may also like this elegant knot that is suitable for all occasion wear.
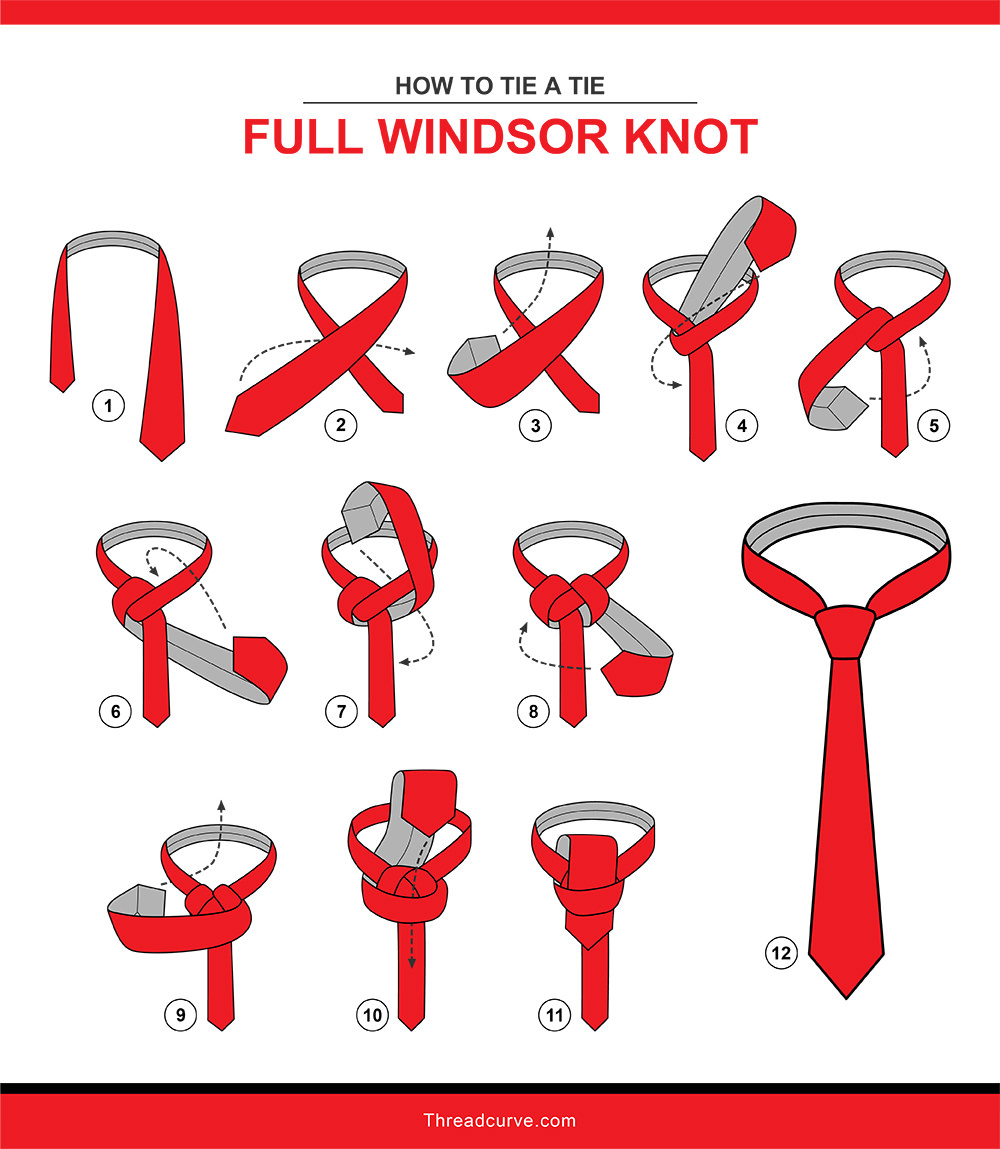
Instructions
- Cross the thicker side of the tie over the skinnier side.
- Bring the thick side of the tie up and under the collar, then back down over the collar, without moving to the other shoulder. You’ll still be on the side of the shoulder opposite your starting shoulder.
- Move the tie behind the knot, going back across toward your starting shoulder.
- Go up and over the collar on this side of the knot now, going back down the under the collar while still staying on the starting shoulder side.
- Bring the tie horizontally across the front of the knot, moving to your opposite shoulder again.
- Take the tie up under the knot and then back down the front of the knot through the loop of fabric you just made in the front of the knot.
- Tighten and straighten your elegant Windsor knot. This is what is known as the full Windsor, though it may also simply be called a Windsor knot. There is a variation of this knot known as the half-Windsor.
Half Windsor
The half Windsor knot is smaller than the full Windsor knot, which makes it more versatile knot because it can be worn with so many types of shirt collars. This is a great semi-formal tie knot that works with many different occasions and events, including daily office wear.
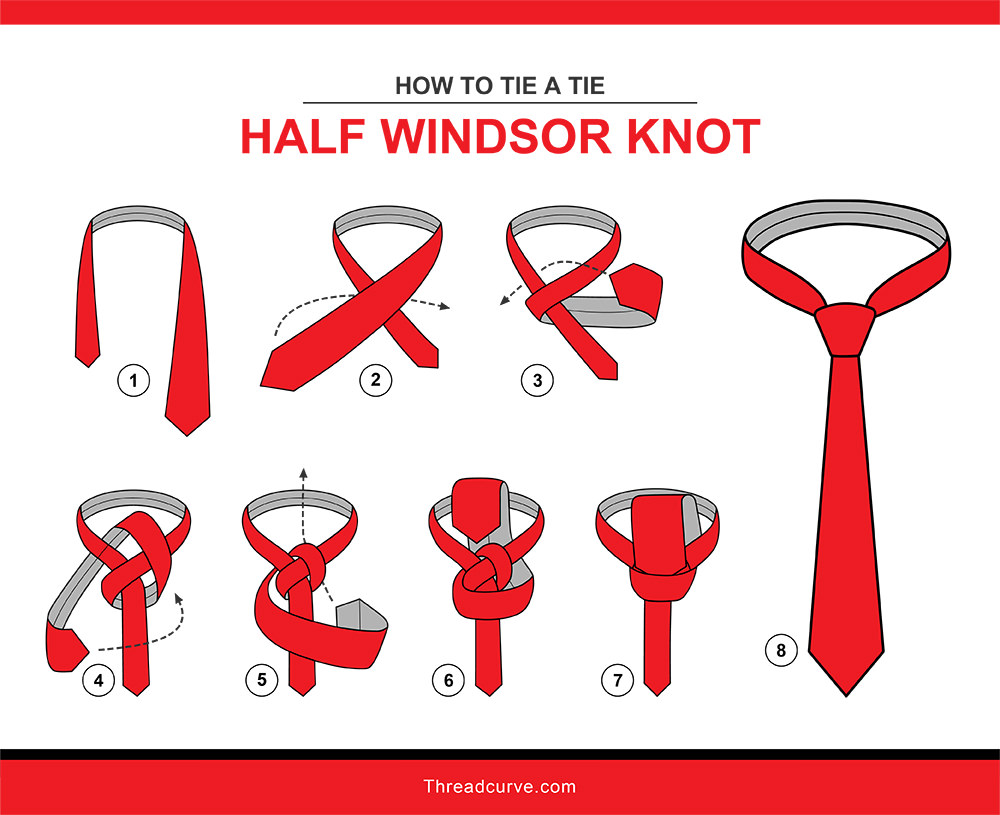
- Take the thicker side of the tie over the thinner side, moving to the opposite shoulder.
- Bring the tie under the cross section you just made, moving back to the starting shoulder.
- Take the tie up over the collar, then under the knot and back down, taking the tie across to the opposite shoulder again.
- Move the tie horizontally across the front of the knot to return to the starting shoulder.
- Take the tie up under the collar, then back down and through the loop you just made across the knot.
- Tighten and straighten your half Windsor knot.
Trivia
Interestingly enough, James Bond famously hates the Windsor knot, as written in the series of Bond novels by Ian Fleming. It was noted that 007 mistrusted anyone who wore a Windsor knot. However, famous movie Bond Sean Connery wore a Windsor knot in three films where he portrayed Bond, according to Bond Suits.
Creating the Tie Dimple
It’s considered to be stylish to add a tie “dimple,” a little indentation that adds that extra little touch of style. There are multiple ways to put a dimple in your tie. Before you start making your tie knot, you can pinch the fabric of the tie just under the collar. Pinch in a “W” shape. Then, begin creating the knot directly under the pinch.
You can also add a dimple by pinching the tie, just below the knot, right before you tighten the knot. Give the dimple a little pinch after you straighten your tie and it should stay in place, according to Real Men Real Style.
Bow Ties
The bow tie is a great tie to wear anywhere, anytime. It can be paired with the most formal outfits and it’s considered to be the thing to have to complete a tuxedo. But you can also wear a bow tie as everyday, casual wear to add a little pop of style to whatever you might have on.
Bow ties have a reputation for being incredibly difficult to tie. But actually, it only takes a few steps to create a beautiful-looking bow tie knot. Master the steps and you can use bow ties to create all sorts of different looks.
Instructions
- Make one side slightly longer than the other, about two inches. The side with the longer end is going to be your starting side.
- Cross the longer end over the top of the other side, forming an X with the tie.
- Take the longer side up, under the collar of the tie. Pull it up toward your face, angling it toward the starting side. The back side of this section of the tie will be facing outward.
- With your other hand, take hold of the other side of the bow tie and fold it, pulling it toward the shoulder that’s opposite your starting shoulder. The back side of this tie will be facing outward now. You’ll be holding it out horizontally.
- Fold this horizontal section back on itself to create the bow shape. The front side of the bow will be facing outward.
- Bring the half of the tie that you’ve been holding up toward your face down now, taking it vertically down the center of the bow.
- Fold the fat part of this side of the bow tie under the bow tie, so that only the end section of the bow tie is folded. The fold should point back at your neck, with the end flap facing directly away from you.
- Take that fold and bring it up behind the bow, then over the top of the bow and through that front loop you just made.
- Grasp both folded sides of the bow tie and pull to tighten and adjust. You’re done!
Types of Bow Ties
There’s really only one standard way to tie a bow tie, but there are several different styles of bow tie that can create different looks.
Batwing
The batwing bow tie is a simple ribbon of fabric with a slender width. This is perfect for creating a sleek, minimalist look with your bow tie. However, you won’t have as much guidance as you tie the tie. The humps and shape of the bow tie can help you achieve a perfect knot because you get a sense of where to fold. With the batwing bow tie, you have to focus on creating a beautiful knot with no guidance.
Hourglass
The hourglass bow tie is the classic bow tie shape, the one you probably picture when you see an untied bow tie in your mind. This is the familiar curved bow tie. This may also be called the butterfly bow tie, according to Real Men Real Style. You can also get a variation of this known as the big butterfly bow tie that creates a large bow.
Pointed
The pointed bow tie looks like the classic hourglass bow tie shape but the ends are pointed. This adds a touch of modern flair to the traditional bow tie, according to GQ. This may also be called the diamond point bow tie.
Rounded Club
The rounded club bow tie is probably seen the least of all other bow tie types, according to Ties.com. This bow tie is designed to create rounded edges on either side of the bow. It’s perfect for casual wear.
Other Types of Knots
Necktie knots are a very specific set of knots. There are also many different types of knots you can use for rope and similar materials, such as the classic square knot, the overhand knot, the bowline knot, sheet bend, half hitch, and the reef knot. Tie knots are specific to ties. For instance, you won’t ever tie a rope into a half Windsor knot!
All the different tie knots are designed to be used with soft fabrics, such as what you find in silk tie designs, while rope knots are made for tougher, coarser materials. That doesn’t mean that you can try to make a taut-line hitch with thick ties. Stick to the right type of knot for whatever you’re working with, whether it’s thick twine or a soft necktie.
FAQs
Do you have questions about ties and tie knots? Are you wondering how to choose the right knot? If you still have questions about types of knots, you aren’t alone. Get answers to the most common questions people have about necktie knots and become an expert on this important style feature.
Which tie knot is the most professional?
Since neckties matter a great deal in the professional world, it’s important to choose the right knot when you’re in a business setting. According to business experts, you can’t go wrong with the Windsor knot. It’s classic, it’s clean and it’s much less casual than the standard four-in-hand, which is too simplistic for strict professional wear, according to the Business Journal.
Which tie knots are good for weddings?
Any formal tie knot will be suitable for wedding attire. If you’re a guest, something classic like a Windsor knot or an elegant formal knot of any kind will do. If you’re in the wedding party, however, you may want to take things up a notch with an interesting tie knot like the rose knot or the rosebud knot, or something equally showy that will look amazing in the photographs. Experiment with different knot looks to find one that will make a stunning impression at any wedding. But whatever you do, make sure your knot doesn’t outshine the groom’s attire!
Do tie knots have meaning?
The phrase “to tie the knot” refers to marriage. Knots have been associated with marriage since at least the 1200s, though the exact origins of this phrase aren’t known, according to the Phrase Finder.
Different colors on ties can be symbolic. Red, for example, is considered to be a “power” color for neckties. Striped ties often have meanings, as the patterns can represent certain affiliations with universities or clubs.
Necktie knots, however, have no special symbolism or particular meaning, though some knots are considered to be more classic and traditional and others are considered to be more modern and less conservative.
Which tie knots are in style?
Trends will always come and go in fashion. And because there are so many potential ways to tie a necktie, knots can fade in and out of style as well. But if you master a few classic neckties you won’t ever be out of style.
The Modest Man recommends the simple knot, the four in hand, the Prince Albert and the full and half Windsor knots. These knots can be worn any time and still be classic, which makes them timelessly stylish.
According to the Gentleman’s Gazette, the four-in-hand and the Windsor are the two most popular tie knots.
How many different types of tie knots are there?
It’s hard to calculate how many different types of tie knots there are, but two physicists at Cambridge University decided to take on this challenge. They used a mathematical model, performed internet research and searched through literature to answer this question. They determined that there are 85 different types of tie knots.
However, they also found that only four types of knots are regularly worn. These are the four-in-hand, the half-Windsor, the Windsor and the pratt.
Where does your tie clip go?
When you really want to add that extra oomph to your look and you’re rocking a tie knot that deserves to get noticed, adding a tie clip can really call attention to your tie. Also known as a tie bar, this is a simple little accessory that clips directly onto your tie. The question is: where do you put it?
The Trend Spotter says that the tie clip should be placed between the third and fourth buttons of your shirt, right around the middle of your sternum. Secure the clip from right to left. Tie clips were originally invented to clip to your shirt, which holds ties in place. Now, however, it’s common to wear tie clips simply as a great-looking tie accessory.
Is there a knot that cannot be untied?
According to legend, the Gordian knot is the most difficult knot to untie on the planet. A Greek legend tells of Alexander the Great, who solved the riddle of the Gordian knot by hacking through it with his sword. So much for the legend of the knot that can’t be untied!
Outside of legend, the so-called “impossible” knot is also famously difficult to untie, according to HowStuffWorks. This is more properly known as a double fisherman’s knot. And while it is not impossible to untie, it is extremely difficult to loosen this knot once it’s been made.
However, when it comes to necktie knots, even the most complicated knot designs can, indeed, be untied. Sometimes you may have to work backwards and untie the ties in the opposite way that you tied them, because not every single necktie knot can simply be loosened and untied this way.
What do you do if your tie is too long?
If you’re having a problem with your tie length, you aren’t alone. Many men struggle with knowing how long their tie should be and what to do when they find that their tie is too long. As a general rule, you want the front of your tie to just reach the top of your belt buckle.
You do not want the tail of the tie to be any longer than the front of the tie. If it is, there are some tricks you can use. You can always tuck the tail excess into your shirt, going through the button immediately above your waistline. For a more streamlined look, tuck the tie into your shirt under the collar and completely hide the tail of the tie inside your shirt.
If you can’t seem to get the front of your tie at the right length, try a more elaborate or a thicker knot, such as the Windsor. The pratt also has a few more steps to create than the standard four-in-hand, which means you’ll have less length when you’re done.
Which tie knot suits you?
The necktie knot you choose to wear is actually very important. The knot you choose could make your neck look slimmer or thicker and also has an overall effect on the way your face appears as well. So, how do you choose the right tie knot to suit your body shape and face?
Do you have a slimmer face? You should consider a spread collar shirt with a Windsor knot, either full or half. Other wide knots will suit you as well. Think of it this way: slim face, wide knot.
Do you have a thicker face, maybe a heavy jawline and full cheeks? Wear a wider tie knot to help balance out your look. A slim tie knot, such as the Van Wijk, will only emphasize the heavier areas of your face.
A medium-sized face will benefit from a medium-sized or smaller tie knot.
How long should a tie be with a suit?
There’s a general rule of ties that pretty much applies no matter how tall you are or what you’re wearing: the bottom of the tie should fall just to the top of the belt buckle. The only exception is if you’re wearing a vest. When you have on a vest, the tie knot matters far more than the length of the tie, according to Jos. A. Bank.
What type of tie knot do royals use?
When it comes to style, no one does it quite like the royals. Various members of the royal family have inspired style trends through the centuries, and neckties are no exception. The Windsor knot itself is named for Edward VIII, though he actually most commonly wore a wide four-in-hand knot style that inspired the Windsor knot.
The Prince Albert knot is named for another famous member of the royal family, the man who was married to England’s great Queen Victoria.
Princes William and Harry are both considered to be male style icons. Prince Harry is pretty well-known for not being a big fan of wearing ties. William, however, is pictured wearing ties quite often. He typically favors slim, neat knots that are more slender than the wider knot style his famously stylish uncle used to wear. Prince Phillip, another icon of men’s style, also typically wears slim, clean tie knots.
What’s the fanciest type of tie knot?
When you want a tie knot that’s truly over-the-top and totally fancy, there are several to choose from. The Eldredge knot is considered to be one of the most difficult knots to tie, which makes it perfect for any super-formal event. The Merovingian tie, made famous in the “Matrix” franchise, is also considered to be extremely fancy, according to the Adult Man.
Intricate tie knots such as the trinity knot, the Truelove knot and the fishbone knot are all pretty fancy, too. But if you’re looking for a tie that is truly considered to be the most formal of formal ties, opt for a simple, silk black bowtie. Nothing says high-class like this.
Which tie knot does the military use?
According to the guidelines for uniform components as put forth by the U.S. Navy, the acceptable uniform necktie knots are the four-in-hand, the half-Windsor or the Windsor.
Army specifications state that men should wear four-in-hand knots, Windsor or half-Windsor knots in their neckties.
Which tie knot is best for an interview?
To make a strong impression at a job interview, opt for a large tie knot because this can help you look more confident. A Windsor or half-Windsor will give you a neat, symmetrical look that shows professionalism and style. Choose a conservative tie as well and you will definitely be dressing to impress.
How should a necktie fit?
Your necktie must fit well in order to look good. This means that the knot should be up against your neck with a fully closed and buttoned shirt collar. However, you don’t want it to be too tight. Insert two fingers between your tie and shirt collar to make sure you have plenty of room for swallowing and talking.
You also want to have a neat-looking, well-tied tie and you want it to be the right length, reaching just to the top of your belt buckle.
Are tie clips in style?
Tie bars are a classic accessory and they are definitely in style. According to TrendHim, tie bars and tie clips are a wonderful way to express a little bit of style and give your looks that extra bit of pop for a real “wow” factor. You can stick to simple tie bars in metal colors like silver and gold or get bold and wear colored tie bars that playoff an accent color in your tie or suit.
What is the easiest tie knot to tie?
There are plenty of complicated tie knots out there. But if you’re looking for something super easy, you’ve got options there as well.
The first tie knot that most people learn is the four-in-hand knot This is why this knot is also sometimes called the schoolboy knot. In our list, the four-in-hand can be completed in five steps. Other tie knots that can be created in five steps or less are the Onassis knot, the double-cross knot, and the simple knot.
Which types of tie knots work with skinny tie styles?
Skinny ties already provide you less fabric to work with than standard neckties, so it’s not easy to find the right tie knot to show off this slim tie silhouette. It’s tempting to choose a thin tie knot style to go with the skinny tie, but this actually isn’t a great idea, style-wise.
According to OTAA, you want to use a tie knot that has a bit of thickness and heft to it. The Prince Albert works very well with skinny tie styles, for example.
The four-in-hand and half Windsor knot both work very well with skinny ties as well.
References:
101Knots – Atlantic Knot Tutorial
Business Insider – 18 Ways To Wear A Necktie
Couture Crib – How To Tie A Tie Step By Step
Otaa – What Do Neckties Symbolise?
Real Men Real Style – How To Tie The Balthus Knot
Supportive Guru – HOW TO TIE A TIE:: STEP-BY-STEP GUIDE [INFOGRAPHIC]
TrendHim – How to Tie a Cross Knot
TrendHim – How to Tie a Fishbone Knot