Wearing a scarf is a great way to add a pop of color, update your outfit, and still look trendy and fun. But, there is a particular skill required to be able to tie a scarf correctly. Often, people will say, “I’m just not a scarf person,” but really, this means they don’t know how to tie a scarf in a fun and stylish way.
Below, we are happy to give you 19 different ways to secure your scarf so that you can be trendy, fashionable, and practical in any season. Our step-by-step tutorial is designed to help give you options and solutions to update your everyday wardrobe.
Contents
- 1. Classic
- 2. Double Bandana
- 3. Double Loop
- 4. Hidden Knot
- 5. Knotted Necklace
- 6. Knotted Shawl
- 7. Rolled loop
- 8. Simple Neck Knot
- 9. Single-Side Bow
- 10. Slouchy Turtleneck
- 11. The Braid
- 12. The Cowl
- 13. The False Knot
- 14. The French Knot
- 15. The Shawl
- 16. The Tie-Loop
- 17. Twisted Necklace
- 18. Twisted Turtleneck
- 19. Two-Sided Twist
- FAQs
Related: 15 Types of Scarves
1. Classic
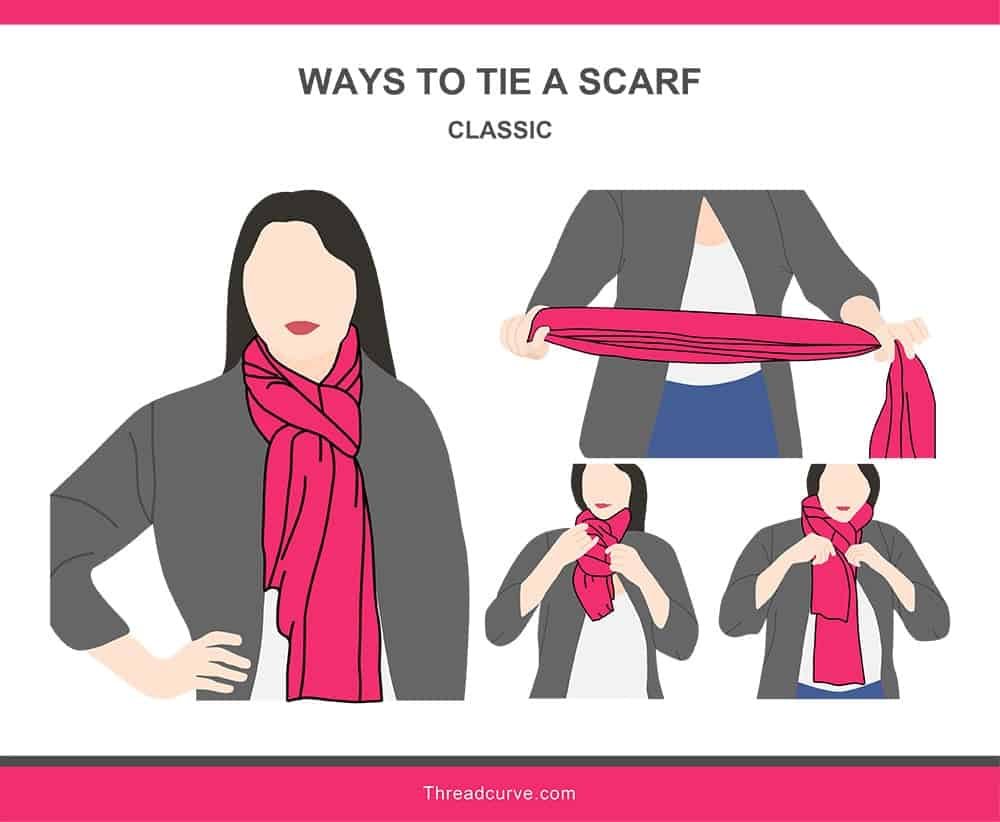
Fold the scarf in half length-wise, allowing the two ends to touch, creating a loop. Wrap the folded scarf around your neck and tuck the scarf ends through the loop. Tighten until comfortable around your neck.
2. Double Bandana
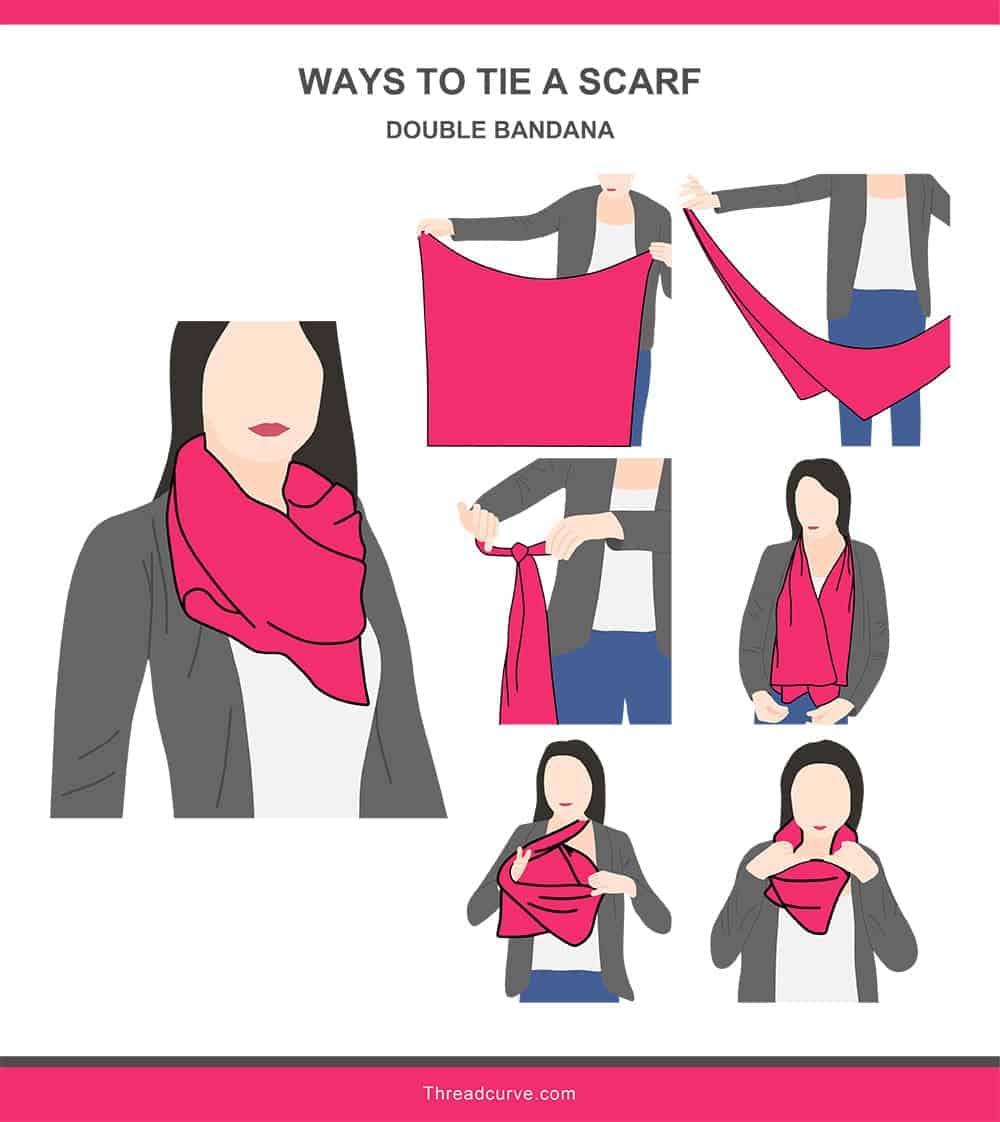
Open the scarf completely, and fold diagonally, making a large triangle shape. Loosely tie the two ends together in a knot, forming one large, triangular loop. Place over your head with the knot at the back of your neck. Insert your hand into the loop, rotate the loop by 180 degrees (one twist), and place the new, smaller loop back over your head again. Position the knot at the back of your neck, so it is comfortable, and have the scarf’s points toward the front.
3. Double Loop
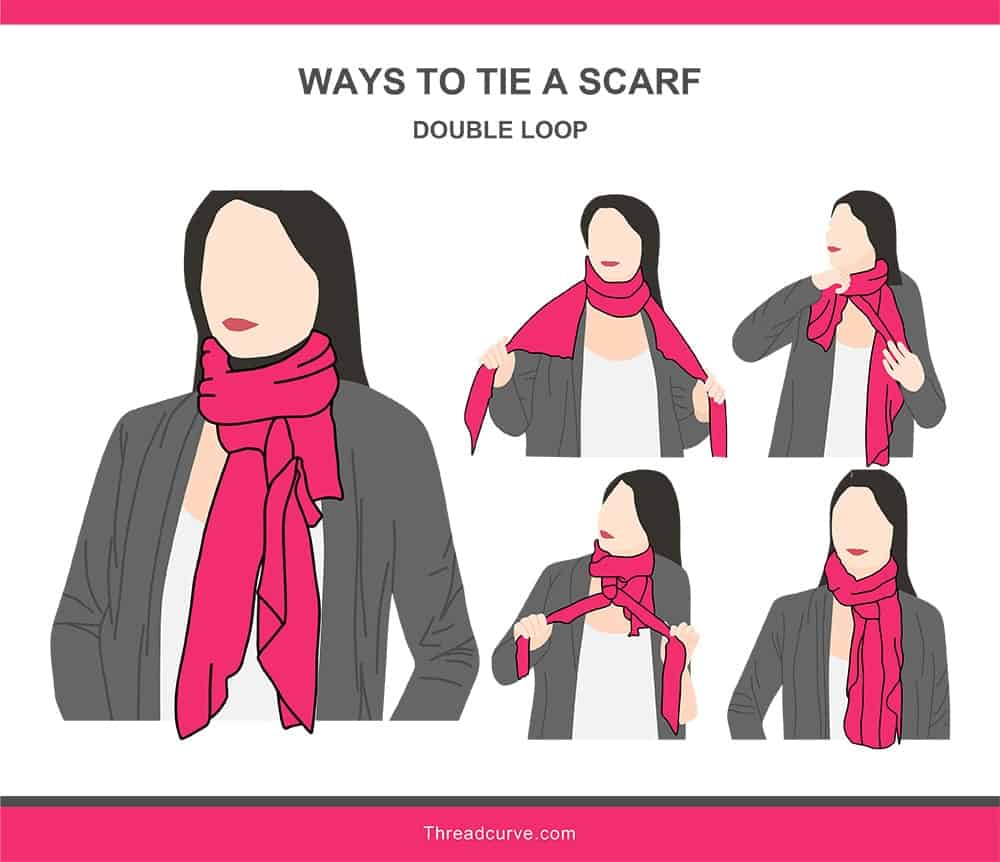
With the scarf extended length-wise, wrap the scarf around your neck two times. Make sure you leave long and equal tails to the scarf on either side of your wrap. Next, slide the scarf, so one side of the scarf tail is longer than the other. Take the long end of the scarf and knot it around the shorter side of the scarf. Position the knot neatly below the double wrap around your neck, allowing the loose ends to hang freely at the bottom of the knot.
4. Hidden Knot
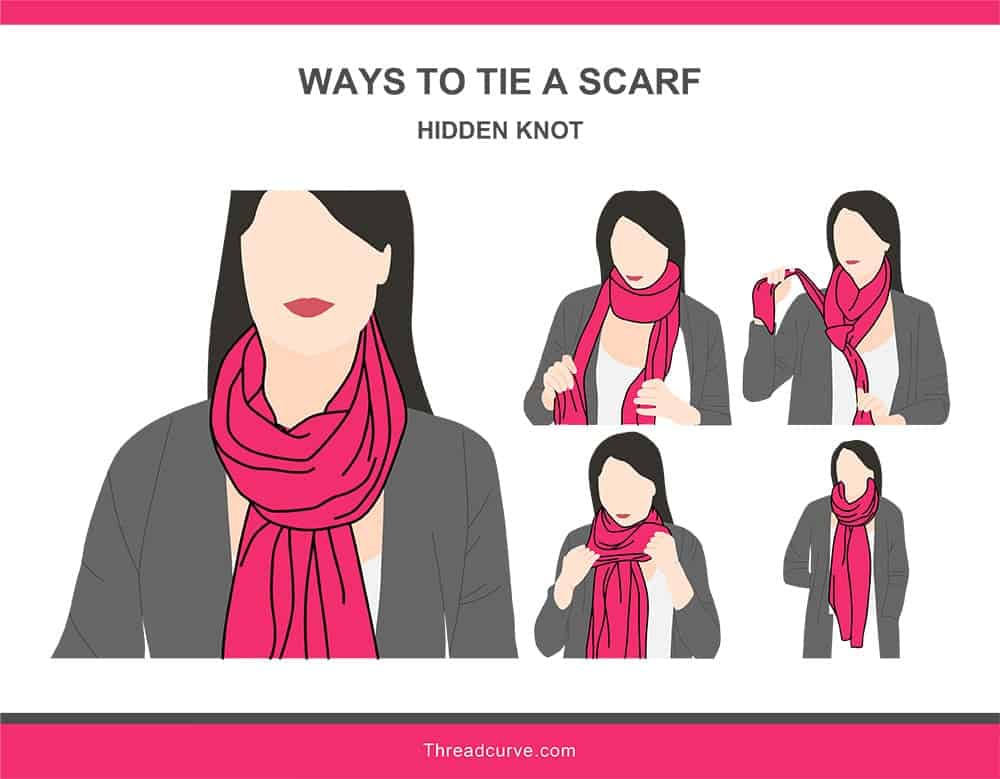
Wrap the scarf around your neck, crossing the ends of the scarf at the back of the neck, and allow the loose ends of the scarf to hang forward. Tie a loose, simple knot close to your neck. Gently position the bulk of the scarf (wrapped around your neck) over the hidden knot. Arrange the scarf, so it falls neatly to your front with the knot hidden under the draped scarf around your neck.
5. Knotted Necklace
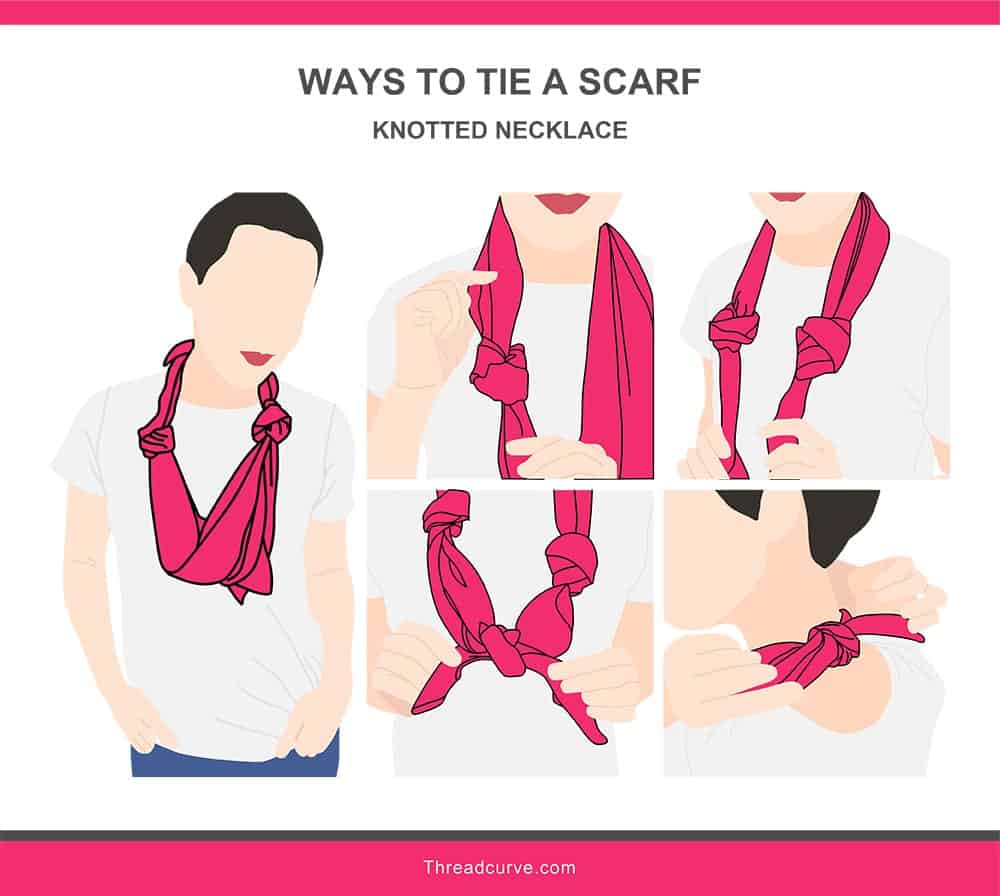
Gently drape the scarf around the back of your neck, with the front ends of the scarf falling over your shoulders. Tie one small knot on either side of the scarf. Make sure the two knots hang at the same level and are even with one another. Next, create one large loop in the scarf by tying together the two ends of the scarf. Rotate the scarf, so the conjoining knot is at the back of your neck, creating a necklace with two decorative knots at the front.
6. Knotted Shawl
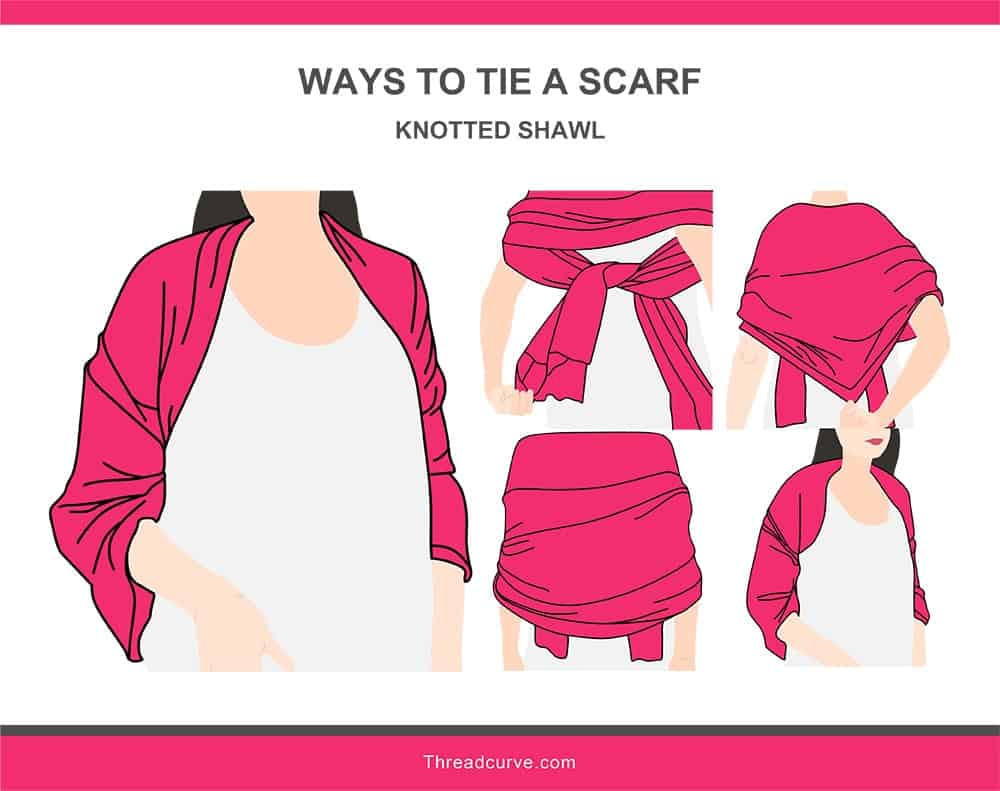
Open the scarf entirely and fold in half diagonally, creating a large triangle. Loosely drape the scarf over your shoulders, allowing the ends to flow down toward your hands. This will have the top of the triangle pointed downward across your back. With the ends of the scarf positioned over your arms, tie a knot loosely across your back. Pull the pointed part of the scarf downward to cover the knot.
7. Rolled loop
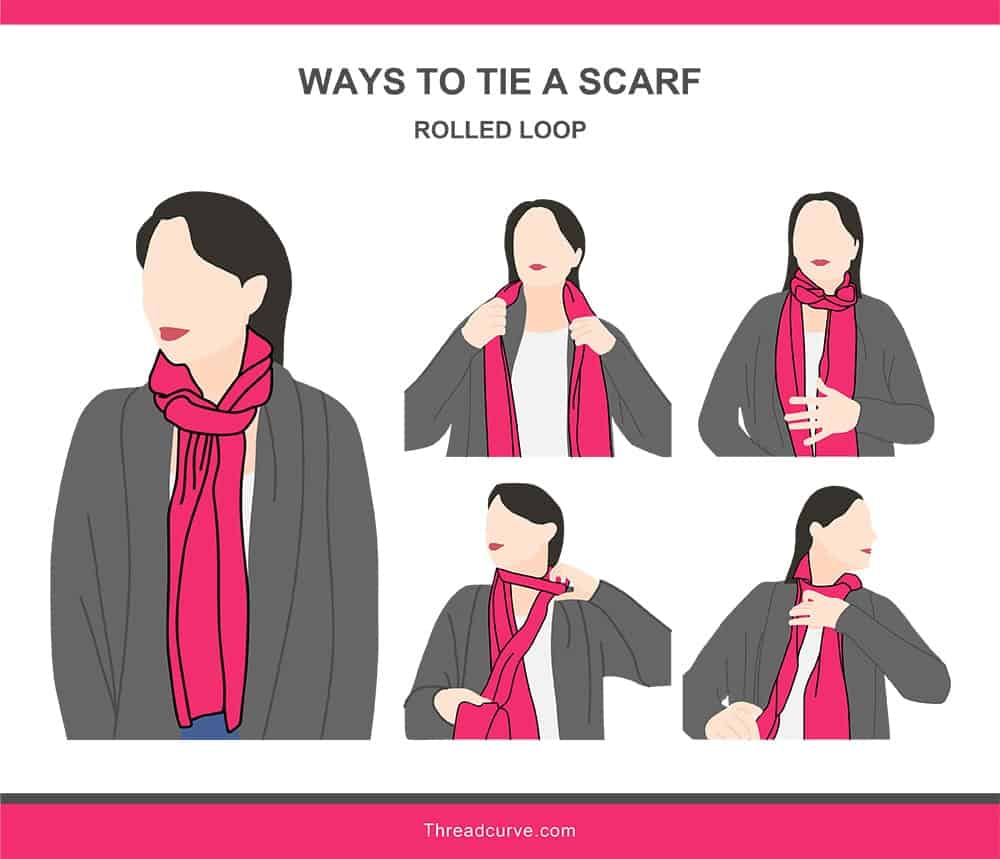
Wrap the scarf loosely around your neck one time, allowing the flat part of your scarf to be at the front of your neck, and the scarf to cross at the back of the neck. Bring the ends of the scarf forward. Take one end of the scarf, and insert the end over the top of the loop around your neck. Pull the end out of the underside of the loop. This will cause the loop to twist slightly. Repeat the process with the other side, lifting the end, pulling it over the loop at your neck, and pulling it through the underside of the loop. Position the two ends of the scarf neatly alongside one another in parallel.
8. Simple Neck Knot
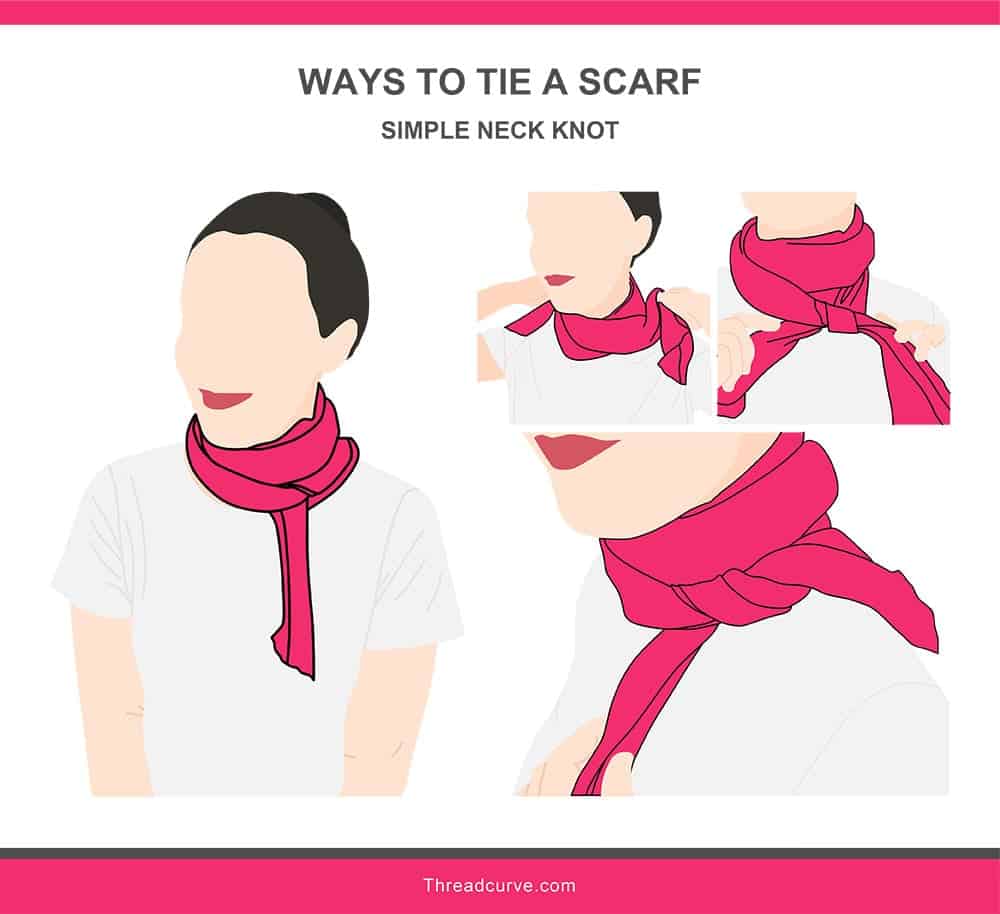
Beginning with the scarf center on your neck, wrap the scarf loosely around your neck, crossing the ends repeatedly until the majority of the scarf’s length is used up in the wrap. This may take several crosses of the scarf, creating a tall neck covering. When the ends are just about exhausted, tie the two ends together loosely at the wrap base. Leave the ends untucked, or position one end over your shoulder.
9. Single-Side Bow
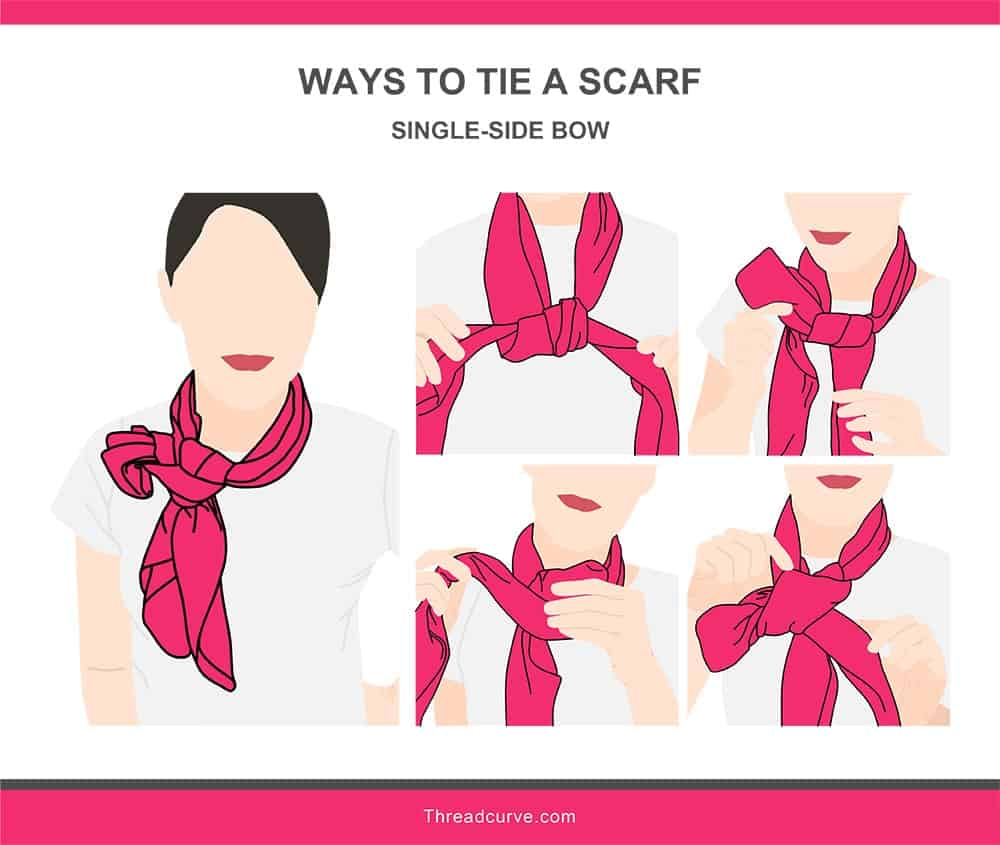
Wrap a long scarf around your neck with the ends hanging to the front. Tie in a loose knot. Take one side of the scarf and pinch the fabric close to the loose knot, fold the fabric over itself, making the start of a bow. Next, take the other side of the scarf and wrap the fabric around the newly formed bow base.
Slide this side of the material under itself, creating a loose knot, trapping the one side of the bow. Tightening this newly formed knot will also tighten the looped piece of scarf forming the bow. The ends should hang freely downward. Position the bow appropriately and open the fabric of the bow to make a more prominent statement.
10. Slouchy Turtleneck
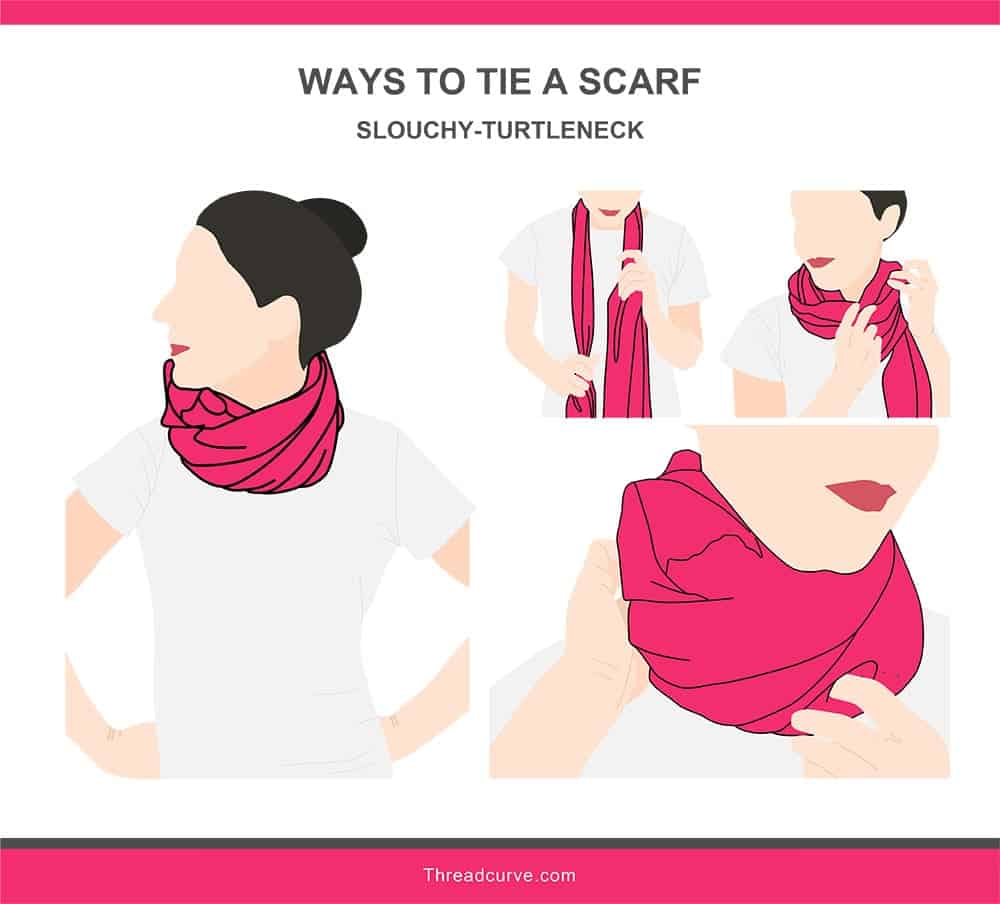
Hang the scarf around your neck with the ends open toward the front. Slide the scarf’s ends to create one long piece and one side of the scarf that just reaches the neck. Wrap the long end around the short piece in a loose knot, working toward the back of the neck. Continue to insert the longer end of the scarf into the loop around your neck, tucking the piece in to the wrapped scarf to hide the ends. The scarf will begin to take on a thick twist. This particular scarf tie needs to keep the fabric loose and flexible, creating a slouchy look.
11. The Braid
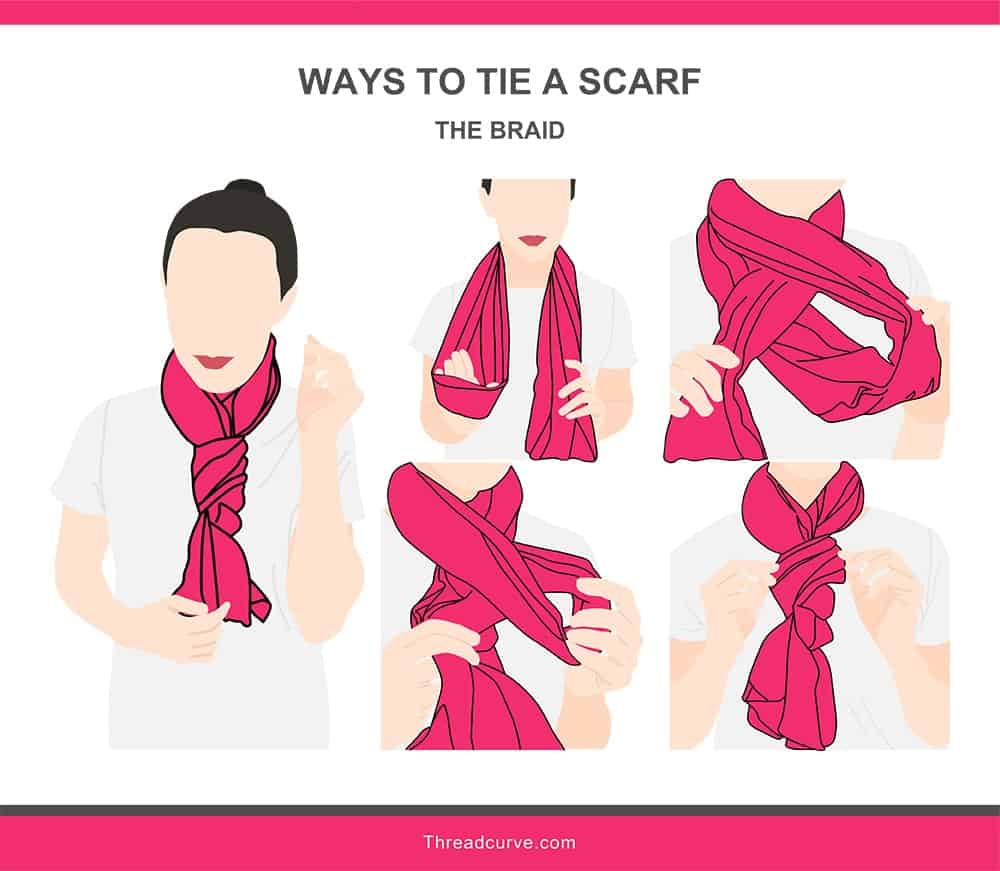
Tie your scarf in the Classic configuration, which involves folding the scarf in half length-wise, forming a loop at one end of the scarf. Wrapping the folded scarf around your neck, tuck the ends of the scarf through the newly formed loop. Instead of pulling the scarf tight around the neck, keep the formed loop loose.
Next, insert your hand into the loop and twist the scarf by 180 degrees. Pull the ends of the scarf back through this newly twisted loop. Pull the ends of the scarf tight, which will further tighten both loops and twists on this beautiful, but intricate scarf knot.
12. The Cowl
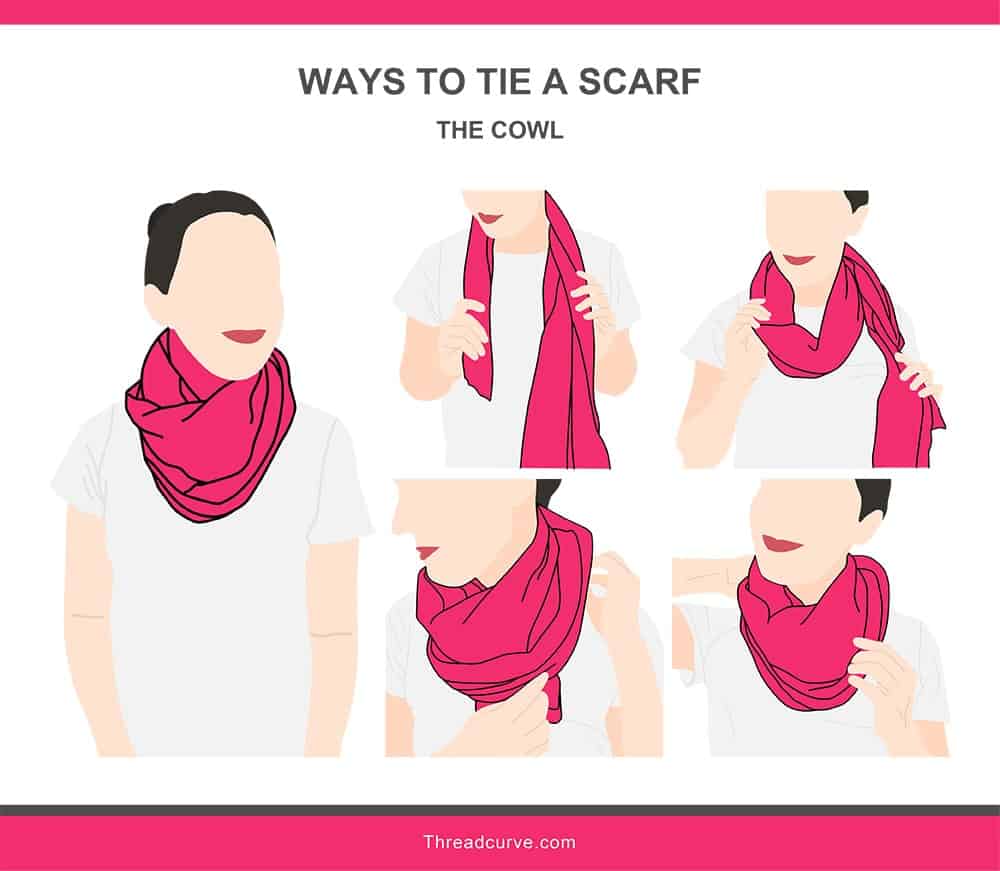
This knot can give the appearance of an infinity scarf using a traditional scarf. Drape the scarf around your neck with the ends open and to the front. Slide one side of the scarf so that the shorter piece is just a few inches below your collar bone. Move the short piece across the front and loosely tuck the end under the other side of the scarf, creating a low-hanging loop. Loosely take the longer side of the scarf and wrap the fabric over the loose loop, tucking the end into the underside of the other half of the scarf. Fold and position the loose loop around your neck to let the fabric flow loosely.
13. The False Knot
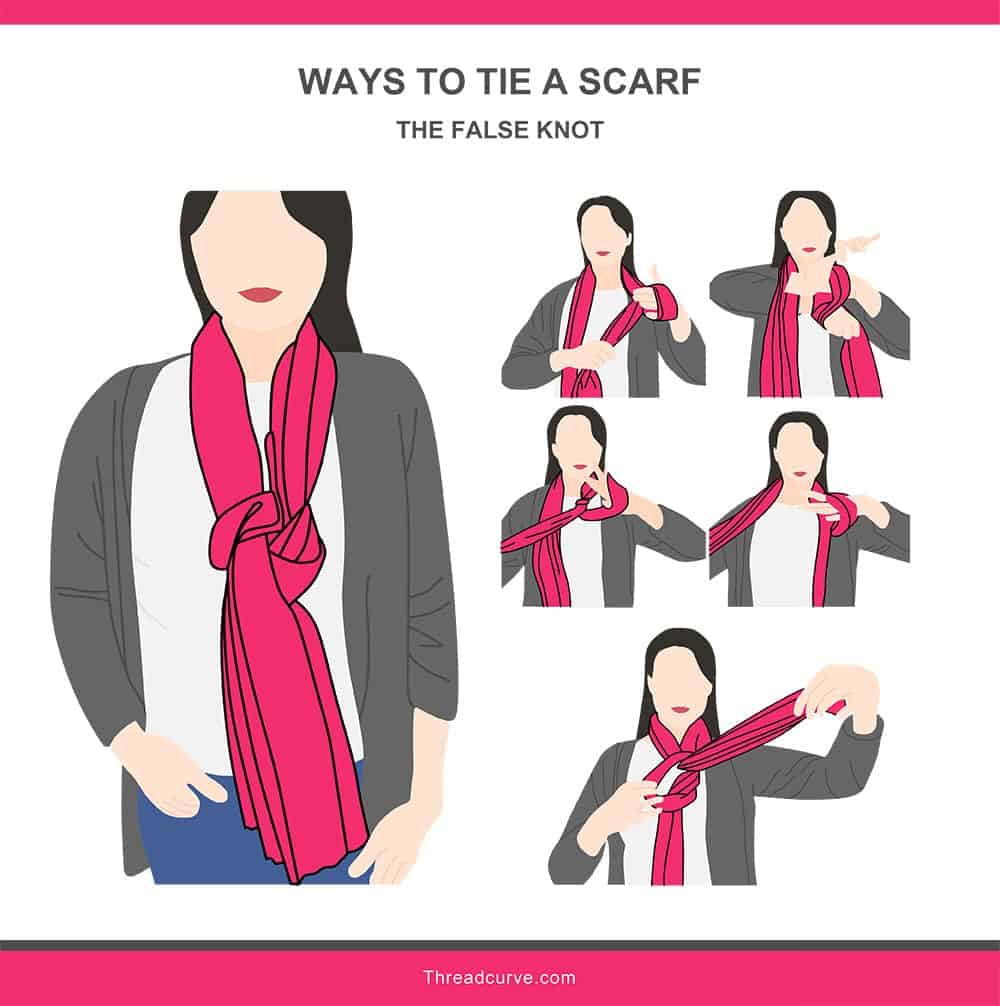
Wrap the scarf around your neck with the open ends hanging toward the front. Create a small loop in the center on one side of the scarf. Pull the end of the scarf through this loop, making an open knot. Do not pull the knot tight, but rather keep your hand in the looped part of the knot. Reaching through this small looped-knot, grab the other end of the scarf. Pull the other end of the fabric through the open, loose knot, allowing the fabric to drape over the loop. Tightening the knot will trap the other side of the scarf, creating a false knot appearance.
14. The French Knot
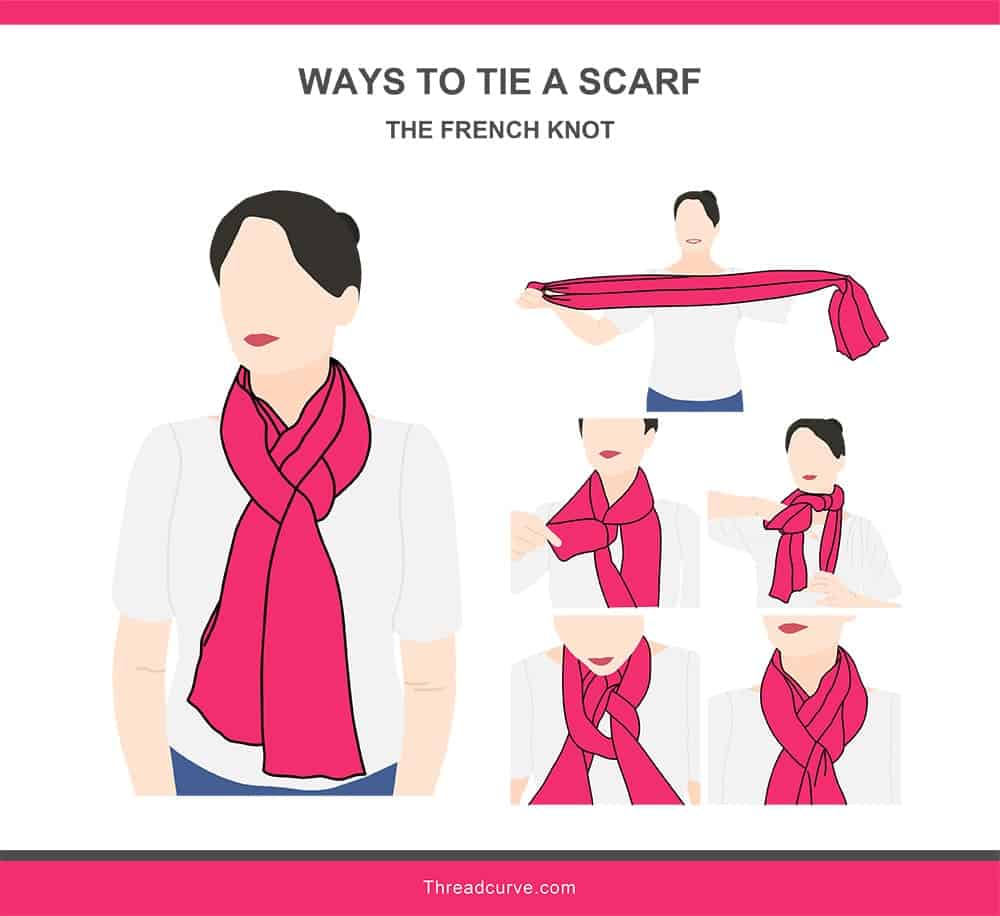
Fold the scarf in half length-wise to create a long loop at one end, with the open scarf ends opposite the loop. Wrap the scarf around your neck. Take one of the scarf’s loose ends and place it over, then under the two sides of the looped top. Next, take the other loose end of the scarf and place it under, then over, the two sides of the looped scarf. This will create an almost woven pattern around the loop. Pulling the ends through the knot will make the knot tighter around the neck. This works well with a lightweight scarf due to the intricacy of the knot.
15. The Shawl
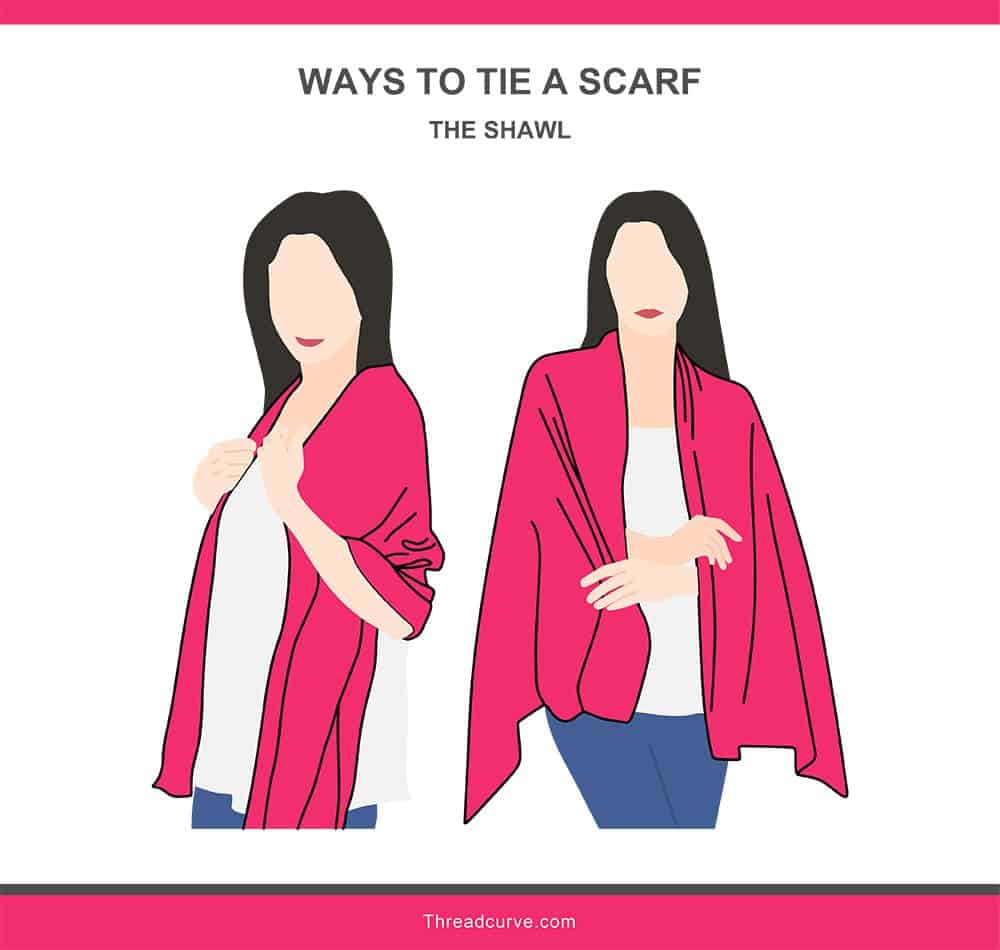
Open the scarf, separating the two sides. At the center of one scarf edge, place the scarf at the back of the neck, allowing the scarf to hang downward and drape over the shoulders. This makes a casual shawl, and almost blanket, for cold winter days.
16. The Tie-Loop
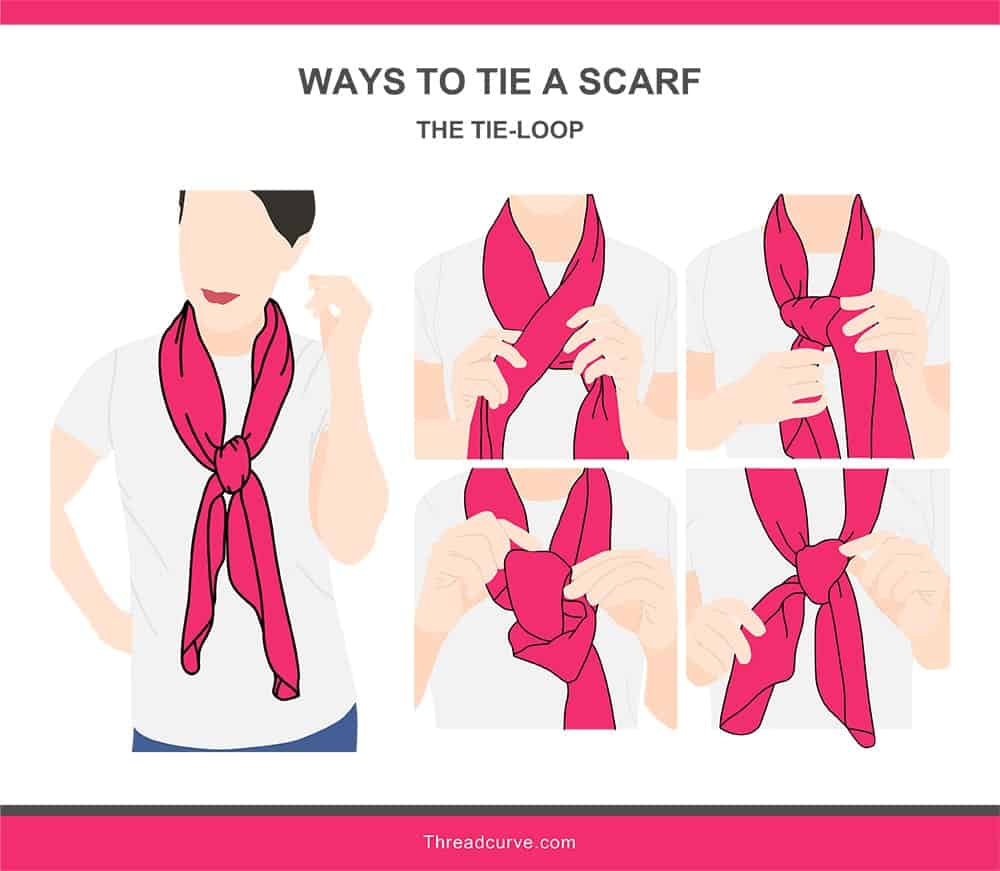
Place the scarf around your neck with the ends open and hanging to the front. Cross one side of the scarf over the other. Take the side of the scarf that is over top of the other, and pull the scarf’s end under and back over the top of the formed loop. This motion is similar to how you tie a necktie.. Before pulling the knot tight, pass the end of the scarf through the rolled knot top. Pull the knot tight, trapping both ends of the scarf together in a square knot positioned at the front of the body.
17. Twisted Necklace
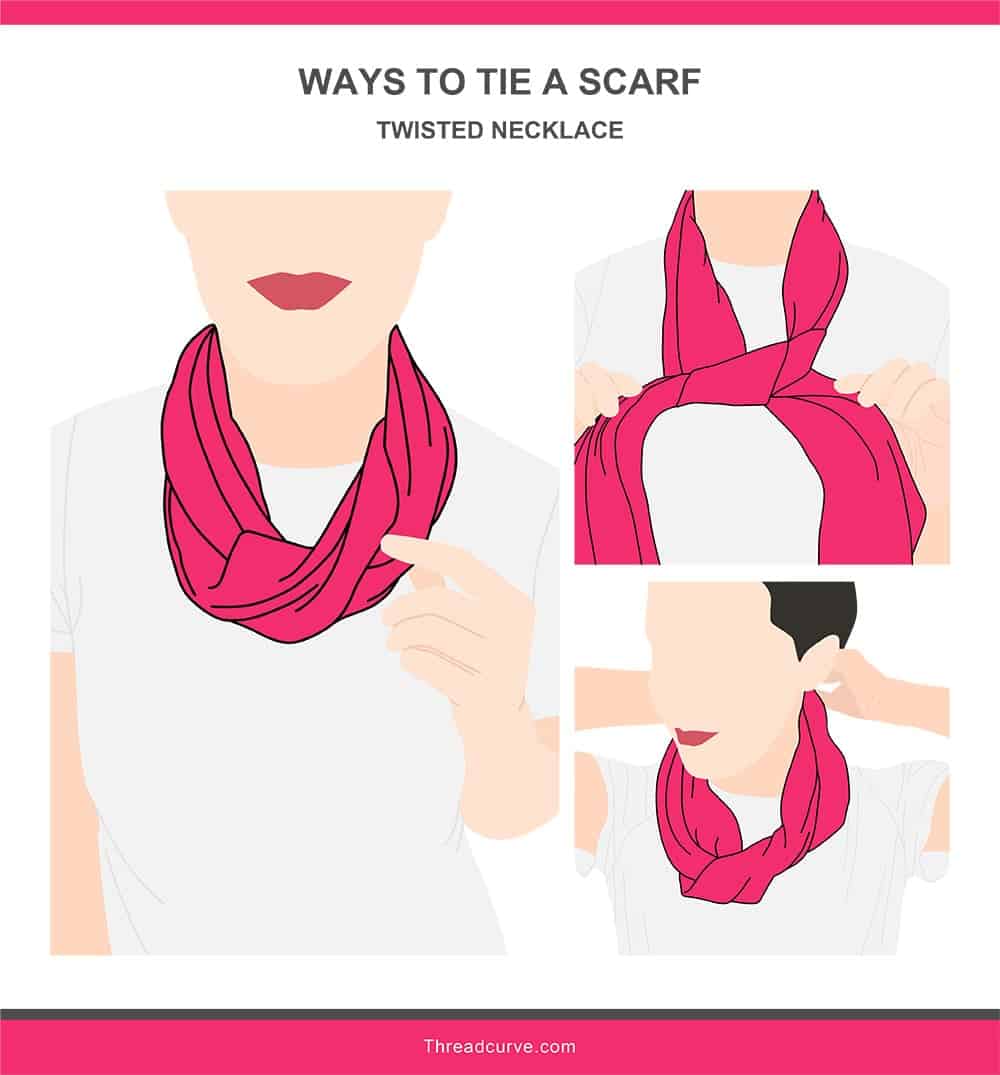
Position the scarf around the neck with the ends open and hanging toward the front. Tie the two ends together in a loose knot placed where a necklace would naturally hang around your neck. Take the loose ends of the scarf and wrap them into the necklace you just created by tucking the ends of the scarf into the body of the scarf around your neck. Secure the loose, wrapped ends at the back of the neck.
18. Twisted Turtleneck
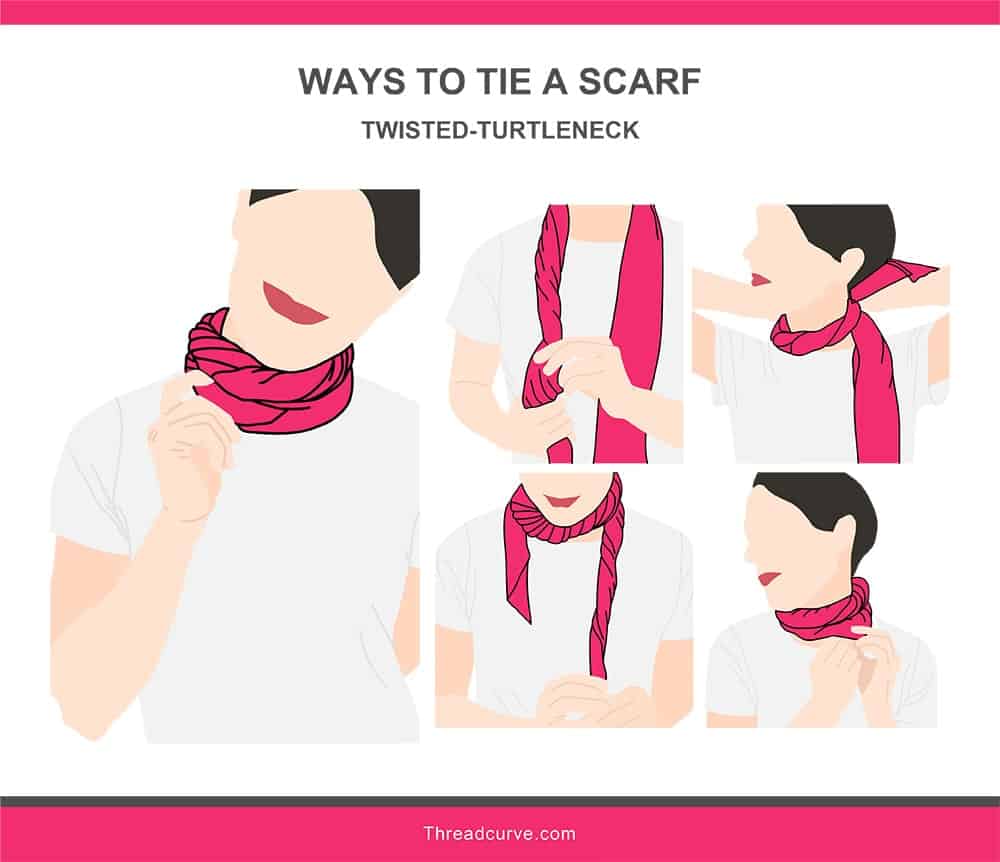
Hang the scarf around your neck with the ends open and to the front. Take one side of the scarf and twist the fabric until you reach the bottom. Wrap this side of the fabric around the neck, and when you run out of the scarf, tuck the end into the body of the scarf itself. Repeat the same process for the other side, twisting the fabric along its length, wrapping the fabric around the neck, and tucking the loose end into the scarf’s body.
19. Two-Sided Twist
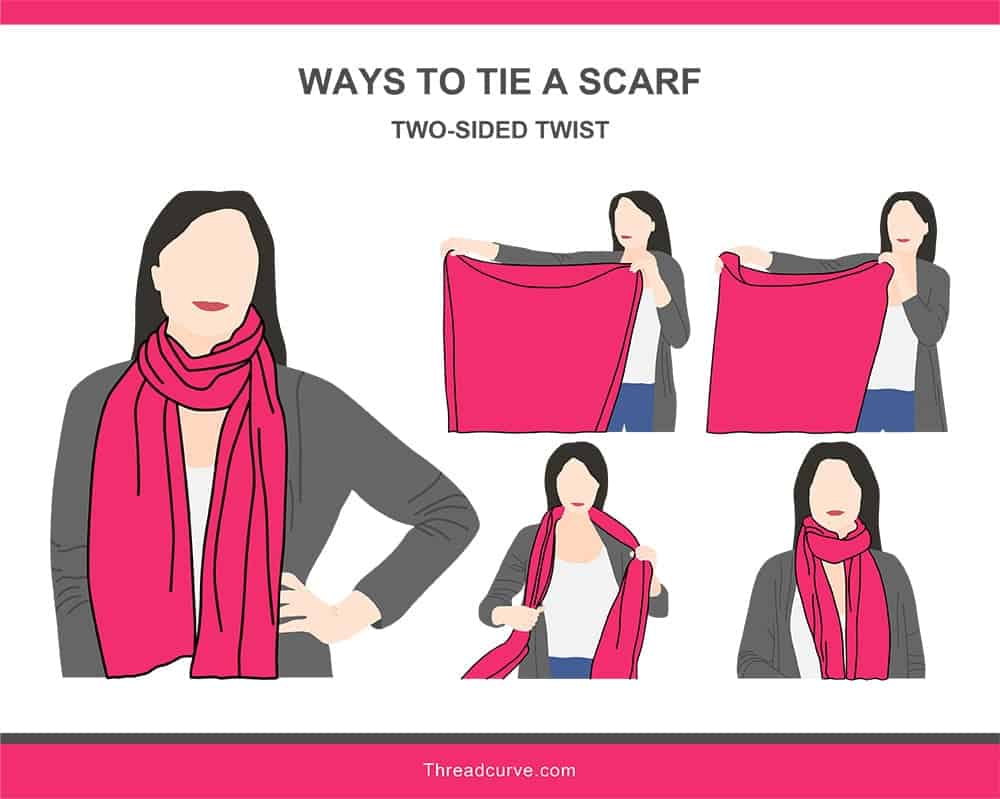
This easy scarf knot requires the use of two scarves. Place the scarves back to back with the printed fabric facing outward. Wrap the combined scarf around your neck, crossing the loose ends of the scarves at the back of your neck and then pulling the ends forward, allowing them to drape to the front. Flip the part of the scarves around your neck 180 degrees, exposing the underside of the scarf outward. This will give you a fun, two-sided effect using two of your favorite scarves.
FAQs
Tying a scarf doesn’t have to be complicated, and our guide is intended to help walk you through the necessary steps to look fashionable and be practical at the same time. However, starting off wearing a scarf can be tricky, especially if you have never dipped into this fashion foray before. Below, we have put together some commonly asked questions about tying a scarf so you can bundle up in any season with style.
When can I wear a scarf?
A scarf is an accessory that can really be worn any time of the year. Thick scarves made of soft wool can be worn in the winter to help keep you warm and protected from the elements. A winter scarf is a great way to stay fashionable and warm at the same time.
A summer scarf can easily be added to any wardrobe to help bring some color and movement to your outfit. This scarf can be added casually when you are just going out with friends or can help to dress up an outfit for a formal occasion.
More importantly, a scarf can be dressed up or dressed down and appropriate for several settings. Wear a scarf to the workplace as a smart and practical fashion piece, or add a scarf to your elegant evening attire to further add luxury and color to your wardrobe. A scarf can be easily packed away and transported from place to place, so it is the perfect accessory to stuff in your purse in the event that the weather may turn chilly.
What materials work best to tie a scarf?
Really, any material can work well when trying a new scarf knot, but it is important to be realistic about which knot you can tie with which material. Thicker scarves work better for simple knots or for creating a drape with the scarf around your shoulders. It can be difficult to manipulate and manage thick materials into a tight knot.
Conversely, scarf tying with a thin material, like a silk scarf, is better for more intricate and detailed knots. This is because the material is thinner and easier to work with. Also, it is important to consider the overall length of the scarf when deciding which scarf knot to tie. Long scarf designs can also work better for more intricate knots because the knot itself can take up a great deal of fabric. Shorter scarves or an oblong scarf may work better for simpler knots that do not require a long piece of fabric.
Are scarves fashionable?
Scarves are very fashionable and have been around for years as a regular fashion staple. Wearing a scarf can go with just about any outfit. Your scarf style can be completely customized and catered to your own style and look. Making a scarf fashionable really just depends on wearing the scarf your favorite way, so it highlights your personal style choices.
A thick winter scarf can be perfect for keeping you warm with an added pop of color, or a thin silk scarf may be a great way to dress up an outfit in the summer. Thin silk scarf options are also great to carry around with you. They can easily fit into a purse, adding the perfect fashion accessory if the weather turns cool.
Can I wear a scarf at a wedding?
Yes! Bringing a small, skinny scarf to a wedding is a great way to help stay warm and fashionably dressed. Adding a small scarf around your shoulders in the event of colder weather is the perfect way to keep your attire formal while staying practical and warm. Plus, using a scarf drape or a wrap around your shoulders is easy, and it can go with any outfit.
Tuck a scarf carefully away in your purse to always have a practical and easy solution to unpredictable weather. And the best part is, once you warm up from all that dancing you will be doing, you can easily store your scarf away in your bag to enjoy an evening of fun and merriment with friends and family.
Is an infinity scarf popular?
Adding an infinity scarf to any outfit is the best way to keep you warm and fashionable at the same time. An infinity scarf is an easy-to-use scarf that is already made into a scarf loop. Simply twist the infinity scarf around itself and pop it around your neck. This option is a great way for scarf beginners to look like they have an expertly tied and flowing scarf without learning the complicated and intricate knots required to tie a scarf.

